How to Change Offline Permissions on Windows 11

Offline permissions in Windows 11 let you run downloaded Microsoft Store apps and games without an active internet connection. The setting ties your PC to your Microsoft account. Once it is on, the PC can confirm your licenses locally, so you can play during a flight or an internet outage.
You can turn on offline permissions for only 1 designated device at a time. That makes it a good fit for a main laptop or a travel PC. Set it up while you still have a connection, because it cannot be done once you are offline.
Open the Microsoft Store, click your Profile icon, select Settings, and toggle the Offline permissions switch. Ensure your PC is online for the initial setup, and launch each desired game once while connected to grant it offline access.
What is Offline Permissions?
Normally the Microsoft Store checks in with Microsoft’s servers to confirm you own an app or game before it runs. With offline permissions on, your PC skips that constant online check and relies on the license information it has already stored. This helps on flights, on remote trips, or any time the Wi-Fi drops.
You need to be signed in to the Microsoft Store with your Microsoft account. The setting belongs to the account, not to the app, so it only works for content that account owns.
Important Things to Know
- Some games that need online multiplayer or co-op will not work offline, even if Offline permissions are on. Offline permissions only cover the license check. They cannot supply a connection the game itself requires.
- You must set up your device while connected to the internet before going offline. Do this at home, not at the gate or on the plane.
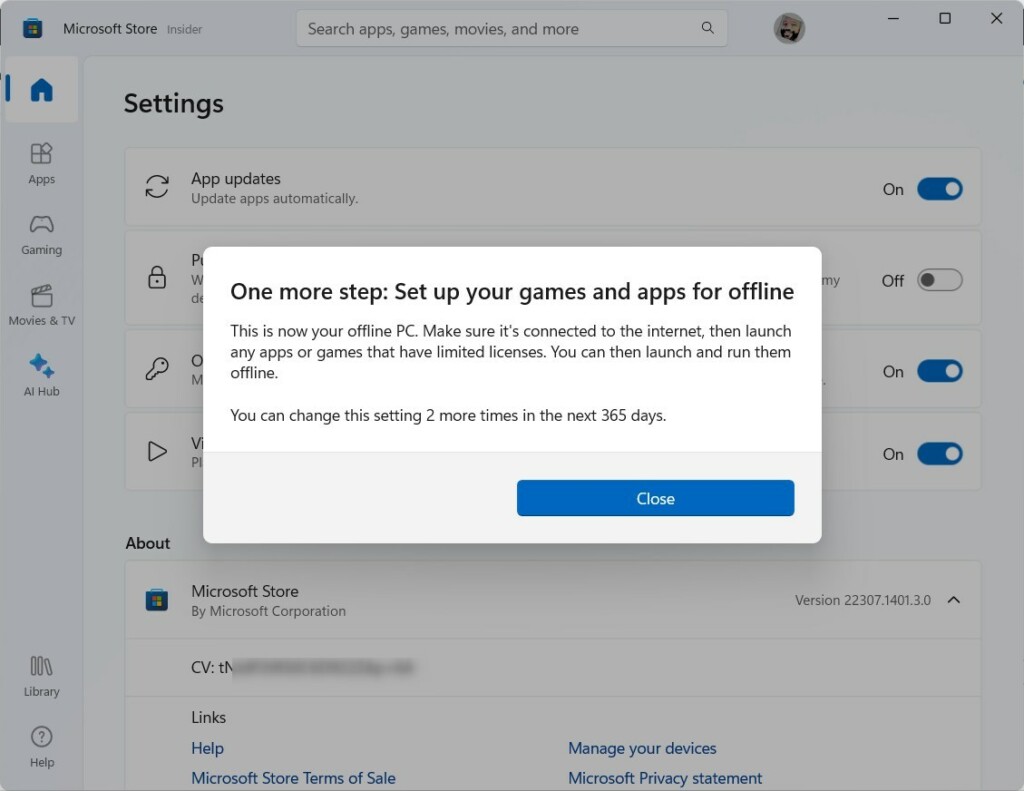
- You can only change which device is your designated offline device 3 times per year. Think before you switch, and don’t try it out on a PC you only use now and then.
How to Turn On or Off Offline Permissions
- Make sure your PC is connected to the internet. It needs to be online to set this up. Open any website to confirm the connection works before you go on.
- Check for Windows updates. Install anything that is pending, and restart if Windows asks you to. An out-of-date system or Store app is a common reason an option is missing. Follow the steps here: How to update Windows 11
- Open Microsoft Store. Click the Microsoft Store icon on your taskbar , or search for it in the Start menu . The Store window should open on its home page.
- Click your Profile icon at the top right, next to the search box. A menu should drop down. If it shows a generic sign-in prompt instead of your name, sign in with your Microsoft account first.
- Choose Settings from the menu. The Store’s settings page should open.
- Find and click on Offline permissions. You should see a single toggle switch. If you can’t find it, update the Microsoft Store app and Windows, then restart the Store and look again.
- Toggle the switch to On to enable offline play, or Off to disable it. No restart is needed. The switch should now show the state you chose, and this PC becomes your designated offline device when it is On.
In short, offline permissions let you play your Microsoft Store games when your computer is not connected to the internet. To turn the feature on or off, open the Microsoft Store app, go to your profile settings, and use the Offline permissions switch. Do this while your PC is connected to the web.

Prepare Your Games for Offline Play
Turning the switch on is not the last step. You also need to open each game at least once while your computer is online. That saves the license files to your hard drive, so the game can start without a web connection. A game you have never opened on this PC may refuse to launch offline, even with the switch on.
- Make sure your device is online and set as your designated offline device (see the steps above). Check that the Offline permissions switch still reads On.
- Open the game you want to play offline. Launch it from the Start menu or from the Xbox app.
- Sign in to your Xbox account when asked. Use the same Microsoft account that owns the game. The game should then reach its title screen or main menu.
- Start playing the game for a few moments, then you can close it. The game has now stored what it needs for offline use.
Repeat this for each game you want to play offline. After you finish the setup for a game, you can play it anytime without an internet connection. Before a trip, it is worth disconnecting from Wi-Fi once at home and launching each game, to confirm it really starts.
Switch Back to Online Play
When you want to go back to playing games online, connect to the internet, open the Microsoft Store, and go to your profile icon > Settings. Then set the Offline permissions switch to Off again. This undoes the change, and you can turn it back on later if you need it. Remember that moving the offline setting to a different device counts toward your limit of 3 changes per year.
Summary
- Offline permissions let you play Microsoft Store games without internet.
- You must set your device as the offline device while online.
- Each game needs to be opened once online and signed in to Xbox.
- You can only change your offline device 3 times a year.
- Turn Offline permissions off to switch back to online gaming.
Windows 11 offline permissions let you run Microsoft Store games without an internet connection, as long as you set up your device and open each game online first. Microsoft limits how often you can change your designated offline device each year, so choose the PC you travel with most.
Now you know how to use offline permissions on Windows 11.
Was this guide helpful?

About the Author
Richard
Tech Writer, IT Professional
Richard is a writer at Geek Rewind who turns complex IT tasks into clear, step-by-step guides. He draws on years of hands-on experience in system administration and enterprise IT operations, focusing on Windows, Linux and WordPress: the problems people actually run into, and the fixes that work. His server and WordPress guides come from systems he runs himself. Richard builds and maintains the platform behind Geek Rewind, from its Ubuntu servers and Nginx configuration to its custom WordPress plugins. Many new tutorials start with readers' questions, and he's always glad to answer them in the comments.


No comments yet — be the first to share your thoughts!