How to Change MAC Address on Windows 11

- 12 steps
- Needs administrator rights
- Includes a restart or sign-out
Changing your MAC address on Windows 11 lets you swap your network card’s physical serial number for a temporary one. A Media Access Control (MAC) address is a unique 12-character code of letters and numbers that helps your PC talk to routers and other devices on a network.
Switching this hardware identifier can help you fix stubborn connection bugs or get around strict Wi-Fi limits at hotels and cafes. You can do it through Device Manager in Windows 11 without buying any extra software.
Change your MAC address in Windows 11 by opening Device Manager, navigating to your network adapter’s properties, and selecting “Locally Administered Address” under the Advanced tab. Enter a new 12-digit hexadecimal value in the Value box.
How to change your MAC address in 🪟 Windows 11
You change the address in Device Manager. Open your network card’s properties, go to the Advanced tab, and type a new locally administered address into the value field. This spoofs the address Windows uses on the network. It does not rewrite the number stored on the card itself, so you can always go back to the original.
Before you start, sign in with an administrator account. Windows will ask for approval or a password if you are not one. Also note which adapter you are using right now, such as your Wi-Fi card or your Ethernet card, because you will change only that one.
- Press Win+I to open Settings. You can also click Start and then Settings. The Settings window opens with a list of categories on the left.

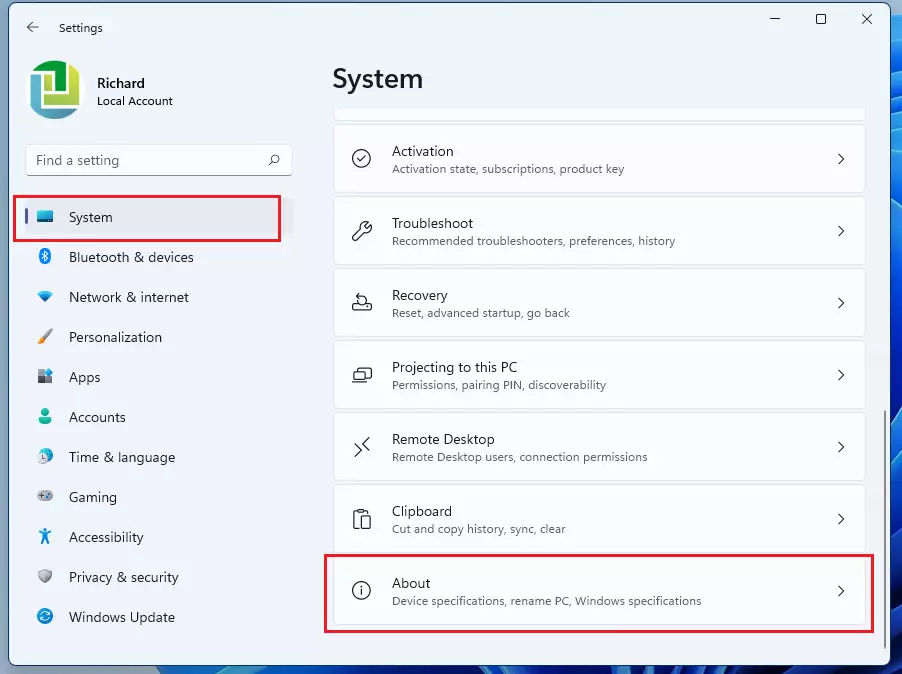
- Click System on the left.
- Scroll down on the right side and select About. You should now see your device name, processor and Windows edition.
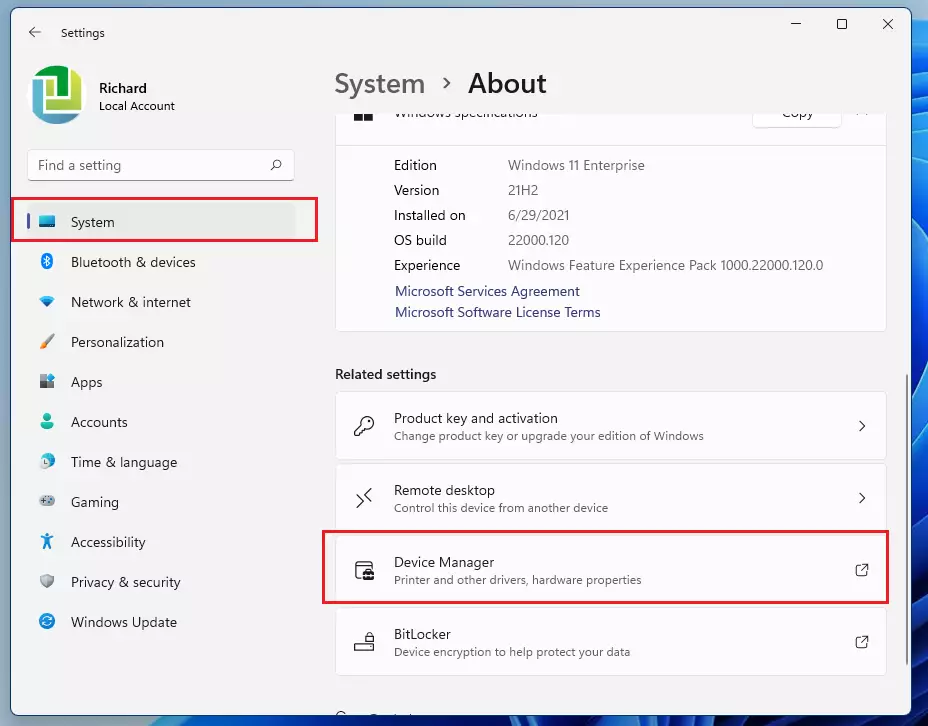
- On the About page, find Device Manager in the related links and click it. A new window opens with a list of your hardware.
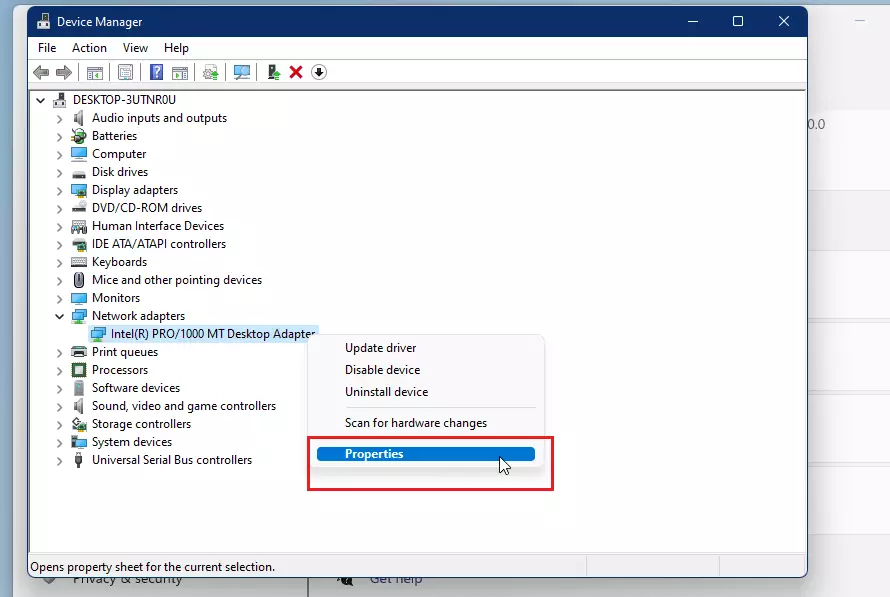
- In Device Manager, find the section called Network adapters and click the small arrow next to it. Your network hardware appears underneath.
- Right-click the adapter you are currently using and select Properties. Skip entries such as virtual adapters or WAN Miniport, because changing those will do nothing useful. A properties window opens for that adapter.
- Click the Advanced tab.
- In the Property box, scroll until you find Locally Administered Address. This is the setting that lets you change the MAC address. On some drivers it is called Network Address instead. Click it.
- Select the Value option on the right and click in the box beside it.
- Type your new 12-digit code. It uses numbers (0-9) and letters (A-F) only. Do not add dashes, colons or spaces. For example, type the code as one unbroken string of 12 characters.
A few tips for choosing the code. Make the second character a 2, 6, A or E, because those values mark an address as locally administered, and other values can be rejected by the driver or the network. Also never use an address that another device on the same network already uses, or both devices will have connection problems.
If you cannot find either setting in the list, your adapter's driver does not support changing the address. Many Wi-Fi and Ethernet cards do support it, but some do not. Updating the driver sometimes adds the option, though not always.
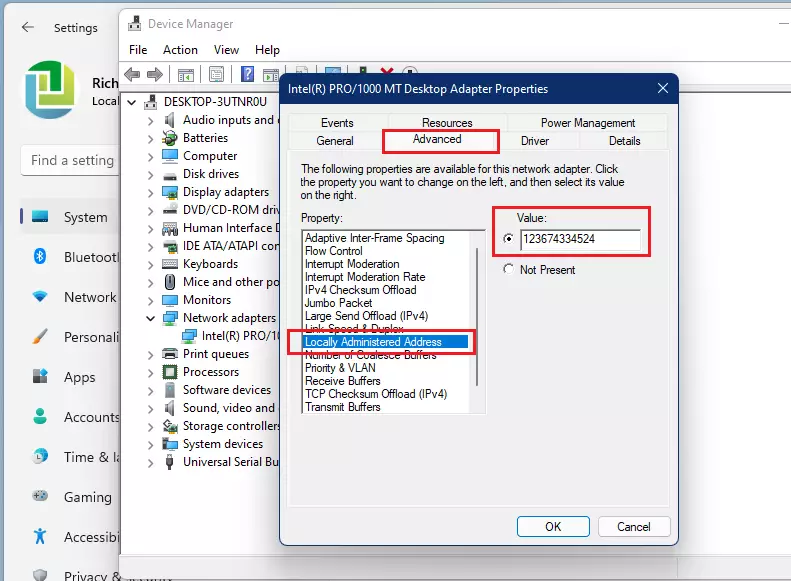
- Click OK to save your changes. Your connection will usually drop for a few seconds while the adapter restarts, then reconnect. A full restart of the PC is normally not needed. If the address does not change, right-click the adapter in Device Manager, choose Disable device, then enable it again, or restart the PC.
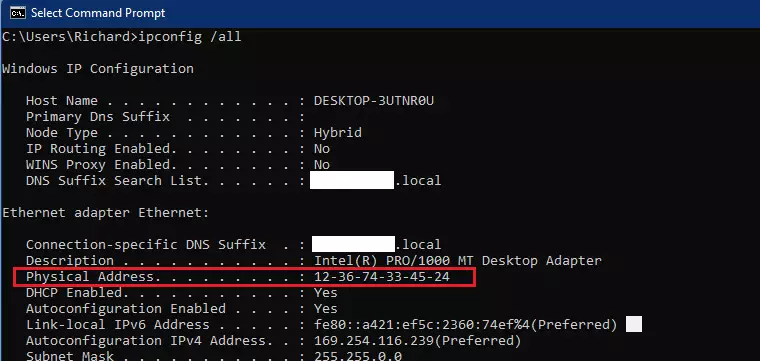
- To confirm your computer is using the new ID, open the Command Prompt and type the following command, then press Enter.
ipconfig /allIn the output, find the entry for the adapter you changed and look at its MAC (physical) address. It should match the 12-digit code you typed, usually shown with dashes between pairs of characters.
To undo the change, go back to the same Advanced tab, select Locally Administered Address (or Network Address), choose Not Present, and click OK. Windows then goes back to using the address built into the card.
Summary
Changing your MAC address on Windows 11 can fix network problems by giving your computer a new digital ID, managed through Device Manager. If the option is missing, your adapter's driver does not allow it, and the setting always reverts with Not Present.
Have a question about this guide?
Answered by AI from this guide. Good questions may be added to this page — please don't include personal details.
Did this guide fix your problem?

About the Author
Richard
Tech Writer, IT Professional
Richard is a writer at Geek Rewind who turns complex IT tasks into clear, step-by-step guides. He draws on years of hands-on experience in system administration and enterprise IT operations, focusing on Windows, Linux and WordPress: the problems people actually run into, and the fixes that work. His server and WordPress guides come from systems he runs himself. Richard builds and maintains the platform behind Geek Rewind, from its Ubuntu servers and Nginx configuration to its custom WordPress plugins. Many new tutorials start with readers' questions, and he's always glad to answer them in the comments.
This is not compatible with many modern Wi-Fi adaptors in laptops. No such field exists – “Locally Administered Address”
This doesn’t work.
No such field as “Locally Administered Address”.