How to Change HungAppTimeout Settings in Windows 11

HungAppTimeout in Windows 11 is the built-in timer that decides how long your PC waits for a frozen app to close when you shut down or restart. By default, Windows waits 5000 milliseconds, or 5 seconds, before it pops up a warning asking if you want to force the program to close.
You can change this number in the Registry Editor (an advanced tool for changing system settings) to make your computer wait longer or give up sooner. Lowering the timer makes your PC shut down faster. Raising it gives slow apps extra time to save your work. The change is small, but the Registry affects the whole system, so take a backup first and follow the steps in order.
Modify the HungAppTimeout registry value. Open Registry Editor, navigate to 🗝️HKEY_USERS.DEFAULTControl PanelDesktop, create a new String Value named HungAppTimeout, and set its data to your desired milliseconds. Restart your PC for the change to take effect.
How to Change HungAppTimeout for Everyone Using Your PC
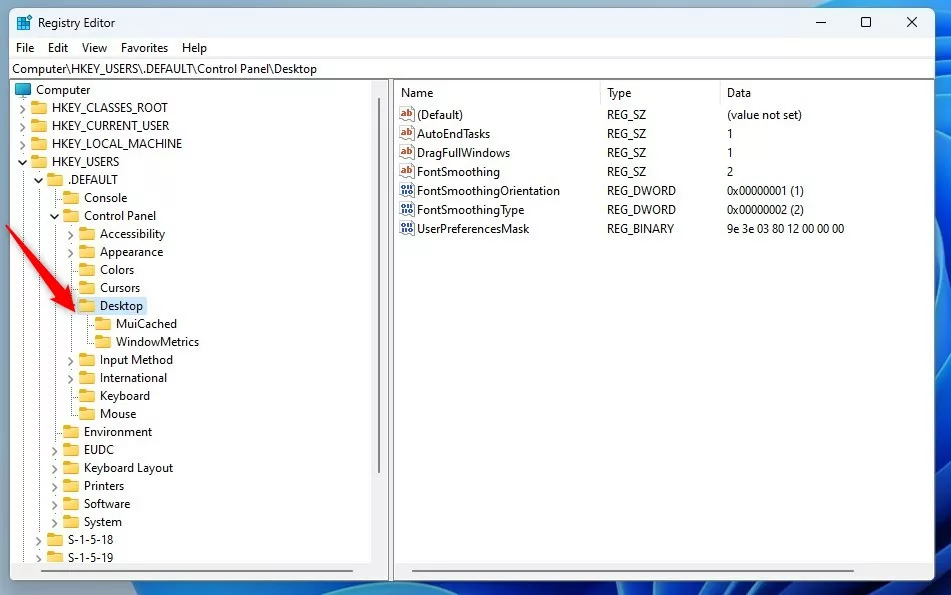
You can change HungAppTimeout for everyone using your PC by editing the Windows Registry. Press the Win plus R, type regedit, and press Enter to open Registry Editor. Then go to 🗝️HKEY_USERS\.DEFAULT\Control Panel \Desktop, find the HungAppTimeout value, and change its data to the number of milliseconds you want.
The steps are the same on Windows 11 Home and Pro, because Registry Editor ships with both. You do need to be signed in with an administrator account, or be able to enter an administrator’s password at the prompt.
- Press Windows key + R to open the Run box. You should see a small window with a text field.
- Type regedit and press Enter to open the Registry Editor. Click Yes if User Account Control asks for permission. The Registry Editor window opens, with a folder tree on the left and values on the right.
- Back up the Registry first. Click File Export, choose All under Export range, give the file a name, and click Save. If something goes wrong later, you can double-click that file to restore it.
- In the Registry Editor, go to this folder path. You can expand the folders on the left one at a time, or paste the path into the address bar at the top of the window:Registry
HKEY_USERS\.DEFAULT\Control Panel\Desktop
- If you don’t see a folder named Desktop under Control Panel, right-click Control Panel, choose New Key, and name it Desktop. The new folder appears in the left pane. Click it to select it.
- Look at the right side panel for an existing HungAppTimeout entry. If it is already there, skip ahead to the step where you double-click it. If not, right-click an empty area in the right side panel (inside Desktop) and choose New String Value.
- Name this new string HungAppTimeout and press Enter. The new entry appears in the list with a blank value.
- Double-click HungAppTimeout and set the Value data to the number of milliseconds you want Windows to wait. Type digits only, with no letters or spaces. For example:
- 5000 = 5 seconds (default)
- 10000 = 10 seconds
- Don’t use less than 1000 (1 second) to avoid issues. A very short timer can make Windows close apps before they finish saving.
- Click OK and close the Registry Editor. The entry in the right panel should now show your number in the Data column.
- Restart your computer to apply the changes.
To undo the change, repeat the steps and set the value back to 5000, or right-click the value and choose Delete to remove it. You can also double-click the backup file you exported earlier. Restart afterward so the old setting takes effect.
Change HungAppTimeout for Only Your User Account
If you want to change this setting just for your user account (and not all users), use this folder path instead:
HKEY_CURRENT_USER\Control Panel\Desktop
Then follow the same steps as above, starting from the step where you check for the Desktop folder. Settings stored under your own account affect only you. Other people who sign in to the PC keep their own values.

What Does the End Task Prompt Look Like?
When an app is slow to close during shutdown or restart, Windows shows a message like this:
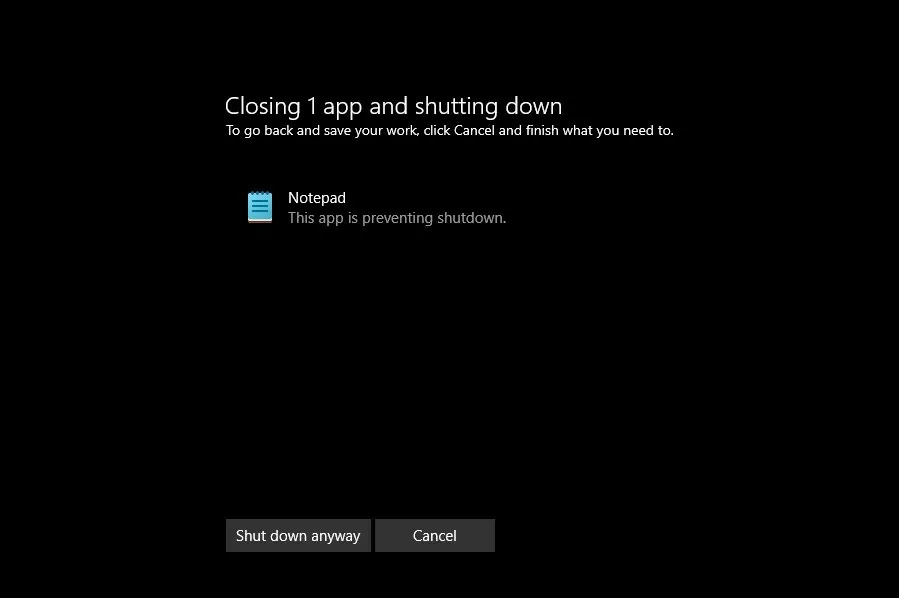
You can choose to wait, close the app, or shut down anyway. The exact button names can vary a little depending on whether you are shutting down or restarting. If you wait, Windows gives the app more time. If you force it, any unsaved work in that app is lost. If you lengthened the timer, this message simply appears later than before.
Summary
- HungAppTimeout controls how long Windows waits before forcing an app to close.
- You can increase or decrease this time by editing the Windows Registry, either for all users or just for your own account.
- Always back up the Registry before making changes.
- Changing this setting can help if apps take longer to close or if you want faster shutdowns.
- Restart the PC after the change, and keep the value at 1000 or higher.
- Follow the steps carefully to avoid any problems.
HungAppTimeout controls how long Windows waits before forcing a frozen app to close, helping you speed up shutdowns or give slow programs more time to respond. You can adjust this timer in the Windows Registry to fit your needs. Always back up your registry before making changes to keep your system safe.
Have a question about this guide?
Answered by AI from this guide. Good questions may be added to this page — please don't include personal details.
Did this guide fix your problem?

About the Author
Richard
Tech Writer, IT Professional
Richard is a writer at Geek Rewind who turns complex IT tasks into clear, step-by-step guides. He draws on years of hands-on experience in system administration and enterprise IT operations, focusing on Windows, Linux and WordPress: the problems people actually run into, and the fixes that work. His server and WordPress guides come from systems he runs himself. Richard builds and maintains the platform behind Geek Rewind, from its Ubuntu servers and Nginx configuration to its custom WordPress plugins. Many new tutorials start with readers' questions, and he's always glad to answer them in the comments.
No comments yet — be the first to share your thoughts!