How to Change How Narrator Reads Capital Letters in Windows 11

Narrator is the built-in screen reader in Windows 11. It reads text and interface elements aloud. Out of the box it may not give you any hint when a word is capitalized, or it may do so in a way you find distracting. If you listen to long documents, emails or web pages, changing this setting makes the speech easier to follow.
Windows 11 gives you three ways to handle capital letters. Narrator can raise the pitch of its voice, say “cap” before the capitalized text, or ignore capitals completely. You pick one, and Narrator uses it from then on.
Open Settings Accessibility Narrator, scroll to Verbosity, and click Change how capitalized text is read. Select Don’t announce, Increase pitch, or Say cap. The change takes effect immediately with no restart needed.
What Are Your Options?
The three options suit different kinds of listening. If you proofread, you need to know exactly where capitals fall. If you only want to hear the content, you can switch the announcements off. The setting only changes how Narrator speaks. It does not change the text on screen or in your files.
- Don’t announce: Narrator reads the text normally, with no special mention of capital letters. This is the quietest option and works well for casual reading.
- Increase pitch: Narrator raises its vocal tone when it reads capitalized words. You hear the difference without extra words, but it can be hard to notice with some voices.
- Say cap: Narrator says the word “cap” before a capitalized word to signal uppercase text. This is the clearest option for proofreading, though it can feel slow in text with many capitals.
How to Change This Setting
You change this in the Settings app. The path is Settings Accessibility Narrator, and the option sits in the Verbosity section. The steps are the same on Windows 11 Home and Pro. You do not need to restart the PC.
- Open Settings. Press
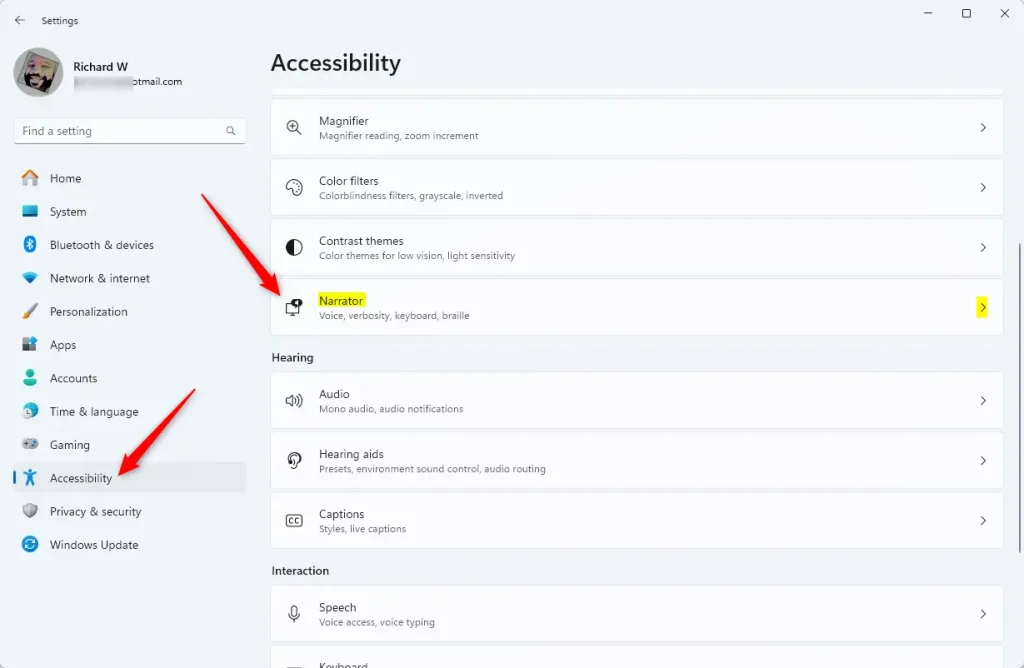
Windows key + Ion your keyboard, or click the Start menu (the Windows icon in the bottom left corner) and then click Settings. The Settings window opens. - Click Accessibility in the left menu. The accessibility options appear on the right.
- On the right side, click Narrator. The Narrator settings page opens.
- Scroll down to the Verbosity section. It controls how much detail Narrator speaks. Click it to expand it if it is collapsed.
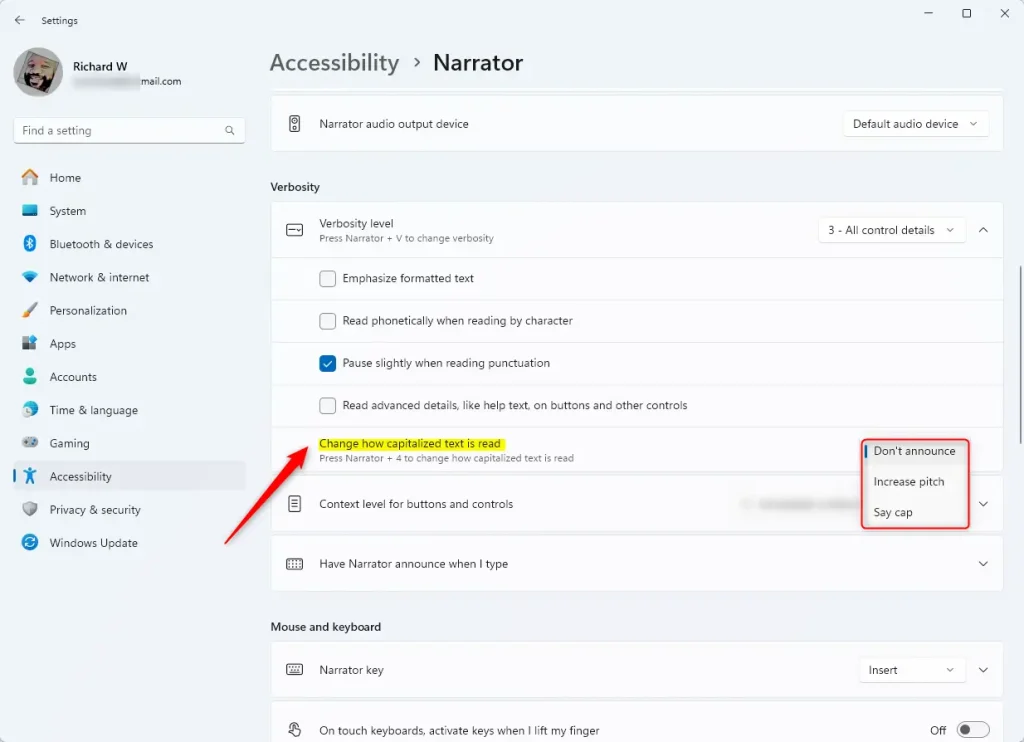
- Find Change how capitalized text is read and click it. A list of options opens.
- Choose one of the three options: Don’t announce, Increase pitch, or Say cap. The setting is saved as soon as you select it.
- Close the Settings app when you are done.
Settings pages in Windows 11 change a little between builds, so the Verbosity section may sit in a slightly different place. Make sure Windows is up to date if it is missing altogether.
After you choose an option, the list closes and the selected choice shows as the current value. To check that it works, open a document or web page with mixed capitals and let Narrator read a sentence. Listen for a higher pitch or the word “cap”, depending on what you picked.
To undo the change, return to the same setting and choose a different option. Select Don't announce if you want Narrator to go back to reading capitals with no special announcement. If one option sounds wrong, try another, since each voice handles pitch differently.
Quick Tip
Press Narrator key + 4 to cycle through them on the fly. The Narrator key, which controls these screen-reader functions, defaults to the Caps Lock or Insert key. If a shortcut does nothing, check that Narrator is running and that you are holding the Narrator key.
Why Change This?
Microsoft built Narrator to give you precise control over how uppercase letters sound. Pick the option that fits how you listen. Many people use Increase pitch for everyday reading and switch to Say cap when they need to check capitalization closely.
Summary
- Narrator reads text aloud to help people with low vision or blindness.
- You can choose how it reads capital letters: no special announcement, a higher voice, or saying "cap".
- The setting is in Settings Accessibility Narrator, in the Verbosity section.
- The change takes effect right away, and you can reverse it by choosing another option.
- For more help with Narrator, check out this easy guide on how to turn Narrator on or off in Windows 11.
Some terms used in this guide:
- Accessibility: A section within Settings dedicated to features that help users with disabilities interact with their devices.
- Narrator: Windows' built-in screen reader that converts text on your screen into speech.
- Dropdown menu: A user interface element that reveals a list of options when clicked.
Was this guide helpful?

About the Author
Richard
Tech Writer, IT Professional
Richard is a writer at Geek Rewind who turns complex IT tasks into clear, step-by-step guides. He draws on years of hands-on experience in system administration and enterprise IT operations, focusing on Windows, Linux and WordPress: the problems people actually run into, and the fixes that work. His server and WordPress guides come from systems he runs himself. Richard builds and maintains the platform behind Geek Rewind, from its Ubuntu servers and Nginx configuration to its custom WordPress plugins. Many new tutorials start with readers' questions, and he's always glad to answer them in the comments.




No comments yet — be the first to share your thoughts!