How to Change Your Device Name for Nearby Sharing in Windows 11

A Nearby Sharing device name is the custom label your Windows 11 PC uses so other computers can spot it easily over Bluetooth or Wi-Fi . Windows assigns a random, confusing name by default, but you can change it in a couple of minutes through the system settings.
Giving your PC a clear name helps you avoid sending files to the wrong computer in a room full of devices. You need to open your system settings, type a new name, save the change and restart. Plan on one restart, because the new name usually does not show up to other devices until the PC has rebooted.
Open Settings , go to System About, click Rename this PC, enter your new name and select Next. Restart your computer to apply the change and make the new name visible to other devices on Nearby Sharing.
Computer Name vs. Device Manager Names
Your main computer name controls how you appear on a network and share files, while Device Manager labels only manage internal hardware parts like your graphics card. Understanding the difference between computer name and Device Manager names ensures you change the right setting for Nearby Sharing without messing up how Windows tracks your physical hardware components.
Device Manager labels apply strictly to hardware drivers like graphics cards or network adapters. Modifying the network identifier leaves internal hardware names untouched. If you only want a friendlier name for other people to see, you never need to open Device Manager.
A few naming tips before you start:
- Keep the name short and recognizable, such as the room or the owner plus the device type.
- Stick to letters, numbers and hyphens. Spaces and special characters are often rejected.
- Staying at 15 characters or fewer is the safest choice for older network features.
- Do not reuse a name that another PC on your network already has.
Change Your Device Name via System Settings
System Settings is the fastest way to change the device name in Windows 11 so other computers can recognize your PC during file transfers. Open the Settings app, go to the About page under the System menu, and click the Rename this PC button to update how your computer appears when using Nearby Sharing. The path is Settings System About
Follow the steps below. After you confirm the new name, Windows asks you to restart. You can restart later, but the old name stays visible until you do. If you need to undo the change, repeat the same steps and enter the old name.
- Open the Settings app by pressing Windows key + I.
- Go to System and select About at the bottom of the list.
- Click the Rename this PC button.
- Enter your new name and click Next.
- Restart your computer to apply the changes.

If you sign in with a standard account, Windows asks for an administrator password when you save the name. This applies to both Windows 11 Home and Pro. After the restart, check that Nearby Sharing is switched on under Settings System Nearby sharing It must be set to My devices only or Everyone nearby for other PCs to see you.
Rename Using PowerShell
PowerShell offers a rapid alternative for command-line users via the Rename-Computer cmdlet. It is handy when you rename several PCs or work over a remote session. You must open PowerShell with Run as administrator. Otherwise the command fails with an access denied error.
- Right-click the Start button and select Terminal (Admin).
- Type the following command and press Enter:
Rename-Computer -NewName "New-Friendly-Name" - Restart your computer to finish.
As with Settings, the new name takes effect after a restart. To undo it, run the same cmdlet again with the previous name and restart once more.
Advanced Registry Method
Registry Editor lets you change your sharing identifier for specific network features without altering your computer's main hostname. You need an administrator account to use this advanced method, and you must follow each step carefully because mistakes in HKEY_LOCAL_MACHINE\SOFTWARE\Microsoft can cause serious system problems. For a normal rename, the Settings method above is the safer choice.
Administrative rights are mandatory for registry edits. Mistakes when modifying `HKEY_LOCAL_MACHINE\SOFTWARE\Microsoft` could lead to system instability.
Before you change anything, back up the registry. In Registry Editor, choose File Export and save a copy somewhere safe. Creating a system restore point first is also a good idea. If something goes wrong, you can double-click the exported file to restore it.
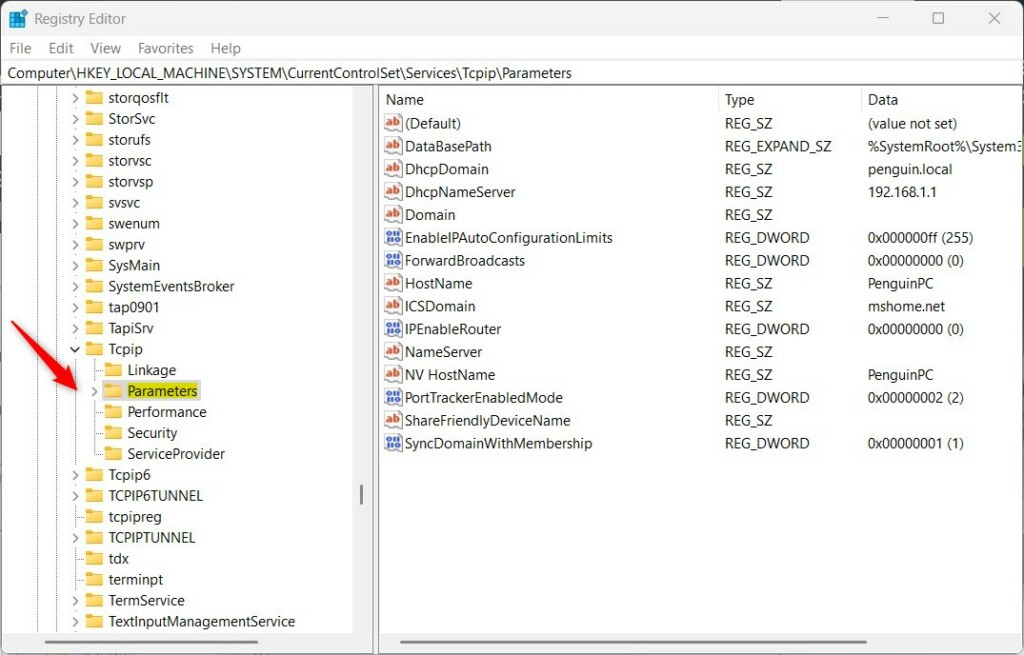
- Open the Registry Editor by searching for regedit in the Start menu.
- Navigate to:
HKEY_LOCAL_MACHINE\SYSTEM\CurrentControlSet\Services\Tcpip\Parameters - Right-click in the empty space, select New, then String Value.
- Name it
DeviceName. - Double-click it and enter your preferred name.
Summary
Customizing your PC label streamlines file transfers and network discovery. Once the restart is done, open Settings System About and confirm the Device name shows what you typed. Then try a Nearby Sharing transfer from another PC to confirm the new name appears in the list. If the old name still shows, restart both computers and make sure Bluetooth and Wi-Fi are on.
Was this guide helpful?

About the Author
Richard
Tech Writer, IT Professional
Richard is a writer at Geek Rewind who turns complex IT tasks into clear, step-by-step guides. He draws on years of hands-on experience in system administration and enterprise IT operations, focusing on Windows, Linux and WordPress: the problems people actually run into, and the fixes that work. His server and WordPress guides come from systems he runs himself. Richard builds and maintains the platform behind Geek Rewind, from its Ubuntu servers and Nginx configuration to its custom WordPress plugins. Many new tutorials start with readers' questions, and he's always glad to answer them in the comments.

No comments yet — be the first to share your thoughts!