Enable or Disable Guest Mode in Google Chrome

Guest mode in Google Chrome opens a temporary browsing window that saves no web history, cookies, or personal data. When guest mode is on, anyone can use your computer to browse the web without seeing your saved passwords, bookmarks, or autofill information. When the window closes, Chrome deletes everything from that session.
You can turn this feature on or off depending on whether you share your PC with others. Turning it off forces everyone to use their own profile, so data stays separate. Once it is off, the Guest option no longer appears in Chrome’s profile menu.
If your school or workplace manages your PC, policy settings might block you from changing guest mode yourself. In that case the change may be reverted, or you may not be allowed to edit the registry at all. Ask your IT department.
To enable or disable guest mode in Google Chrome, open the Registry Editor as an administrator, navigate to 🗝️HKEY_LOCAL_MACHINE\
Enable / Disable Guest Mode in Chrome using the Registry
You can manage guest mode in Chrome by adding a policy value to the Windows Registry. Chrome reads this value at startup and applies it to every user on the PC. Because the value sits under 🗝️HKEY_LOCAL_MACHINE, you need administrator rights to create it.
This method works on both Windows 11 Home and Pro. It is useful if you want to stop other people from browsing on your PC without saving their history, or if you want to make sure guest browsing stays available.
It also fails if you did not open the Registry Editor as an administrator. If you see a permissions error when creating a key, close the editor and reopen it with administrator rights.
- Open the Windows Registry as an administrator. Click Yes if the User Account Control prompt appears. You should see the Registry Editor window with a folder tree on the left.
- Before you change anything, back up your registry (a record of your computer's settings) or create a System Restore point. If something goes wrong, you can then return to a known good state.
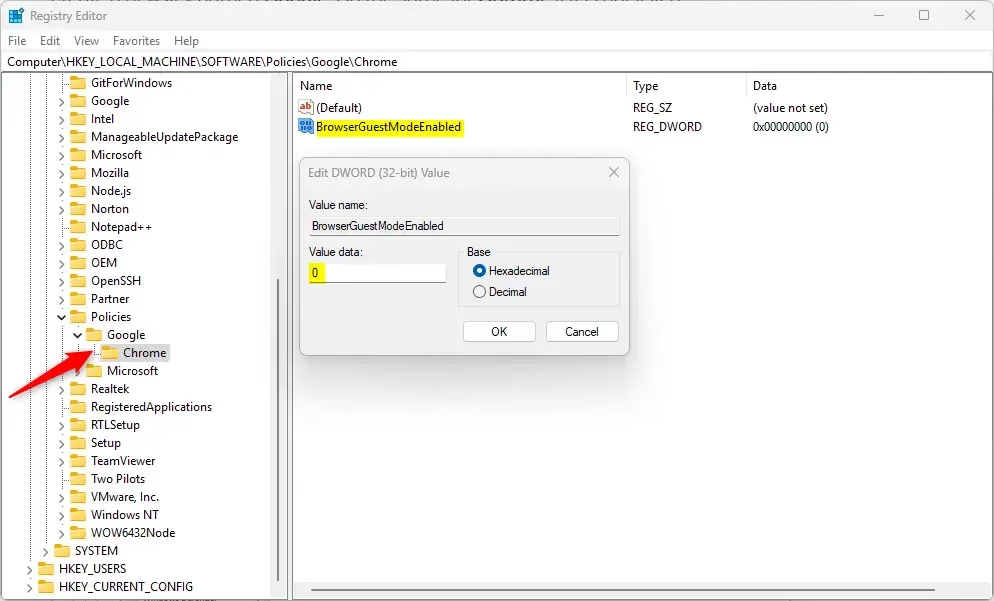
- Go to this path. You can expand the folders one by one in the left pane, or paste the path into the address bar at the top of the Registry Editor window and press Enter:
Computer\HKEY_LOCAL_MACHINE\SOFTWARE\Policies\Google\Chrome
- Check whether the Google folder exists under Policies. If you do not see it, right-click the Policies folder, select New Key, and name the new key Google.
- Do the same for Chrome if it is missing: right-click the Google folder, create a new key, and name it Chrome. This is normal on a PC where no Chrome policies have been set before.
- Right-click the Chrome folder.
- Select New DWORD (32-bit) Value. A new entry appears in the right pane with its name ready to edit.
- Type BrowserGuestModeEnabled as the name and press Enter. Use the exact spelling, because Chrome ignores a misspelled name.
Browser Guest Mode is a privacy setting in Google Chrome version 110 and later. It allows temporary users to browse without saving history or cookies. The BrowserGuestModeEnabled value controls it.
- Double-click BrowserGuestModeEnabled. The Edit DWORD (32-bit) Value window opens.
- Type 0 in the Value data box to disable Browser Guest Mode. Type 1 to enable it, which keeps guest browsing available so that other people's sessions stay out of your own profile and personal data.
- Click OK. The entry now shows your new value in the right pane.
- Close the Registry Editor and fully close and reopen Chrome. Open the profile menu and check whether the Guest option is there.
To restore the default settings, go back to the same Chrome key, right-click the BrowserGuestModeEnabled entry, and select Delete. Confirm when asked. Chrome then goes back to its normal behavior, and users can choose guest mode again.
You may need to restart your computer for these changes to work. If the Guest option does not change after you restart Chrome, restart Windows and check again.
Using Google Chrome ADMX Templates
Businesses and IT teams can manage guest mode settings for many computers using Google Chrome ADMX templates with the Group Policy Editor. Download the Chrome templates from Google and add them to your policy definitions first. Then you can set the guest mode policy once and apply it across your domain.
The Group Policy Editor is not included in Windows 11 Home. On Home editions, use the registry method above instead. Policies applied this way write the same value that you would create by hand, so they override any manual change.
Conclusion
Always back up your registry before you change anything. To undo a change, set the value back or delete the entry. If your computer is managed by an organization, contact your IT department to change these settings.
Reference:
Have a question about this guide?
Answered by AI from this guide. Good questions may be added to this page — please don't include personal details.
Did this guide fix your problem?

About the Author
Richard
Tech Writer, IT Professional
Richard is a writer at Geek Rewind who turns complex IT tasks into clear, step-by-step guides. He draws on years of hands-on experience in system administration and enterprise IT operations, focusing on Windows, Linux and WordPress: the problems people actually run into, and the fixes that work. His server and WordPress guides come from systems he runs himself. Richard builds and maintains the platform behind Geek Rewind, from its Ubuntu servers and Nginx configuration to its custom WordPress plugins. Many new tutorials start with readers' questions, and he's always glad to answer them in the comments.
No comments yet — be the first to share your thoughts!