How to Change Lid Close Action in Windows 11

Changing the lid close action in Windows 11 lets you decide what happens when you shut your laptop.
This setting controls whether your PC goes to sleep, hibernates, shuts down, or stays on when you close the lid. It’s a power option that helps manage your computer’s energy use.
For instance, you might want your laptop to sleep automatically to save battery power. Recent updates, starting around Windows 11 build 29550.1000, simplify this by applying your chosen lid close action across all your power plans.
You adjust the lid close action in Windows 11 via Power Options in Control Panel. Open Power Options, click “Choose what the power button does,” and select your desired action for “When I close the lid” under both “On battery” and “Plugged in.
Change Lid Close Action for Current Power Plan in Settings
This option is only available starting with Windows 11 version 24H2.
- Open Settings (⊞ Win+I).
- Click System on the left side, then click Power & battery on the right side.

- Click Lid & power button controls to expand it open.
- Select Do Nothing, Sleep (default), Hibernate, Shutdown, or Display Off for what you want in the “Plugged in” and “On battery” Closing the lid will make my PC drop menus.

- You can now close Settings if you like.
Option Two
Change Lid Close Action for Current Power Plan in Power Options
- Open the Control Panel (icons view), and click the Power Options icon.
- Click Choose what the power button does in the left pane.

- In both the “On battery” and “Plugged in” drop menus for the “When I close the lid” setting, select Do nothing, Sleep (default), Hibernate, or Shut down for what you want, and click Save changes.

Option Three
Change Lid Close Action for Specific Power Plan in Advanced Power Options
- Open the Control Panel (icons view), and click the Power Options icon.
- Click Change plan settings for the power plan (example: “Balanced”) you want to apply this to.

- Click Change advanced power settings.

- Expand open the Power buttons and lid and Lid close action settings.
- In both the “On battery” and “Plugged in” drop menus for the Lid close action setting, select Do nothing, Sleep (default), Hibernate, or Shut down for what you want, and click OK.

Option Four
Change Lid Close Action for Current Power Plan in Windows Terminal
- Copy and paste the command below you want to use for when on battery and/or plugged in into Windows Terminal, and press Enter.
On battery
{Do nothing}
powercfg -setdcvalueindex SCHEME_CURRENT 4f971e89-eebd-4455-a8de-9e59040e7347 5ca83367-6e45-459f-a27b-476b1d01c936 0OR
{Sleep – default}
powercfg -setdcvalueindex SCHEME_CURRENT 4f971e89-eebd-4455-a8de-9e59040e7347 5ca83367-6e45-459f-a27b-476b1d01c936 1OR
{Hibernate}
powercfg -setdcvalueindex SCHEME_CURRENT 4f971e89-eebd-4455-a8de-9e59040e7347 5ca83367-6e45-459f-a27b-476b1d01c936 2OR
{Shut down}
powercfg -setdcvalueindex SCHEME_CURRENT 4f971e89-eebd-4455-a8de-9e59040e7347 5ca83367-6e45-459f-a27b-476b1d01c936 3AND/OR
Plugged in
This option is particularly useful for desktop computers. Desktop PCs typically won’t show separate “On battery” and “Plugged in” settings unless connected to a UPS.
{Do nothing}
powercfg -setacvalueindex SCHEME_CURRENT 4f971e89-eebd-4455-a8de-9e59040e7347 5ca83367-6e45-459f-a27b-476b1d01c936 0OR
{Sleep – default}
powercfg -setacvalueindex SCHEME_CURRENT 4f971e89-eebd-4455-a8de-9e59040e7347 5ca83367-6e45-459f-a27b-476b1d01c936 1OR
{Hibernate}
powercfg -setacvalueindex SCHEME_CURRENT 4f971e89-eebd-4455-a8de-9e59040e7347 5ca83367-6e45-459f-a27b-476b1d01c936 2OR
{Shut down}
The asterisk (*) next to a power plan indicates the computer’s current active plan, for example, “Ultimate Performance.” Knowing the active power plan helps users understand which energy settings they are changing for their computer’s power use.
powercfg /L- Type the command below you want to use for when on battery and/or plugged in into Windows Terminal, and press Enter.
On battery
(Do nothing)
powercfg -setdcvalueindex GUID 4f971e89-eebd-4455-a8de-9e59040e7347 5ca83367-6e45-459f-a27b-476b1d01c936 0OR
(Sleep – default)
powercfg -setdcvalueindex GUID 4f971e89-eebd-4455-a8de-9e59040e7347 5ca83367-6e45-459f-a27b-476b1d01c936 1OR
(Hibernate)
powercfg -setdcvalueindex GUID 4f971e89-eebd-4455-a8de-9e59040e7347 5ca83367-6e45-459f-a27b-476b1d01c936 2OR
(Shut down)
powercfg -setdcvalueindex GUID 4f971e89-eebd-4455-a8de-9e59040e7347 5ca83367-6e45-459f-a27b-476b1d01c936 3AND/OR
Plugged in
This option is particularly useful for desktop computers. Desktop PCs typically won’t show separate “On battery” and “Plugged in” settings unless connected to a UPS.
(Do nothing)
powercfg -setacvalueindex GUID 4f971e89-eebd-4455-a8de-9e59040e7347 5ca83367-6e45-459f-a27b-476b1d01c936 0OR
(Sleep – default)
powercfg -setacvalueindex GUID 4f971e89-eebd-4455-a8de-9e59040e7347 5ca83367-6e45-459f-a27b-476b1d01c936 1OR
(Hibernate)
powercfg -setacvalueindex GUID 4f971e89-eebd-4455-a8de-9e59040e7347 5ca83367-6e45-459f-a27b-476b1d01c936 2OR
(Shut down)
powercfg -setacvalueindex GUID 4f971e89-eebd-4455-a8de-9e59040e7347 5ca83367-6e45-459f-a27b-476b1d01c936 3Note: Replace GUID with the actual GUID from step 2 for the specific power plan you’re targeting.
Example: Set to “Shut down” while “Plugged in” for the Balanced power plan GUID (381b4222-f694-41f0-9685-ff5bb260df2e)
powercfg -setacvalueindex 381b4222-f694-41f0-9685-ff5bb260df2e 4f971e89-eebd-4455-a8de-9e59040e7347 5ca83367-6e45-459f-a27b-476b1d01c936 3- You can now close Windows Terminal if you like.
Option Six
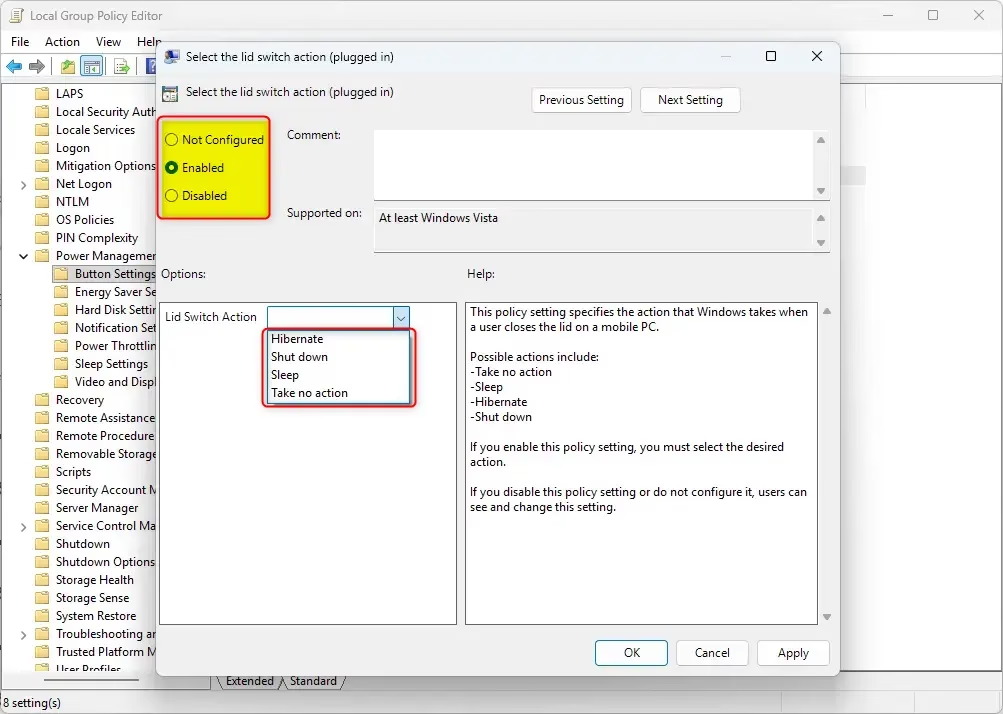
Specify Lid Close Action for All Power Plans in Local Group Policy Editor
⚠️ ADMIN REQUIRED: You must be signed in as an administrator to use this option.
Note: The Local Group Policy Editor is only available in Windows 11 Pro, Enterprise, and Education editions. Other editions can use Option Seven below to configure the same policy.
- Open the Local Group Policy Editor (
gpedit.msc). - Navigate to the location below in the left pane of the Local Group Policy Editor.
Computer Configuration > Administrative Templates > System > Power Management > Button Settings

- In the right pane of Button Settings, double-click the Select the lid switch action (plugged in) and/or Select the lid switch action (on battery) policy you want to edit.
Default User Choice for Lid Close Action
- Select (dot) Not Configured, click OK
To Specify “Hibernate” for Lid Close Action
- Select (dot) Enabled, select Hibernate in the Lid Switch Action drop menu under Options, click OK
To Specify “Shut down” for Lid Close Action
- Select (dot) Enabled, select Shut down in the Lid Switch Action drop menu under Options, click OK
To Specify “Sleep” for Lid Close Action
- Select (dot) Enabled, select Sleep in the Lid Switch Action drop menu under Options, click OK
To Specify “Take no action” for Lid Close Action
- Select (dot) Enabled, select Take no action in the Lid Switch Action drop menu under Options, click OK
Conclusion
Customizing what happens when you close your laptop lid in Windows 11 can enhance your daily experience. By adjusting this setting, you can:
- Choose Your Preferred Action: Select an action that suits your needs—whether it be Do Nothing, Sleep, Hibernate, or Shut Down.
- Apply Settings to Specific Power Plans: Make adjustments for different power plans to optimize performance and energy consumption.
- Utilize Various Methods: Choose from multiple methods such as Settings, Control Panel, Windows Terminal, or Group Policy Editor to implement your desired changes.
- Experience Consistency Across Power Plans: Starting with Windows 11 build 29550.1000, your settings will remain consistent across all power plans.
- Enhance Productivity: Tailor your laptop’s behavior to fit your workflow and enhance overall productivity.
Following these steps helps manage your laptop’s lid-closing behavior to match your preferences.
How to choose what happens when you close the lid?
To choose your lid close action, open Windows 11 Settings, navigate to System, and select Power & battery. Expand the Lid & power button controls section. Here, you can select your preferred action—such as Sleep, Hibernate, or Do Nothing—for both ‘Plugged in’ and ‘On battery’ power states to customize your experience.
How to change laptop behavior when closing the lid?
You can change your laptop’s lid behavior by accessing the Power & battery settings in Windows 11. Under the Lid & power button controls menu, you can modify the settings for when the lid is closed. Select from options like Shut Down, Hibernate, Sleep, or Do Nothing to suit your specific workflow.
How do I make the computer keep working when I close the lid?
To keep your computer running while the lid is closed, go to Settings, select System, and click Power & battery. Expand the Lid & power button controls section. Change the ‘When I close the lid’ setting to ‘Do Nothing’ for both ‘Plugged in’ and ‘On battery’ modes to prevent the system from sleeping.
How to make a laptop work with a lid closed in 🪟 Windows 11?
To keep your Windows 11 laptop active with the lid closed, navigate to Settings > System > Power & battery. Expand the Lid & power button controls menu. Set the action for closing the lid to ‘Do Nothing.’ This ensures your computer continues running tasks or playing audio even when the lid is shut.
Was this guide helpful?

About the Author
Richard
Tech Writer, IT Professional
Richard, a writer for Geek Rewind, is a tech enthusiast who loves breaking down complex IT topics into simple, easy-to-understand ideas. With years of hands-on experience in system administration and enterprise IT operations, he’s developed a knack for offering practical tips and solutions. Richard aims to make technology more accessible and actionable. He's deeply committed to the Geek Rewind community, always ready to answer questions and engage in discussions.


No comments yet — be the first to share your thoughts!