How to Remove System Requirements Not Met Watermark in Windows 11

If you installed Windows 11 on a computer that does not officially support it, you might see a watermark on your screen. It says “System requirements are not met.” Microsoft adds this tag because they have specific basic requirements for their software. While the computer works, this message stays visible in the corner of your screen and inside your settings menu.
Why remove the watermark?
The watermark is just a reminder from Microsoft. It does not change how your computer runs. Removing it simply gives you a cleaner desktop and a better view of your wallpaper.
What happens when done?
After following these steps, the “System requirements are not met” text will disappear from your desktop and settings menu. Your computer will look like a standard, fully supported Windows 11 installation.
Steps to remove the watermark
Note: You must have admin privileges to change these settings. Please be careful when editing the registry, as it is an important part of your system.
- Click the Start button and type
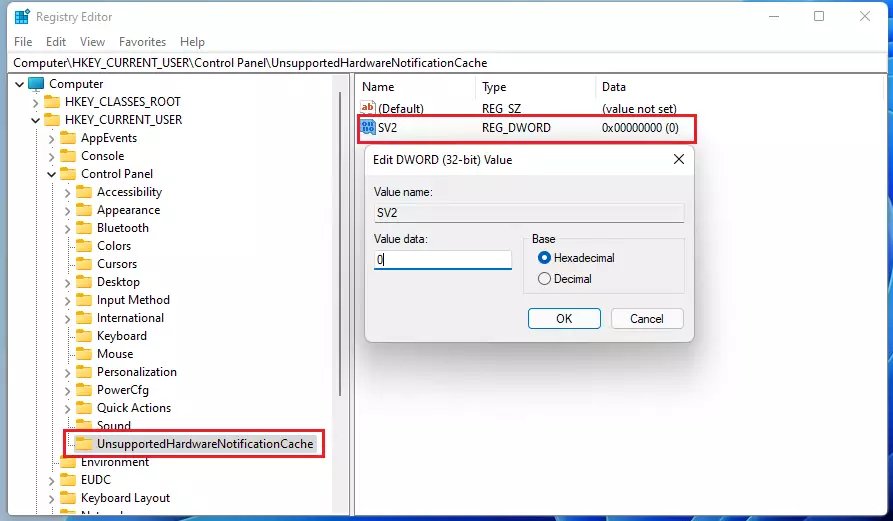
regeditto open the Registry Editor. - Use the sidebar to navigate to this path:
HKEY_CURRENT_USER\Control Panel\UnsupportedHardwareNotificationCache - If you do not see the folder named
UnsupportedHardwareNotificationCache, right-click on theControl Panelfolder, select New, and name the new keyUnsupportedHardwareNotificationCache. - Inside that folder, look for a file named
SV2. - If
SV2is missing, right-click in the empty space, select New, then choose DWORD (32-bit) Value and name itSV2. - Double-click the
SV2file. Change the “Value data” box from1to0. - Click OK and restart your computer to apply the changes.
Summary
You can hide the “System requirements are not met” watermark by editing a specific key in your Windows Registry. By changing the SV2 value to 0, you tell Windows to stop displaying the warning. Always remember that your computer is running on unsupported hardware, so keep your files backed up regularly.
Was this guide helpful?


Leave a Reply