How to Remove System Requirements Not Met Watermark in Windows 11


The “System requirements are not met” watermark is a desktop overlay that appears in Windows 11 version 22H2 and later when the operating system runs on unsupported hardware. Typical causes are an older processor or a PC without TPM 2.0 (Trusted Platform Module, a security chip that Windows 11 requires). The text sits in the bottom-right corner of the screen and is also shown in Settings. Removing it cleans up your screen and hides the warning without affecting system performance or update status.
You can get rid of the watermark by changing a single value in the Registry Editor (a built-in database for Windows settings ) or by running a simple script that patches the system files. Both methods take less than two minutes. This guide walks through the Registry Editor method step by step. It works on Windows 11 Home and Pro alike.
Be clear about what this does. It hides the message and nothing else. Your PC is still unsupported, and no setting here changes that.
Open Registry Editor, navigate to 🗝️HKEY_CURRENT_USER\
Steps to remove the watermark
You can remove the “System requirements not met” watermark in Windows 11 by editing a single registry key. Open the Registry Editor and change the SV2 value inside the UnsupportedHardwareNotificationCache folder. This hides the warning message without affecting your system performance or stopping future security updates.
A standard account cannot save changes to this part of the registry. The Registry Editor is powerful, so if you want a safety net, create a restore point first or export the registry from File Export inside the editor. The change here is small and easy to undo, but a backup costs nothing.
- Click the Start button and type
regeditto open the Registry Editor. Select the result and, if User Account Control asks for permission, click Yes. The Registry Editor window opens, with a folder tree on the left and values on the right. - Use the sidebar to navigate to this path:
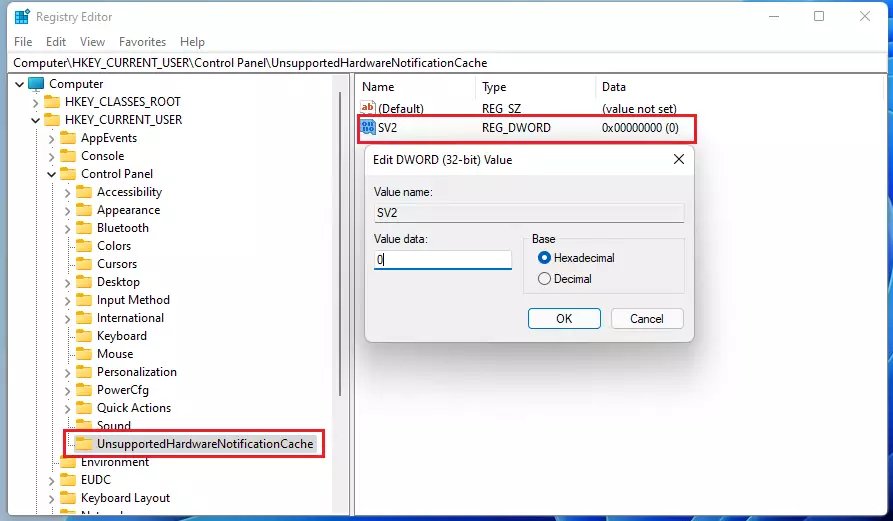
HKEY_CURRENT_USER\Control Panel\UnsupportedHardwareNotificationCache. Click the small arrow next to each folder to expand it. You can also paste the path into the address bar at the top of the window and press Enter. When you reach the last folder, its contents appear in the right pane. - If you do not see the folder named
UnsupportedHardwareNotificationCache, right-click on theControl Panelfolder, select New, and name the new keyUnsupportedHardwareNotificationCache. A key is a registry folder. Choose Key from the submenu, then type the name exactly as shown and press Enter. The new folder appears in the sidebar under its parent. Click it to select it. - Inside that folder, look for a file named
SV2. It is listed in the right pane and is technically a registry value, not a file. If the folder has only a (Default) entry, the value does not exist yet. Go on to the next step. - If
SV2is missing, right-click in the empty space, select New, then choose DWORD (32-bit) Value and name itSV2. Use the 32-bit type even on a 64-bit system. The new value appears in the right pane with the name you typed. - Double-click the
SV2file. Change the “Value data” box from1to0. An Edit DWORD (32-bit) Value box opens when you double-click. Note the original number before you change it, so you can put it back later. - Click OK and restart your computer to apply the changes. You can close the Registry Editor first. After the restart, check the bottom-right corner of the desktop. The watermark should be gone.
If the text is still there after the restart, reopen the Registry Editor and check the path and the value name for typos. Also confirm the value data is the number from the last step. A small spelling mistake in a key or value name is the most common reason this fix does nothing.
Restart again and the watermark returns. Be aware that a major Windows update can bring the message back. If that happens, repeat the steps above.
Summary
To remove the "System requirements not met" watermark in Windows 11, change a setting in the Registry Editor. Open the editor with administrator rights, go to the UnsupportedHardwareNotificationCache key, edit its SV2 value, and restart. This only hides the message. It does not make an unsupported PC supported, and it does not change how Windows runs or updates. If you ever want the watermark back, set the value to its original number.
Was this guide helpful?

About the Author
Richard
Tech Writer, IT Professional
Richard is a writer at Geek Rewind who turns complex IT tasks into clear, step-by-step guides. He draws on years of hands-on experience in system administration and enterprise IT operations, focusing on Windows, Linux and WordPress: the problems people actually run into, and the fixes that work. His server and WordPress guides come from systems he runs himself. Richard builds and maintains the platform behind Geek Rewind, from its Ubuntu servers and Nginx configuration to its custom WordPress plugins. Many new tutorials start with readers' questions, and he's always glad to answer them in the comments.



No comments yet — be the first to share your thoughts!