Understanding And Managing User Accounts In Windows 11
Windows 11 user accounts let you create distinct profiles for different people or purposes on your PC.
Each account acts as a personal space, keeping your files, settings, and preferences separate from others. This is essential for privacy and organization, especially if you share your computer.
For example, you can set up a Standard account for a child to limit their access or a Local account if you prefer not to link to a Microsoft account.
Understanding and managing these accounts helps you secure your data and personalize your Windows 11 experience.
What Are User Accounts in 🪟 Windows 11?
Think of a user account as a digital identity for someone using your computer. Each account comes with its own settings, files, and preferences. This means one person can save their documents without another person seeing them. It also helps keep your computer running smoothly by separating user data.
Why are user accounts important?
- Privacy: Your files and settings stay private to your account.
- Security: You can set different permission levels. Some accounts can make big changes, others can’t.
- Organization: Keeps everyone’s work separate and easy to find.
- Customization: Each user can personalize their desktop, background, and settings.
What happens when you use different user accounts?
When you switch accounts, Windows loads a completely different profile. This means different desktop backgrounds, saved passwords, and all your files. It feels a lot like logging into a different profile on social media, where everything is set up just for you.
Types of User Accounts in 🪟 Windows 11
Windows 11 offers a few main types of user accounts. Understanding these options will help you choose the best fit for everyone using your PC.
Microsoft Accounts vs. Local Accounts
This is your first big decision. A Microsoft account links to an email address (like @outlook.com, @hotmail.com, or even @gmail.com). A local account exists only on that specific computer and doesn’t require an email address.
Microsoft Account
Why use a Microsoft account?
- Syncing: Settings, passwords, and preferences sync across all devices where you use that Microsoft account.
- Access to Microsoft Services: Easily use services like OneDrive, Microsoft Store, and Office.
- Password Reset: If you forget your password, you can reset it online.
- Security: Offers features like two-factor authentication.
What happens when you use a Microsoft account?
When you sign in with a Microsoft account, Windows downloads your profile settings. Your files stored in OneDrive will be accessible. You can install apps from the Microsoft Store without extra steps. If you log into another Windows 11 PC with the same Microsoft account, it will look and feel very similar to your primary PC.
Local Account
Why use a local account?
- Simplicity: No need for an email or online account.
- Privacy: Your data is kept only on that computer.
- Offline Use: Works perfectly even without an internet connection.
What happens when you use a local account?
A local account is tied only to the computer you created it on. Settings and files are stored locally. If you want to use Microsoft services, you’ll need to sign in separately within those apps. Password recovery is harder; if you forget it, you might lose access to your files if they aren’t backed up.
Administrator Accounts
An administrator account gives you complete control over the computer. With this type of account, you can install software, change system settings, create or delete other user accounts, and access all files.
Why have an administrator account?
- Full Control: Needed to perform system-wide tasks.
- Software Installation: Most programs require admin rights to install.
- System Updates: Essential for installing major Windows updates.
What happens when you use an administrator account?
When you’re logged in as an administrator, you can make significant changes to Windows. You will often see a “User Account Control” (UAC) prompt asking for permission before making changes. This is a security feature to prevent accidental or malicious changes.
Standard User Accounts
A standard user account has limited privileges. These users can run applications, save files in their own folders, and change their personal settings. However, they cannot install most software, change system-wide settings, or affect other users’ accounts.
Why use a standard user account?
- Security: Reduces the risk of malware or accidental damage to the system.
- Control: Prevents children or less experienced users from making harmful changes.
- Simplicity: For everyday use, it’s often all you need.
What happens when you use a standard user account?
When you try to perform an action that requires administrator rights (like installing a program), Windows will block you or ask for an administrator’s password. This keeps the system stable and secure.
Managing User Accounts in 🪟 Windows 11
Managing user accounts in Windows 11 is quite manageable. You can easily add new users, change account types, and remove accounts you no longer need.
Accessing Account Settings
To manage your user accounts, you’ll need to go to the Settings app.
- Click the Start button.
- Click on the Settings icon (it looks like a gear).
- In the Settings window, click on Accounts in the left-hand menu.
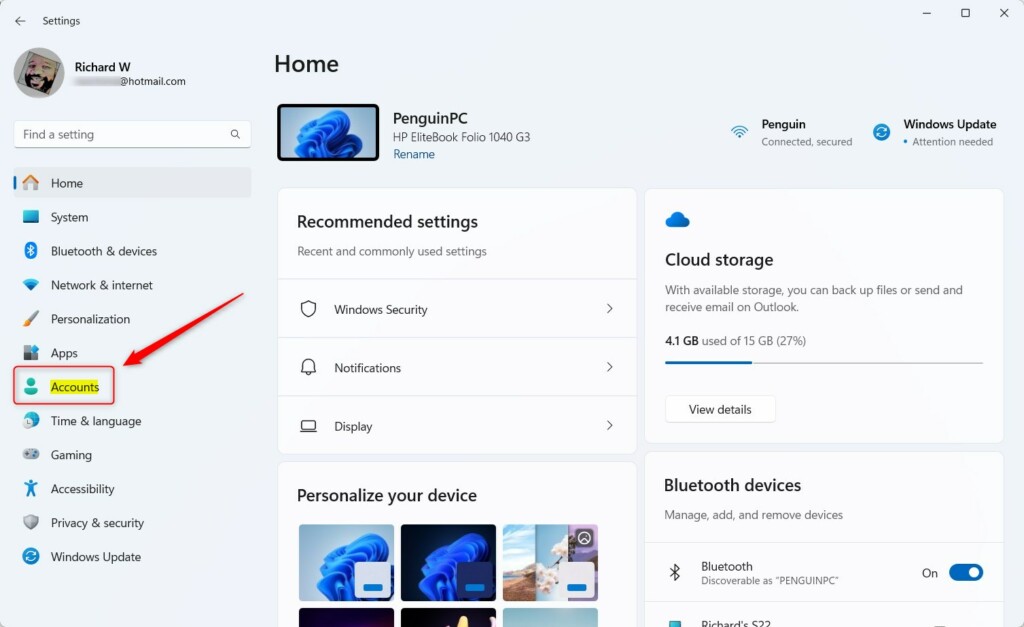
Here you will see options for your own account and for adding or managing other accounts on the PC.
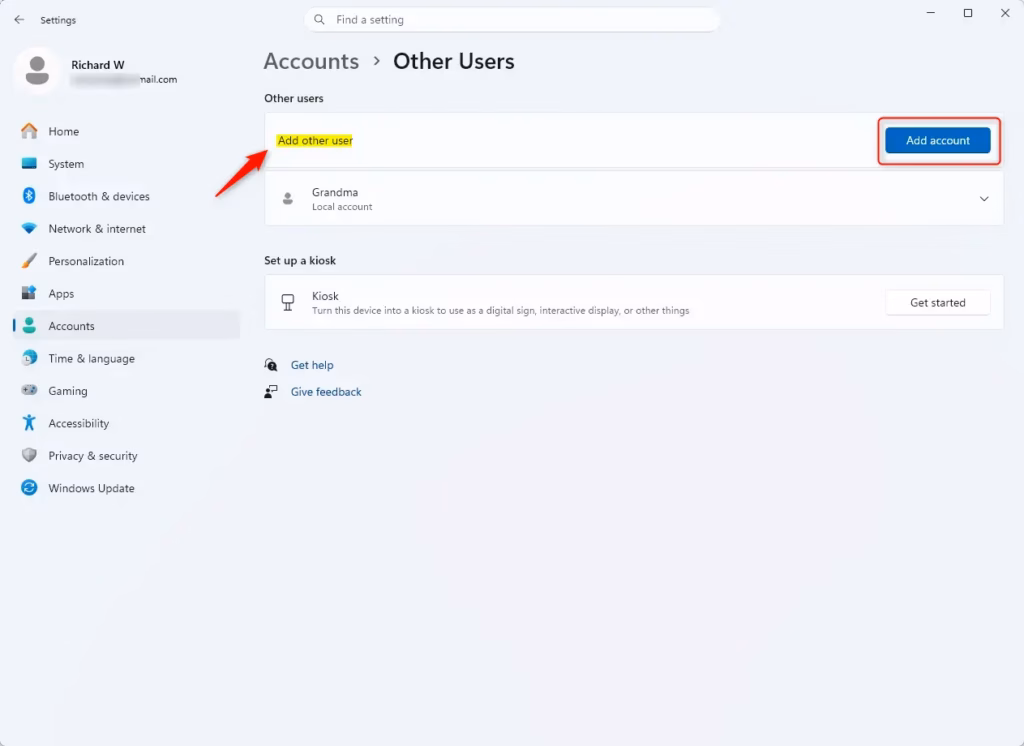
Adding a New User Account
Adding a new account is a straightforward process. You’ll decide whether it’s a Microsoft account or a local one as you go.
- Go to Settings > Accounts.
- Click on Family & other users (or sometimes just Other users).
- Under “Other users,” click Add account.
If you are adding a Microsoft account:
- Windows will ask for the person’s Microsoft account email address.
- Enter the email and click Next.
- Follow the prompts to finish setting up the account.
If you want to create a local account (for someone who won’t use a Microsoft email):
- After clicking Add account, you’ll see a prompt to enter an email. Click I don’t have this person’s sign-in information.
- On the next screen, click I don’t have this person’s Microsoft account.
- Now you can create a username for the local account.
- Enter a password (and a password hint if you wish).
- Click Next.
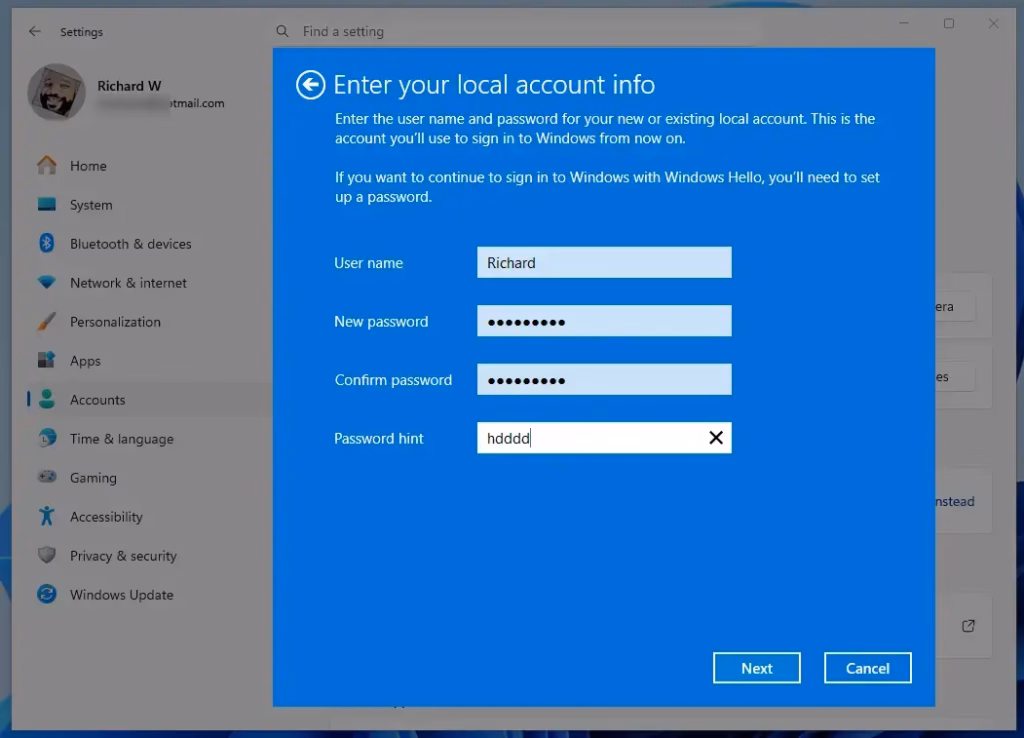
The new account will now appear in the list under “Other users.”
Changing an Account Type (Standard to Administrator)
By default, new accounts are usually created as standard users. You might need to give someone administrator rights.
Steps requiring admin privileges:
- Go to Settings > Accounts > Family & other users.
- Under “Other users,” click on the account you want to change.
- Click the Change account type button.
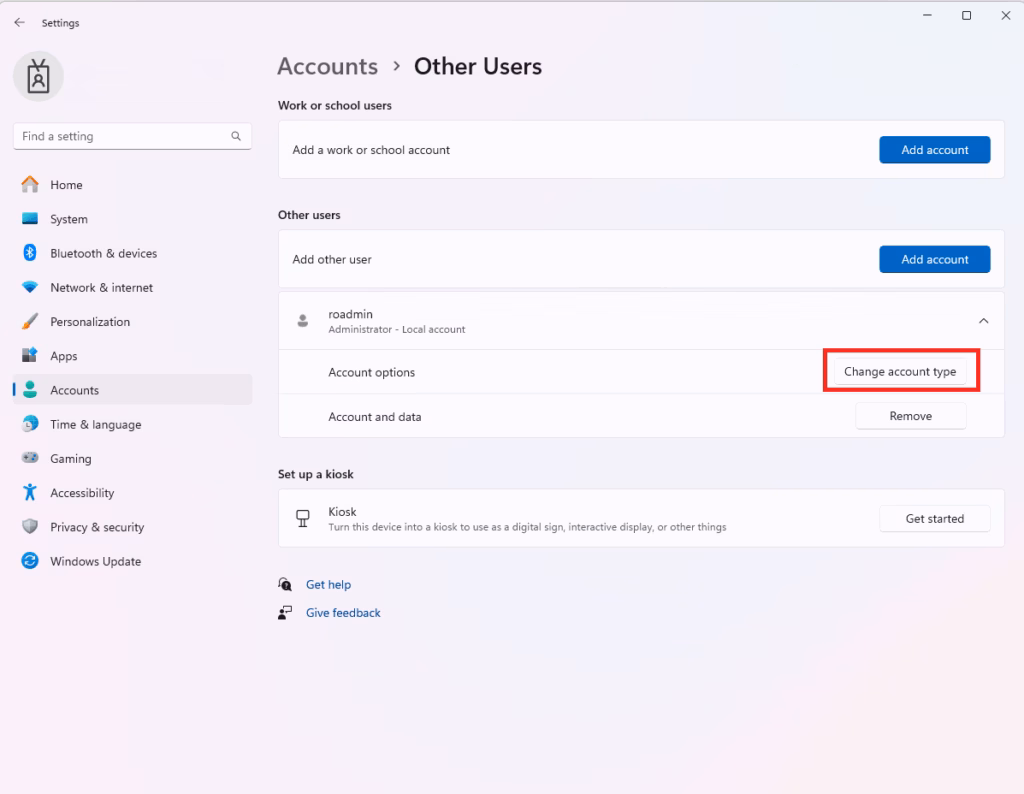
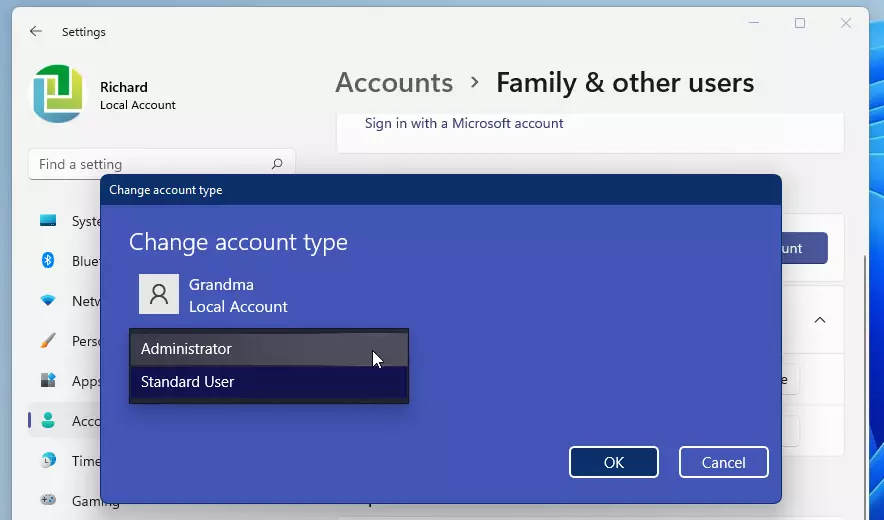
- In the “Change account type” window, click the dropdown menu under “Account type.”
- Select Administrator.
- Click OK.
The user account will now have administrator privileges.
Removing a User Account
If someone no longer uses the computer, you can remove their account. Be careful, as this will delete their files and settings.
Steps requiring admin privileges:
- Go to Settings > Accounts > Family & other users.
- Under “Other users,” click on the account you want to remove.
- Click the Remove button.

- A confirmation message will appear. It will warn you that deleting the account will remove all its data.
- Click Del account and data to confirm.
The account and all its associated files will be removed from the computer.
Switching Between User Accounts
You don’t have to log out completely to switch users. You can switch accounts and keep your current session running in the background.
- Click the Start button.
- Click on your current user profile picture or name at the bottom of the Start menu.
- A menu will pop up. Click on the user account you want to switch to.
Alternatively, you can press Windows key + L to lock your screen. From the lock screen, you can select a different user to sign in as.
What happens when you switch users?
When you switch users, your current applications and files remain open and running in the background. The new user logs into their own desktop environment. This is much faster than logging out and then logging back in.
Advanced User Account Management (Expert Tips)
Beyond the basics, there are more ways to manage user accounts, especially if you need finer control or are managing multiple computers.
Using the Local Users and Groups Manager
This tool, called Local Users and Groups (lusrmgr.msc), offers more detailed control over user accounts and groups. You’ll find it on Windows 11 Pro, Enterprise, and Education editions.
Steps requiring admin privileges:
- Press Windows key + R to open the Run dialog box.
- Type
lusrmgr.mscand press Enter or click OK.
This opens the “Local Users and Groups” console. Here you can:
- Create new users: Right-click in the “Users” folder and select “New User.”
- Manage groups: See which users belong to which groups (like Administrators, Users). You can add or remove users from groups.
- Set account policies: Define password requirements or account lockout settings.
- Disable accounts: Temporarily disable an account without deleting it.
Why use this tool?
It’s useful for managing accounts on a single PC without needing a Microsoft account, or for setting up specific security policies. For example, you could create a group for “Limited Access” users and then assign specific permissions to that group.
Understanding User Account Control (UAC)
User Account Control (UAC) is a security feature that helps prevent unauthorized changes to your computer. When a program or action requires administrator privileges, UAC will pop up a notification asking for your permission.
Why is UAC important?
It acts as a gatekeeper. Even if you are logged in as an administrator, UAC ensures you consciously approve significant system changes. This protects you from malware that might try to make changes without your knowledge.
How to adjust UAC settings:
You can adjust how often UAC prompts you, but it’s generally recommended to keep it at the default level for security.
Steps requiring admin privileges:
- Search for “User Account Control” in the Windows search bar and select “Change User Account Control settings.”
- You will see a slider with four levels.
- The default level is recommended. Moving the slider down will make UAC less intrusive but also less secure. Moving it up is not possible beyond the default.
- Click OK to save any changes.
Best Practices for Managing User Accounts
- Use Standard Accounts for Daily Tasks: Log in as a standard user for everyday activities like browsing the web or checking email. Only log in as an administrator when you need to install software or change system settings.
- Strong Passwords: Use strong, unique passwords for all accounts, especially Microsoft accounts. Consider using a password manager.
- Regularly Review Accounts: Periodically check the list of users on your PC. Remove any accounts that are no longer needed.
- Enable Parental Controls: If children use your PC, set up Microsoft Family Safety features for their accounts. This allows you to manage screen time, app usage, and content filtering. You can find this under Settings > Accounts > Family.
- Understand Permissions: Know the difference between administrator and standard user accounts. Assign administrator rights only to trusted users.
Connecting Work or School Accounts
If you use your Windows 11 PC for work or school, you might need to connect your work or school account. This allows you to access company resources, email, and apps.
Steps requiring admin privileges:
- Go to Settings > Accounts.
- Click on Access work or school.
- Click Connect.
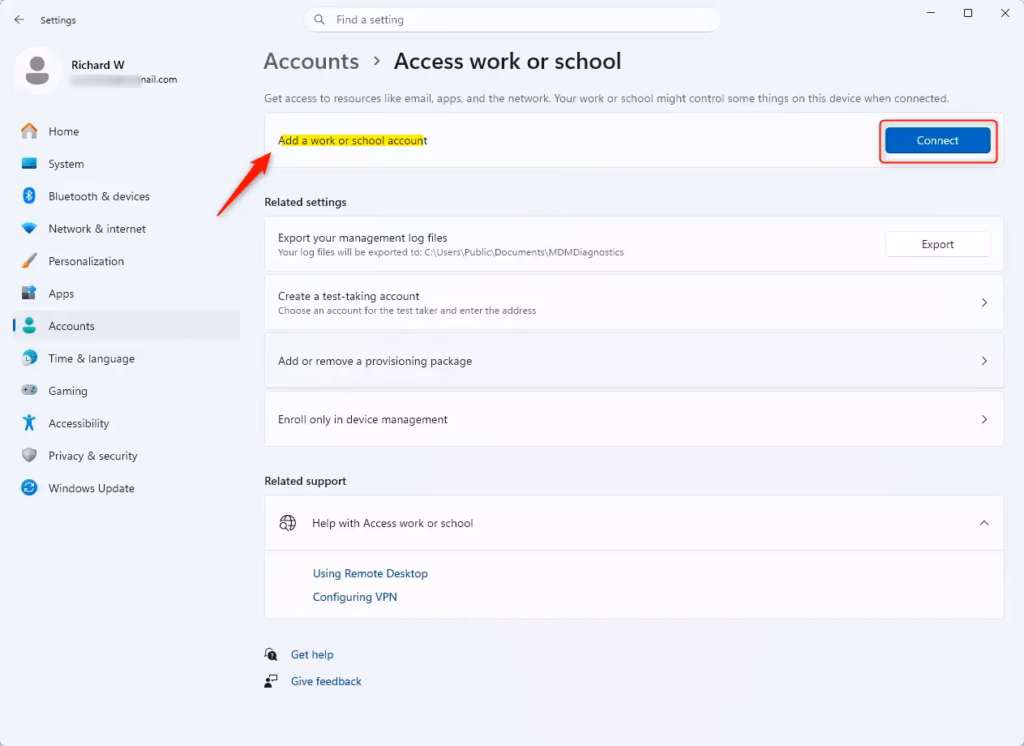
- You will be prompted to enter your work or school email address.
- Follow the on-screen instructions. This might involve signing into your organization’s portal or using a specific setup method provided by your IT department.
What happens when you connect a work or school account?
Your PC is now registered with your organization. You might be able to access shared drives, printers, and company applications. Your IT administrator may also be able to manage certain settings on your PC remotely.
Disconnecting a Work or School Account
If you no longer need to connect to your work or school network, you can disconnect the account.
Steps requiring admin privileges:
- Go to Settings > Accounts > Access work or school.
- Click on the account you want to disconnect.
- Click the Disconnect button.
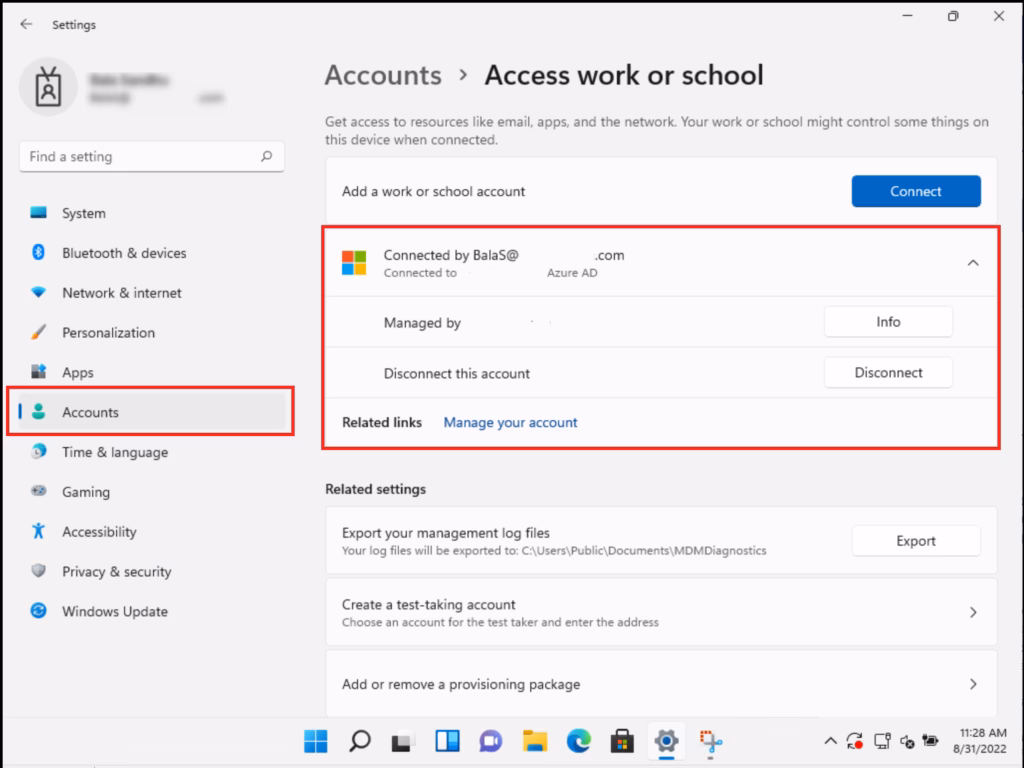
- Confirm that you want to disconnect.
- You may need to restart your computer for the changes to take full effect.
What happens when you disconnect?
Your PC will no longer be managed by your organization. You will lose access to any company resources that were available through that connection.
Summary
Understanding and managing user accounts in Windows 11 is key for keeping your computer private, secure, and organized. You can choose between Microsoft accounts that sync settings across devices or local accounts that are specific to one PC. Administrator accounts give full control, while standard accounts offer more security for everyday tasks. By knowing how to add, change, and remove accounts, and by using tools like User Account Control, you can create a safe and personalized experience for everyone using your computer. [Windows Security Features]
Was this guide helpful?

About the Author
Richard
Tech Writer, IT Professional
Richard, a writer for Geek Rewind, is a tech enthusiast who loves breaking down complex IT topics into simple, easy-to-understand ideas. With years of hands-on experience in system administration and enterprise IT operations, he’s developed a knack for offering practical tips and solutions. Richard aims to make technology more accessible and actionable. He's deeply committed to the Geek Rewind community, always ready to answer questions and engage in discussions.


No comments yet — be the first to share your thoughts!