How to Enable or Disable Built-in Administrator Account Lockout in Windows 11
This tutorial will show you how to enable or disable the Allow Administrator account lockout policy in Windows 11.
Why Account Lockout Matters
Someone who tries many wrong passwords might be a hacker trying to guess your password. Windows keeps track of failed login attempts. It can automatically lock an account to stop these attacks.
The Account Lockout Policy settings control when an account gets locked and what happens next.
Understanding the Settings
Account lockout threshold: This is how many wrong passwords allowed before the account locks. You can set it from 1 to 999 attempts. Setting it to 0 means the account never locks.
Account lockout duration: This is how many minutes the account stays locked before it unlocks automatically. An admin can also unlock it manually.
Reset account lockout counter after: This is how many minutes must pass before the failed login counter resets to zero.
Allow Administrator account lockout: This setting controls whether the built-in Administrator account can be locked.
The Security Trade-off
Limiting failed login attempts stops most hacking attempts. However, a bad actor could try to lock out everyone’s accounts at once. This is called a denial-of-service attack.
New Default Settings
Starting with Windows 11 build 22528, the defaults changed:
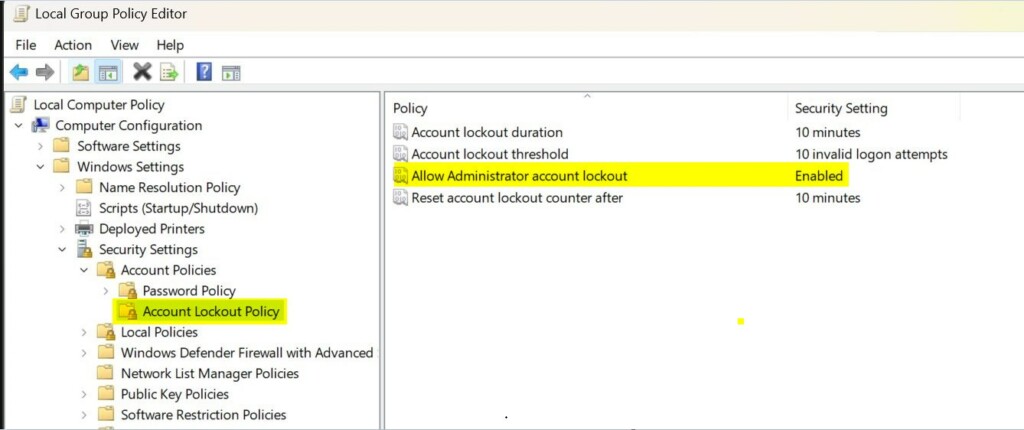
- Account lockout threshold: 10 failed attempts
- Account lockout duration: 10 minutes
- Allow Administrator account lockout: Enabled
- Reset account lockout counter after: 10 minutes
References:
Account Lockout Policy – Windows 10
Describes the Account Lockout Policy settings and links to information about each policy setting.
KB5020282—Account lockout available for built-in local administrators – Microsoft Support
Important Requirements
You need administrator access to change these settings. This feature is only available in Windows 11 Pro, Enterprise, and Education editions.
How to Enable or Disable Administrator Account Lockout
- [Admin Required] Open Local Security Policy. Press the Windows key and search for
secpol.msc, then press Enter. - In the left pane, click on Account Policies to expand it. Then click on Account Lockout Policy.
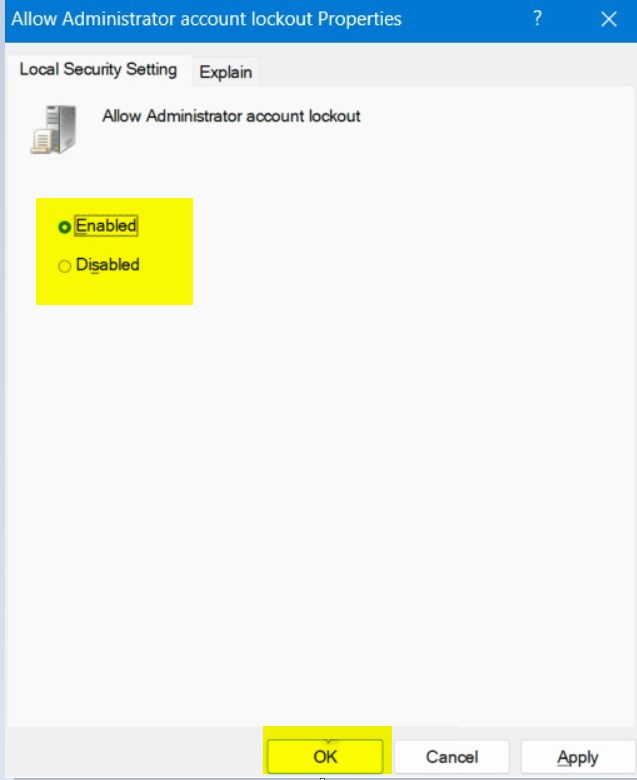
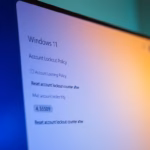
- In the right pane, double-click on Allow Administrator account lockout to open its settings.
- Note: The Account lockout threshold policy must be enabled first to change this setting.
- Select Enabled (the default) or Disabled for what you want. Then click OK.
- If you want, you can also change the Account lockout threshold, Account lockout duration, and Reset account lockout counter after settings.
- When you’re done, you can close the Local Security Policy window.
Summary
The Allow Administrator account lockout policy is a security feature that locks the Administrator account after too many failed login attempts. By default, Windows 11 now locks accounts after 10 wrong password attempts for 10 minutes. You can enable or disable this feature using Local Security Policy on Windows 11 Pro, Enterprise, or Education editions. You need administrator access to make these changes. This helps stop hackers from guessing passwords, but be careful because attackers could try to lock out all accounts at once.
Was this guide helpful?

About the Author
Richard
Tech Writer, IT Professional
Richard, a writer for Geek Rewind, is a tech enthusiast who loves breaking down complex IT topics into simple, easy-to-understand ideas. With years of hands-on experience in system administration and enterprise IT operations, he’s developed a knack for offering practical tips and solutions. Richard aims to make technology more accessible and actionable. He's deeply committed to the Geek Rewind community, always ready to answer questions and engage in discussions.
No comments yet — be the first to share your thoughts!