How to Turn On BitLocker to Protect a Data Drive in Windows 11

Want to keep your files safe on a data drive? This easy guide will help you turn on BitLocker encryption for a fixed data drive on your Windows 11 PC.
Open File Explorer, right-click the data drive you want to protect, and select “Turn on BitLocker.” Follow the prompts to choose how to unlock your drive and back up your recovery key.
What is BitLocker?
BitLocker in Windows 11 is a security feature that locks down your files, making them unreadable to anyone who doesn’t have permission. It’s like putting your important data in a locked box that only you can open. Turning on BitLocker for a data drive means any new files you save there will be automatically scrambled.
Why use BitLocker? Your files stay private and secure.
What happens when it’s on? Any new files you save to that drive get encrypted automatically. If you move files to a drive that isn’t encrypted, they will be unencrypted (normal) on that drive.
You can choose how to unlock your encrypted drive. You can unlock it automatically if your main Windows drive is encrypted. Or use a password. Or use a smart card.
Before You Start
- You need to be signed in as an Administrator on your PC. [ADMIN REQUIRED]
- BitLocker is only available on Windows 11 Pro, Enterprise, or Education editions.
Steps to Turn On BitLocker for a Data Drive
Step 1Set Your Preferred Encryption Method (Optional)
You can choose between two encryption types:
- XTS-AES 256 bit – the strongest option
- AES-CBC 128 bit – the default option
If you don’t want to set this now, BitLocker will use the default method.
Step 2Open File Explorer and Find Your Drive
Press Win + E to open File Explorer. Click on This PC. Find the fixed data drive you want to protect (like drive E:). Right-click it. Select Turn on BitLocker.

Step 3Choose How to Unlock Your Drive
You have three options:
- Password (must be at least 8 characters)
- Smart card (if you have one)
- Automatically unlock on this PC (only if your main Windows drive is encrypted)

Step 4Back Up Your BitLocker Recovery Key
You absolutely need to back up your BitLocker recovery key because it’s the only way to get back into your drive if you forget your password or if Windows has a problem. You can save it to your Microsoft account, a USB drive, as a file, or print it out. Make sure to keep this key somewhere very safe and separate from your computer.
- To your Microsoft account online (if you use one)
- To a USB flash drive
- As a file on your PC
- Print it on paper
Important: Keep this key somewhere safe!
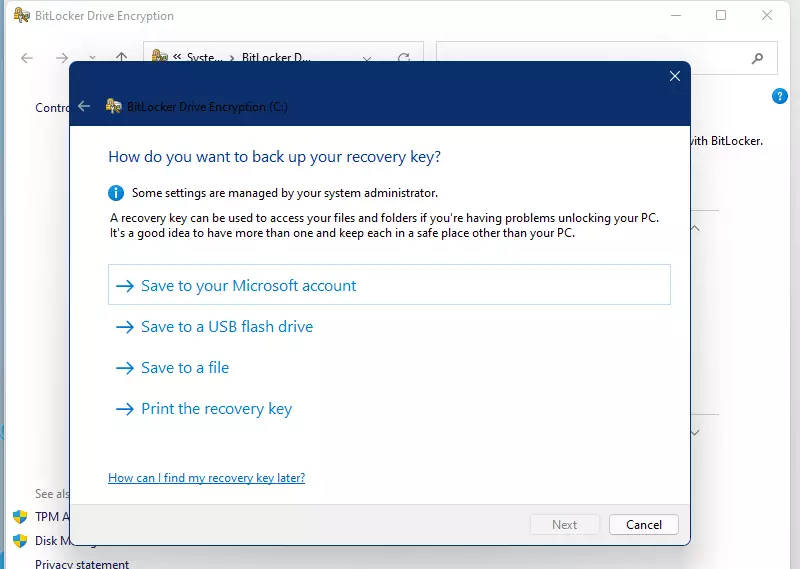
Click Next after backing up your recovery key.
Step 5Choose How Much of the Drive to Encrypt
You have two options:
- Encrypt used disk space only – faster, but only protects files you already have
- Encrypt entire drive – slower, but protects everything (recommended)
Then click Next.
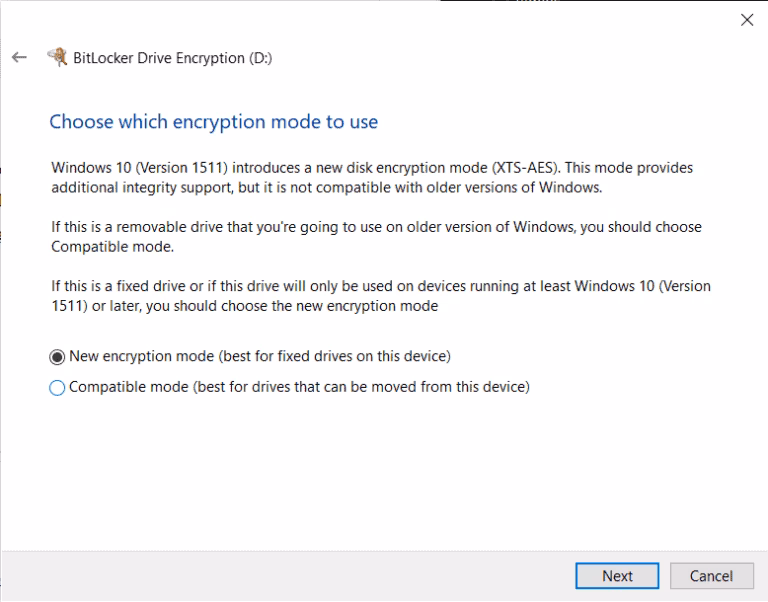
Step 6Pick the Encryption Mode
You have two options:
- New encryption mode (XTS-AES 128-bit) – for fixed drives used on Windows 10 or later
- Compatible mode (AES-CBC 128-bit) – for drives that will be used on older Windows versions
Then click Next.
Step 7Start the Encryption
Click Start encrypting to begin. The encryption process may take a while. It depends on your drive size.

Summary
- Strong Security: BitLocker keeps your data safe from unauthorized access.
- Automatic Protection: New files on the encrypted drive get protected automatically.
- Easy Unlock Options: Use password, smart card, or automatic unlock for convenience.
- Recovery Key Backup: Multiple ways to save your recovery key in case you need it.
- Choose Your Encryption: Pick encryption strength and mode that fits your needs.
- Compatibility: Make sure to select the right mode if you use older Windows versions.
- User Friendly: Simple steps make it easy even if you’re new to encryption.
BitLocker in Windows 11 offers strong security by scrambling your data so only you can access it. It automatically protects new files saved to your data drive. You have easy ways to unlock your drive, like a password, and multiple options to save your recovery key in case you need it later.
Was this guide helpful?

About the Author
Richard
Tech Writer, IT Professional
Richard, a writer for Geek Rewind, is a tech enthusiast who loves breaking down complex IT topics into simple, easy-to-understand ideas. With years of hands-on experience in system administration and enterprise IT operations, he’s developed a knack for offering practical tips and solutions. Richard aims to make technology more accessible and actionable. He's deeply committed to the Geek Rewind community, always ready to answer questions and engage in discussions.


No comments yet — be the first to share your thoughts!