How to Turn On or Off “Compatible Apps Always Control Lighting” in Windows 11
You can manage how your connected RGB accessories react to active or background applications by turning the “Compatible apps always control lighting” setting on or off in Windows 11.
Windows 11’s Dynamic Lighting feature synchronizes effects across compatible apps and devices, like LED keyboards and PC lighting. You can decide if only the app you’re actively using controls the lighting, or if any app running in the background can override your current experience.
This setting is available for users running Windows 11, version 22H2 or later.
Go to Settings > Personalization > Dynamic Lighting. Toggle the “Compatible apps in the foreground always control lighting” switch to On or Off. This setting determines if only the active app or any background app controls your device lighting.
What Does “Compatible Apps in the Foreground Always Control Lighting” Mean?
This setting means:
- On: The app you are currently using controls the lighting.
- Off: Other apps running in the background can also control the lighting, even if you’re using a different app.
How to Turn This Setting On or Off Using Windows Settings
You can easily turn the ‘Compatible apps always control lighting’ setting on or off in Windows 11 through the main Settings app, giving you quick control over how your apps manage your device’s lighting effects.
- Open the Settings app:
- Click the Start menu button and select Settings, or
- Press
Windows key + Ion your keyboard to open Settings quickly.
- Go to Personalization:
In the left menu, click Personalization.
- Select Dynamic Lighting:
Find and click the Dynamic Lighting tile on the right side.
- Toggle the setting:
Find the switch labeled “Compatible apps in the foreground always control lighting”.
Click the switch to turn it On or Off as you want.
- Close Settings:
When done, just close the Settings window.
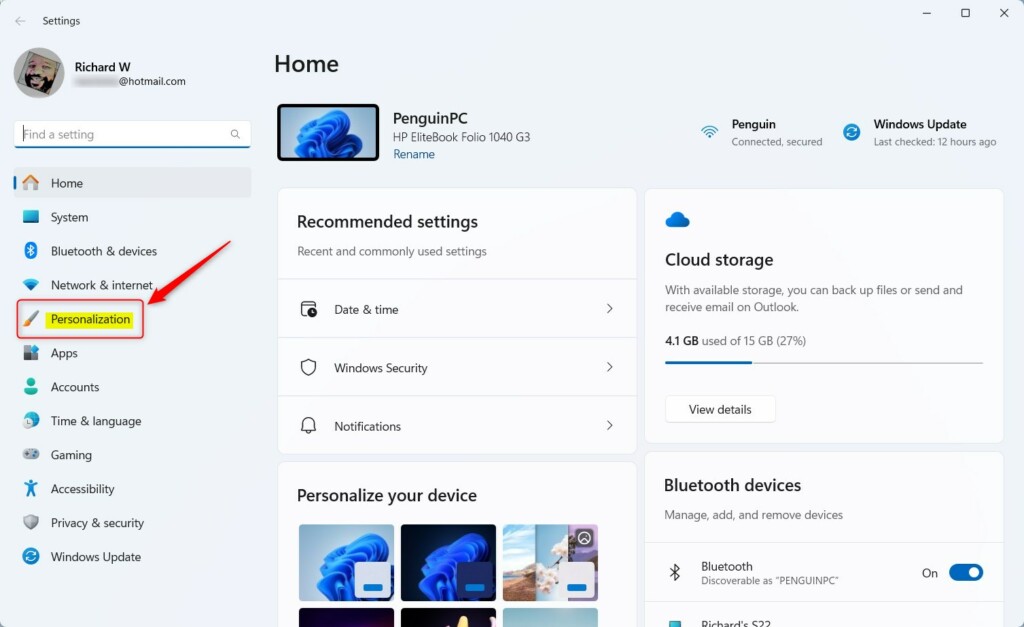
Click Personalization in Windows Settings
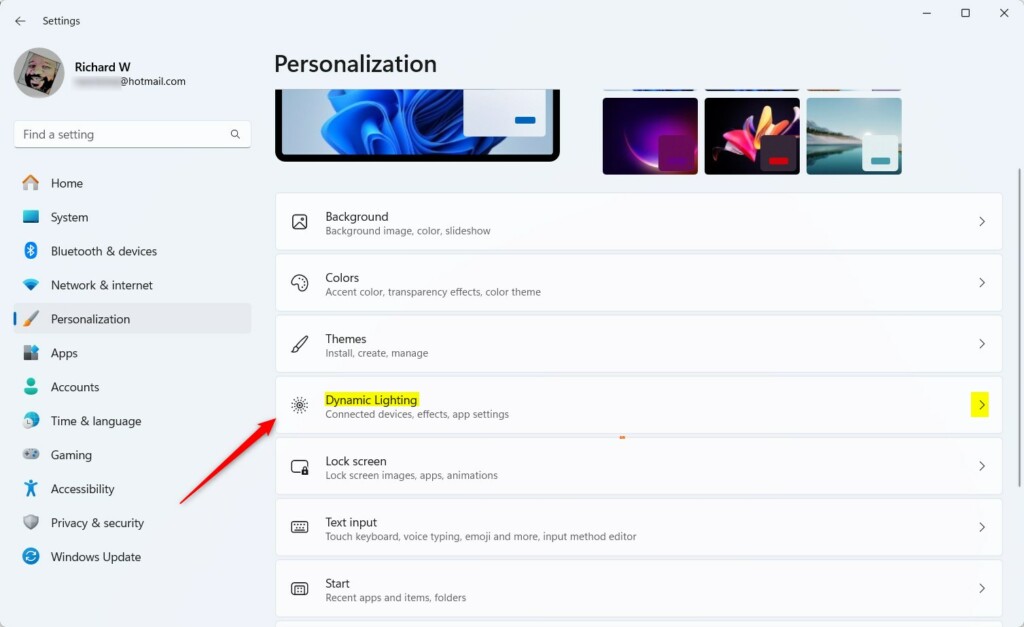
Select the Dynamic Lighting tile
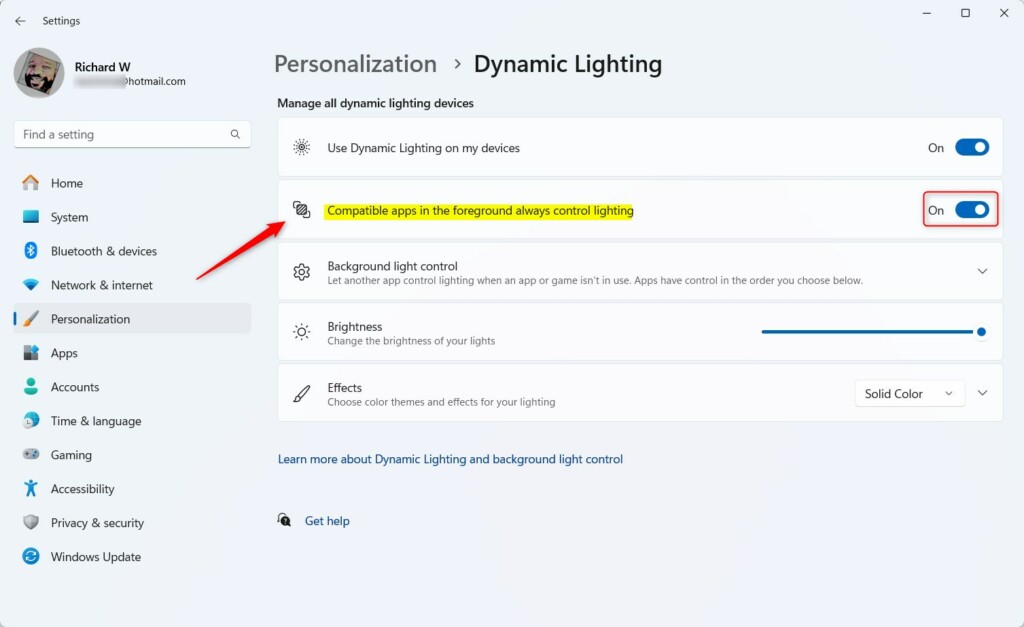
Toggle the setting On or Off
How to Change This Setting Using the Windows Registry (Advanced)
If you’re comfortable with advanced computer settings, you can change the ‘Compatible apps always control lighting’ option in Windows 11 using the Registry Editor, but be careful as mistakes can cause issues.
- Open the Registry Editor:⚠️ Admin privileges required
- Press
Windows key + R, typeregedit, and press Enter.
- Press
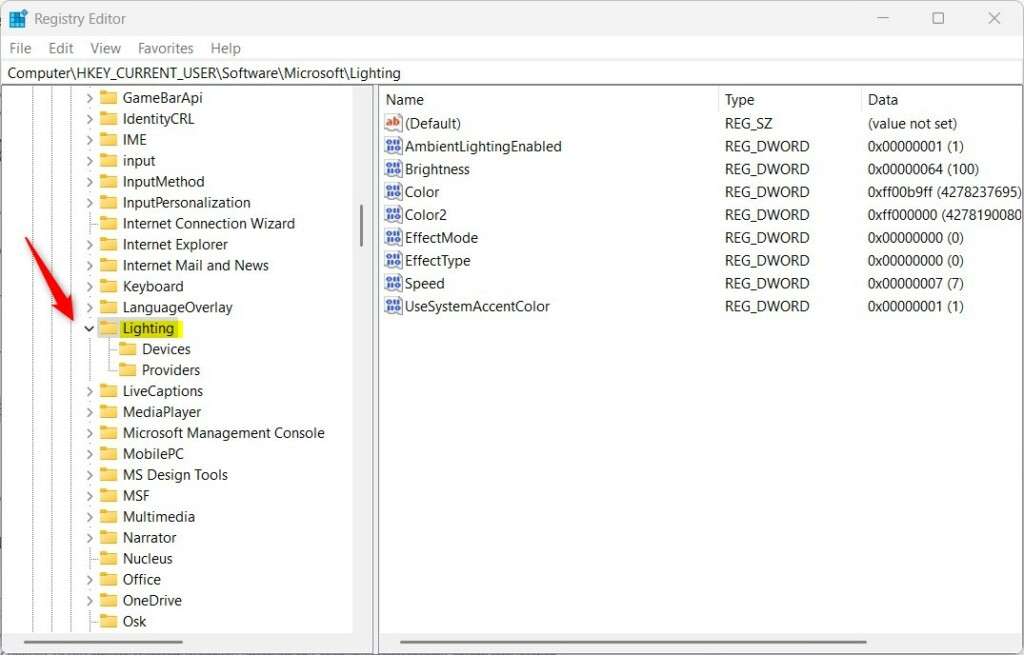
- Go to this folder (key):
HKEY_CURRENT_USER\Software\Microsoft\LightingIf you don’t see the Lighting folder, you can create it by right-clicking on Microsoft, choosing New > Key, and naming it Lighting.
- Create a new value:
Right-click on the right side of the Lighting folder and select New > DWORD (32-bit) Value.
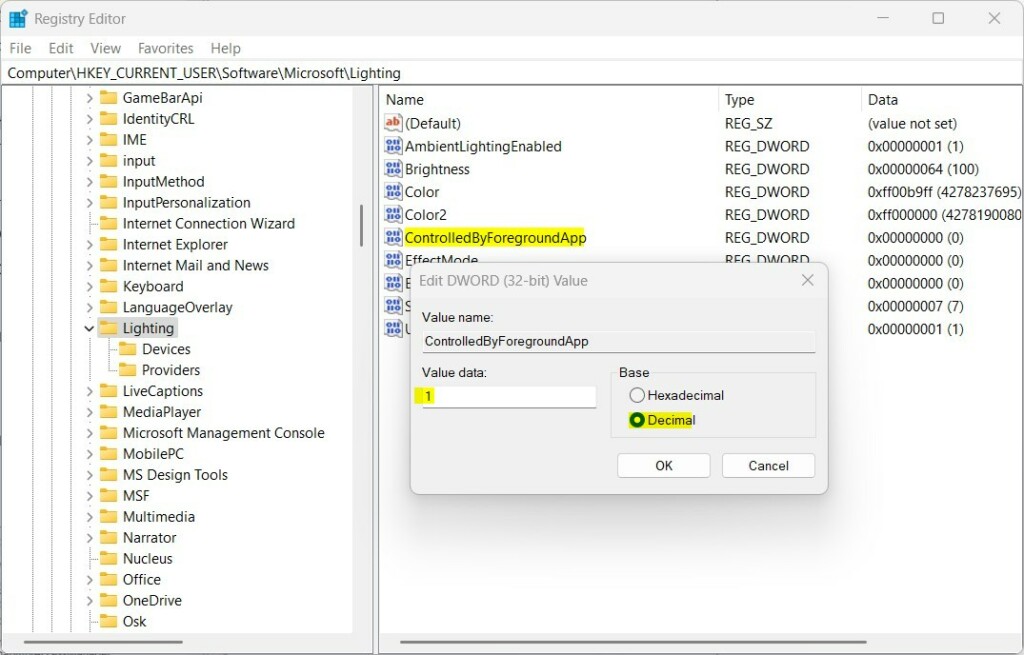
- Name the new value:
ControlledByForegroundApp - Set the value:
Double-click this new value and set the Base to Decimal.
Set the Value data to:
1to turn On (foreground apps control lighting)0to turn Off (background apps can control lighting)
- Apply the changes:
Click OK, close Registry Editor, and restart your PC to apply the changes.
Windows Registry Editor showing Lighting key
Set the value to 1 or 0
Need More Help?
For more info, you can check the official Microsoft support page about Dynamic Lighting.
If you run into problems or have questions, feel free to ask in the comments or search for help online.
Summary
This guide showed you how to control your Windows 11 dynamic lighting by managing the setting that lets apps control your lighting, which you can do through Settings or the Registry Editor.
You can accomplish this through Windows Settings or by using the Registry Editor if you’re comfortable with advanced settings.
Why this matters: This setting helps you manage which apps can alter your lighting effects, giving you more control over your PC’s appearance.
What happens: When you enable this setting, only the app you’re actively using will control your lighting. When you disable it, background apps can also change your lighting even while you’re using something else.
Remember to proceed with caution when using the Registry and always create a backup before making any changes.
How do I turn off dynamic lighting service in 🪟 Windows 11?
Step 1: Go to Windows Settings > Personalization > Dynamic Lighting. Step 2: Toggle off Use Dynamic Lighting on my devices.
How to fix dynamic lighting not working in 🪟 Windows 11?
If you’re not using the 23H2 version of Windows 11, you can update your Windows operating system. For that, go to Windows Update and click on “Check for updates.” If there are any updates available, install them.
Was this guide helpful?
100% of readers found this helpful (1 votes)

About the Author
Richard
Tech Writer, IT Professional
Richard, a writer for Geek Rewind, is a tech enthusiast who loves breaking down complex IT topics into simple, easy-to-understand ideas. With years of hands-on experience in system administration and enterprise IT operations, he’s developed a knack for offering practical tips and solutions. Richard aims to make technology more accessible and actionable. He's deeply committed to the Geek Rewind community, always ready to answer questions and engage in discussions.


No comments yet — be the first to share your thoughts!