How to Change the Font in the Handwriting Panel on Windows 11

You can change the font used by the Windows 11 Handwriting Panel to convert your handwritten input into typed text.
The Handwriting Panel in Windows 11 allows you to write directly on your screen with a pen or finger, and the system converts your writing into digital text.
By default, Windows 11 uses the Ink Free font for this conversion. However, you can customize this to use any font installed on your system, offering a personalized touch to your digital notes.
Changing this font is straightforward and can improve the appearance of text generated from your handwriting.
Change the font in Windows 11 Settings under Bluetooth & devices, then Pen & Windows Ink. Expand the Handwriting section and select your desired font from the dropdown. This updates the font used for converting your handwriting to text.
Method 1Change the Font Using Windows Settings
You can easily change the handwriting panel font in Windows 11 right through the main Settings app.
- Open the Settings app. You can click the Start menu button and choose Settings, or press Windows key + I on your keyboard.
- In Settings, click Bluetooth & devices on the left side menu.
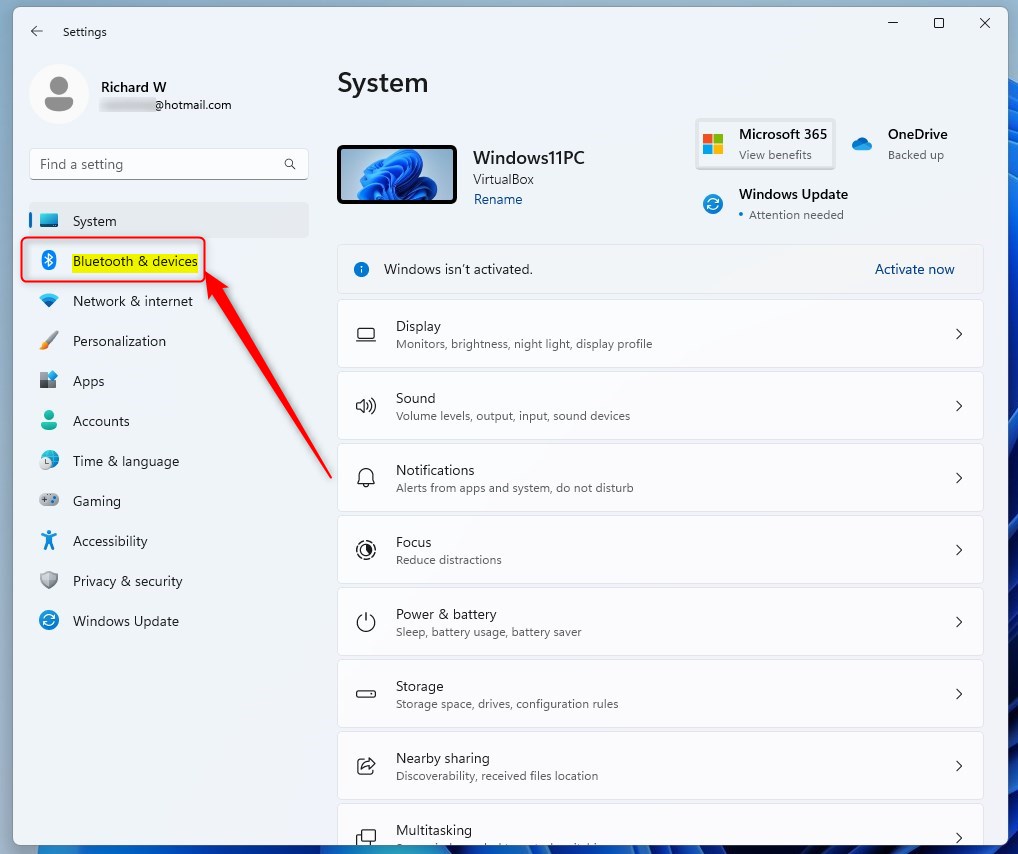
windows 11 bluetooth and devices - On the right side, find and click Pen & Windows Ink.
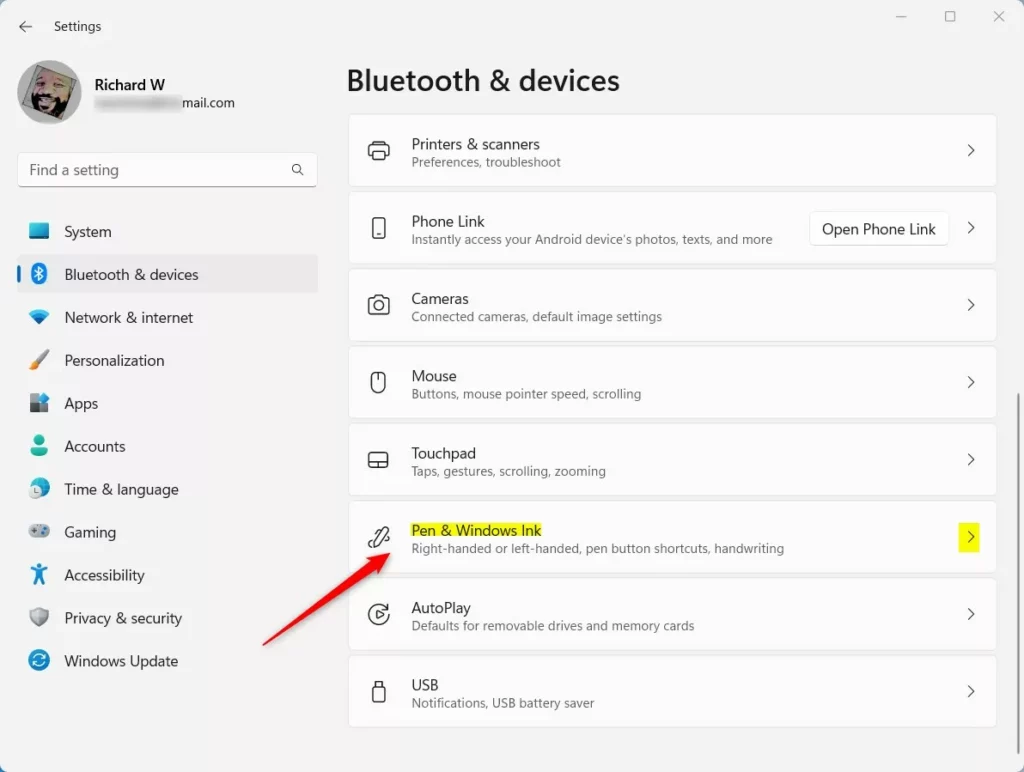
Windows pen and windows ink tile - Under the Handwriting section, click to expand the option called “Use your handwriting to enter text”.
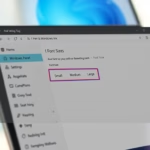
- Now, select the font you want Windows to use when converting your handwriting to text.
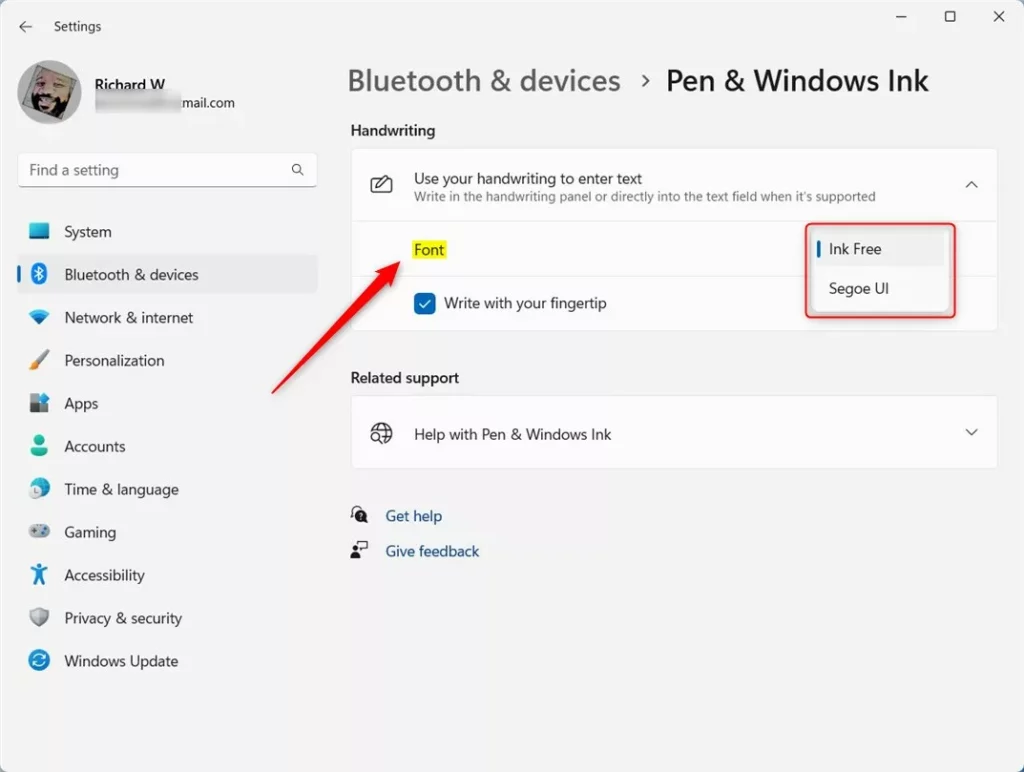
Choose handwriting font in Windows 11 Settings - Close the Settings app when you’re finished.
Method 2Change the Font Using Windows Registry Editor (Advanced)
For more advanced control over your handwriting panel font in Windows 11, you can use the Registry Editor, but be very careful.
Warning: Be careful when editing the registry. Making wrong changes can cause problems with your computer.
- [ADMIN PRIVILEGES REQUIRED] Open the Registry Editor. Press Windows key + R, type
regedit, and press Enter. - If prompted by User Account Control, click Yes to allow it.
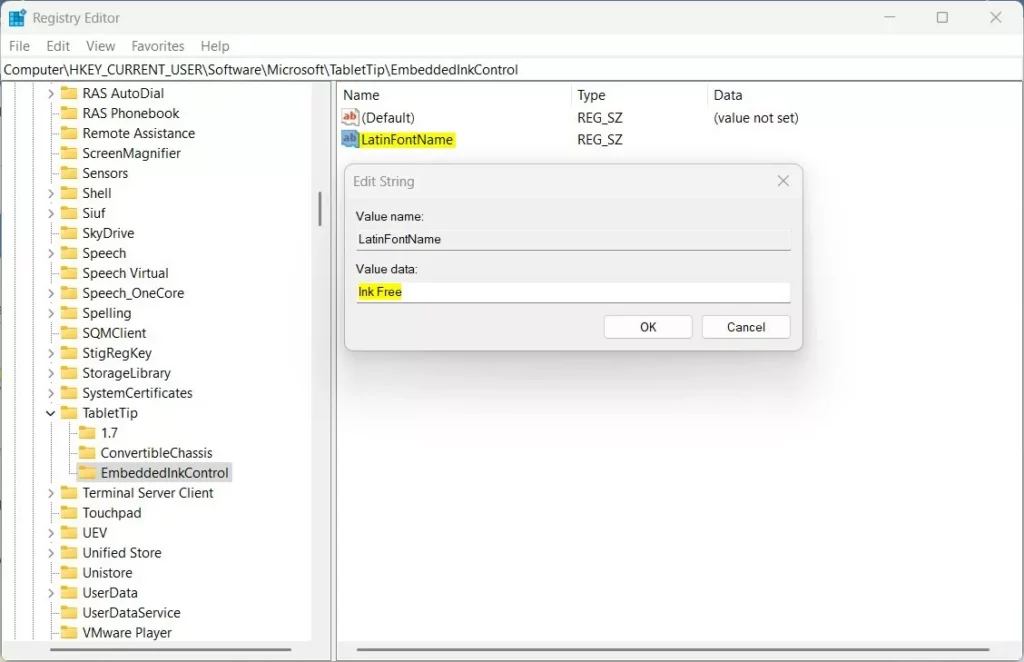
- In Registry Editor, go to this folder path:
HKEY_CURRENT_USER\Software\Microsoft\TabletTip\EmbeddedInkControl - If the EmbeddedInkControl folder (key) does not exist:
- Right-click on TabletTip, choose New > Key, and name it EmbeddedInkControl.
- Click on the EmbeddedInkControl folder. In the right pane, right-click and select New > String Value. Name this new string value: LatinFontName.
- Double-click LatinFontName and set the Value data to the name of the font you want to use. For example, type Arial, Calibri, or any font installed on your PC.
- Close the Registry Editor and restart your computer to apply the changes.
Where to Find Font Names
Windows fonts are stored in C:\Windows\Fonts. You can open this folder to see all fonts available on your computer. Use the exact font name when entering the value in the registry.
Summary
You’ve learned how to change the handwriting panel font in Windows 11 to make it fit your personal style better.
- The easiest way is through the Settings app under Bluetooth & devices > Pen & Windows Ink.
- If you want more control, you can edit the font using the Windows Registry Editor (advanced users only).
- Changing fonts helps personalize your device and can make handwriting recognition more comfortable for you.
- If you have questions or want to share your experience, feel free to leave a comment below!
How to enable handwriting panel in 🪟 Windows 11?
Handwriting panel Select Start and then select Settings > Devices > Pen & Windows Ink . In the Pen & Windows Ink window, under the Handwriting section, select Write in the handwriting panel with your fingertip.
How to enable shell handwriting?
On the right pane, choose Pen & Windows Ink. Under Handwriting, expand Handwriting panel settings and select the checkbox beside Write with your fingertip. Under Shell Handwriting, expand Use your handwriting to enter text and set the toggle to: On = Enables handwriting input into text fields.
Does 🪟 Windows 11 have a writing program?
After that here on the search option search for Notepad. Open the application. And here simply sign in with your Microsoft. Account now here on the notepad.
Was this guide helpful?

About the Author
Richard
Tech Writer, IT Professional
Richard, a writer for Geek Rewind, is a tech enthusiast who loves breaking down complex IT topics into simple, easy-to-understand ideas. With years of hands-on experience in system administration and enterprise IT operations, he’s developed a knack for offering practical tips and solutions. Richard aims to make technology more accessible and actionable. He's deeply committed to the Geek Rewind community, always ready to answer questions and engage in discussions.


No comments yet — be the first to share your thoughts!