Show or Hide Virtual Touchpad Icon on Taskbar in Windows 11

The virtual touchpad puts a software trackpad on your screen. You drag your finger on it to move the mouse pointer, much like a laptop touchpad. It is useful on Windows 11 tablets and touch-screen laptops, and it lets you control the cursor without plugging in an external mouse.
The taskbar icon is the shortcut that opens the touchpad. You can show or hide it whenever you like. Hide it to keep the taskbar tidy, or show it to keep touch controls one tap away. There are two ways to change it: the Settings app, which is the easy one, and the Registry.
To show or hide the virtual touchpad icon on the Windows 11 taskbar, open Settings , go to Personalization Taskbar, scroll to Taskbar corner icons, then toggle Virtual touchpad On or Off. The icon appears in the bottom right corner when enabled.
How to Show or Hide the Virtual Touchpad Icon on the Taskbar Using Settings
The Settings app is the simplest method and works the same on Windows 11 Home and Pro. The switch is in the taskbar settings, in the section for corner icons. When it is on, a small touchpad icon appears in the bottom right corner of the screen. Tap it and the on-screen touchpad opens.
- Open Settings : Press the Win+I. The Settings window opens.
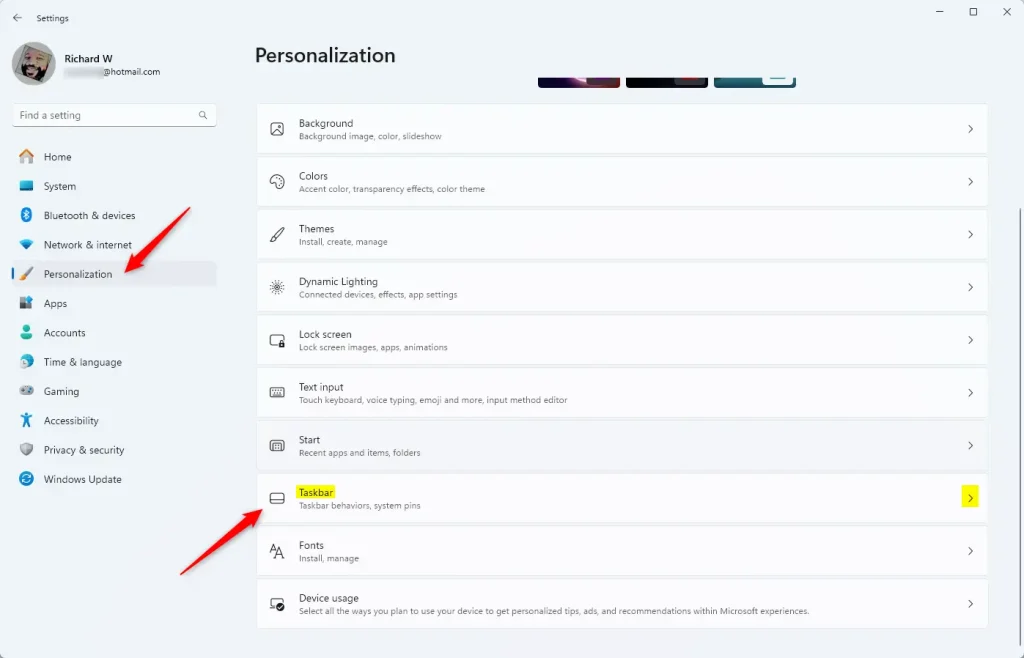
- Go to Personalization: In the left panel, click Personalization. The personalization options appear on the right.
- Open Taskbar settings: On the right, click Taskbar. You will see the taskbar items and behaviors.
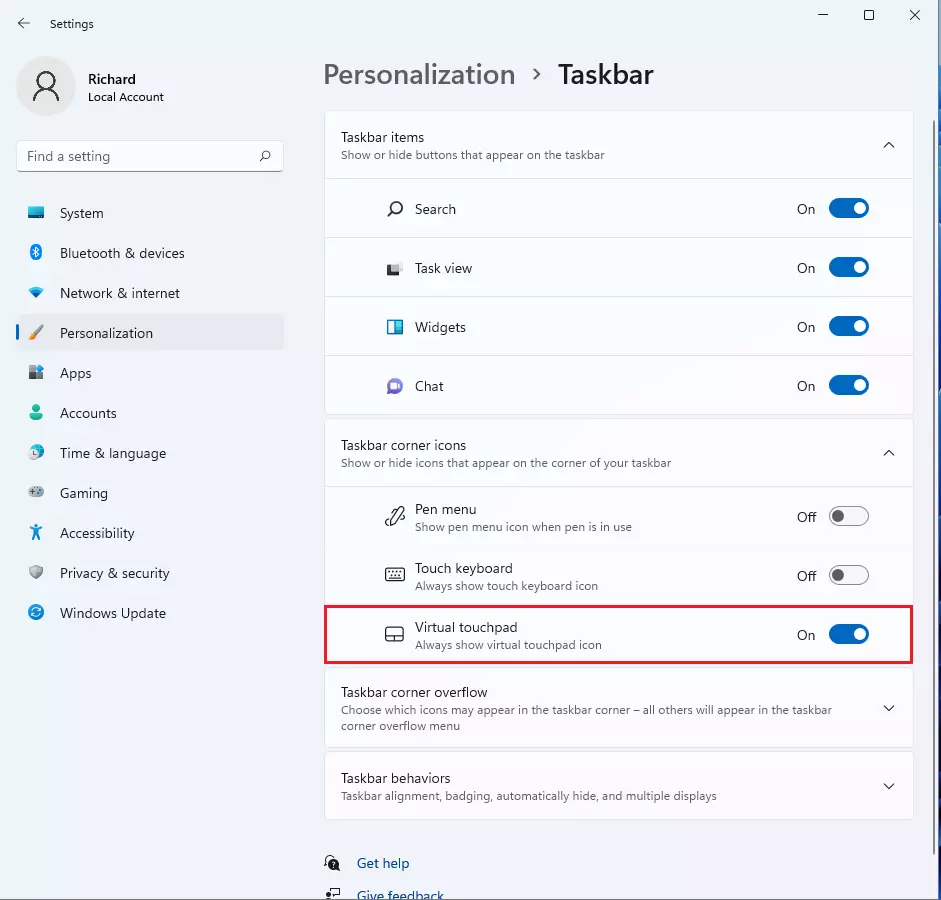
- Find the corner icons section: Scroll down to Taskbar corner icons. On some builds this section may be labeled differently, such as System tray icons.
- Switch the icon on or off: Find Virtual touchpad and click its switch. Set it to On to show the icon, or Off to hide it. The icon appears in or disappears from the bottom right corner of the taskbar .
If you can’t find the Virtual touchpad option, install the latest Windows updates and check again. Older builds may not list it in the same place. You can also reach the same page by right-clicking an empty area of the taskbar and choosing Taskbar settings.
Taskbar settings appear like this:
The toggle for Virtual touchpad looks like this:
The change applies immediately, so you don't need to restart. The icon updates as soon as you flip the switch, and you can close the Settings window afterward. To undo it, go back to the same page and flip the switch the other way.
How to Show or Hide the Virtual Touchpad Icon Using Registry (Advanced)
A wrong change can cause system problems, so back up the Registry before you edit anything. Then, if something goes wrong, you can restore it.
Setting it back to that value is how you undo the change.
To Show the Virtual Touchpad Icon:
reg add "HKEY_CURRENT_USER\Software\Microsoft\Touchpad" /v TouchpadDesiredVisibility /t REG_DWORD /d 1 /fTo Hide the Virtual Touchpad Icon (default setting):
reg add "HKEY_CURRENT_USER\Software\Microsoft\Touchpad" /v TouchpadDesiredVisibility /t REG_DWORD /d 0 /fRegistry changes don't always show up straight away. Sign out and sign back in, or restart the PC, to apply the change. After that, check the bottom right corner of the taskbar to confirm the icon is shown or hidden as you intended.
More Information
Microsoft provides full documentation on enabling or disabling the virtual touchpad at: Enable and disable the virtual touchpad - Microsoft Support
Summary
You can show or hide the taskbar virtual touchpad icon through either Settings or the Registry. Settings suits most people: it takes a few clicks, applies immediately and is easy to reverse. The Registry method takes more care and administrator rights, so use it only if you are comfortable making advanced system changes. Pick whichever fits how you work.
Was this guide helpful?

About the Author
Richard
Tech Writer, IT Professional
Richard is a writer at Geek Rewind who turns complex IT tasks into clear, step-by-step guides. He draws on years of hands-on experience in system administration and enterprise IT operations, focusing on Windows, Linux and WordPress: the problems people actually run into, and the fixes that work. His server and WordPress guides come from systems he runs himself. Richard builds and maintains the platform behind Geek Rewind, from its Ubuntu servers and Nginx configuration to its custom WordPress plugins. Many new tutorials start with readers' questions, and he's always glad to answer them in the comments.



No comments yet — be the first to share your thoughts!