How to Enable or Disable the Lock Screen in Windows 11
You enable or disable the Windows 11 lock screen by adjusting specific settings in the Registry Editor or Group Policy Editor.
The lock screen is the initial view you encounter when starting your PC or locking it with ⊞ Win+L, preceding the sign-in screen where you enter your password or PIN.
Disabling it bypasses this intermediate step, taking you directly to the sign-in prompt. For instance, you can choose to disable the Windows 11 lock screen to streamline your login process.
Remember, you need administrator privileges to make these changes. This tweak is particularly useful if you find the lock screen an unnecessary step.
Disable the lock screen via the Local Group Policy Editor or Registry Editor. For Group Policy, navigate to Computer Configuration > Administrative Templates > Control Panel > Personalization and enable “Do not display the lock screen.” In the Registry Editor, modify the AllowLockScreen value.
What Does the Lock Screen Look Like?
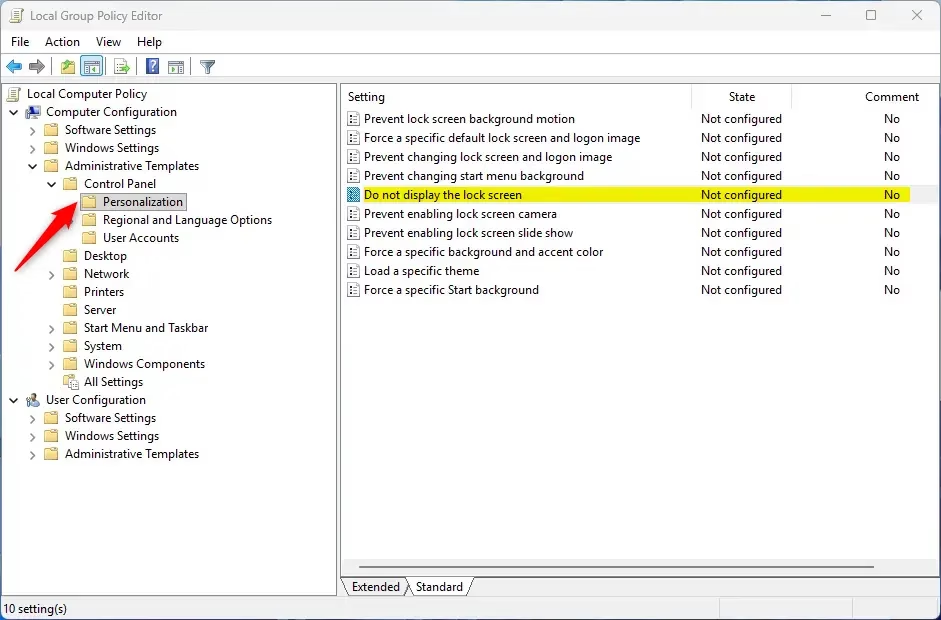
Option 1Turn On or Off Lock Screen Using Local Group Policy Editor
You can turn the Windows 11 lock screen on or off using the Local Group Policy Editor if you have Windows 11 Pro, Enterprise, or Education.
- Open Local Group Policy Editor: Press ⊞ Win+R, type
gpedit.msc, and press Enter. In the window that opens, go to: Computer Configuration > Administrative Templates > Control Panel > Personalization
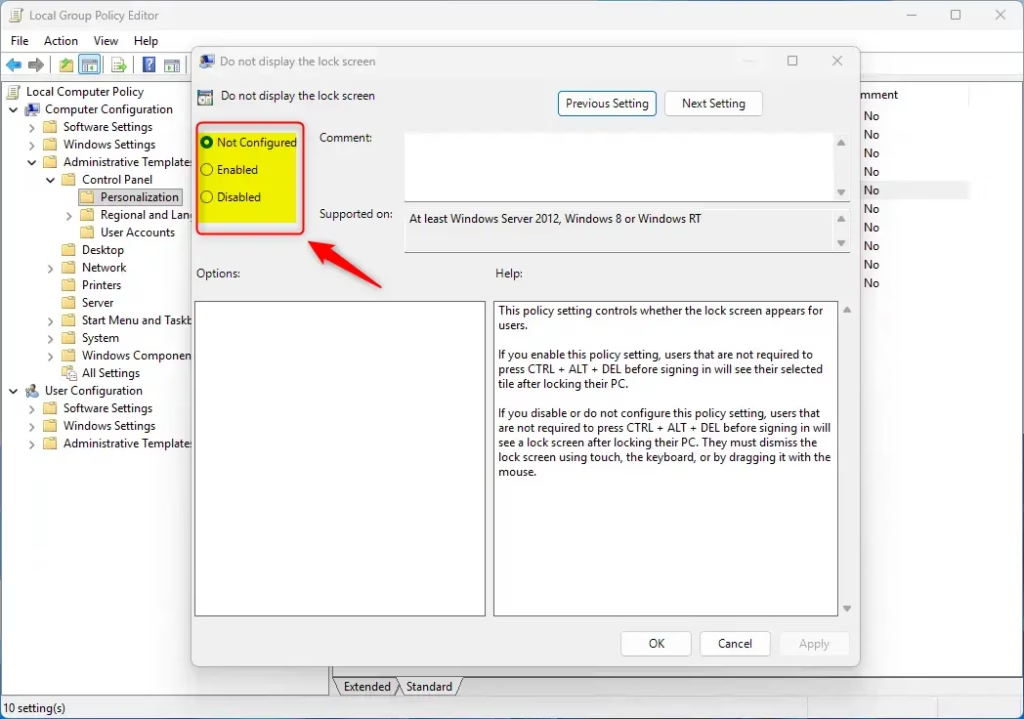
On the right side, find and double-click “Do not display the lock screen”.
To turn ON the lock screen (default): Select Not Configured, then click OK.
To turn OFF the lock screen: Select Enabled, then click OK.
You can now close the Local Group Policy Editor.
Option 2Turn On or Off Lock Screen Using Registry Editor
Warning: Be careful when editing the registry. It’s a good idea to back up your registry before making changes.
Open the Terminal app on your device as administrator. Then run the command below to turn the lock screen on or off in Windows 11.
How to Turn On the Lock Screen (default)
reg add "HKEY_LOCAL_MACHINE\SOFTWARE\Microsoft\Windows\CurrentVersion\Authentication\LogonUI\SessionData" /v AllowLockScreen /t REG_DWORD /d 1 /f
reg delete "HKEY_LOCAL_MACHINE\SOFTWARE\Policies\Microsoft\Windows\Personalization" /v NoLockScreen /f
How to Turn Off the Lock Screen
reg add "HKEY_LOCAL_MACHINE\SOFTWARE\Policies\Microsoft\Windows\Personalization" /v NoLockScreen /t REG_DWORD /d 1 /fSummary
- You can turn the lock screen on or off for all users using either the Local Group Policy Editor or the Registry Editor.
- The Local Group Policy Editor is only available on Windows 11 Pro, Enterprise, and Education editions.
- You need administrator rights to change these settings. %📂%SC0%%
- If secure sign-in (Ctrl+Alt+Del) is enabled, you cannot disable the lock screen.
- Changes affect all users on the computer.
You can change your Windows 11 lock screen settings to be on or off for everyone using either the Local Group Policy Editor or the Registry Editor.
How do I change the Lock screen settings in 🪟 Windows 11?
Type and search [Lock screen settings] in the Windows search bar①, and then click [Open]②. In Lock screen, you can select the background as Windows spotlight, Picture, or create a Slideshow of pictures③.
Was this guide helpful?

About the Author
Richard
Tech Writer, IT Professional
Richard, a writer for Geek Rewind, is a tech enthusiast who loves breaking down complex IT topics into simple, easy-to-understand ideas. With years of hands-on experience in system administration and enterprise IT operations, he’s developed a knack for offering practical tips and solutions. Richard aims to make technology more accessible and actionable. He's deeply committed to the Geek Rewind community, always ready to answer questions and engage in discussions.


No comments yet — be the first to share your thoughts!