How to Enable or Disable the sudo Command in Windows 11
You can enable or disable the sudo command in Windows 11 to run commands with elevated privileges.
The sudo command, familiar to Linux and macOS users, allows you to execute commands as an administrator directly from your command line interface.
Microsoft introduced sudo to Windows 11 starting with Insider Build 26052 (Canary), providing a convenient way to perform administrative tasks without explicitly opening an elevated Command Prompt or PowerShell window.
What Are the Different Ways sudo Can Work?
- In a new window: This opens a new window to run the command with administrator rights.
- With input disabled: The command runs in the same window but doesn’t accept input while running.
- Inline: The command runs in the same window and accepts input, like on Linux or Mac.
Using sudo in Windows makes it easier and faster to do tasks that need administrator permissions without switching users.
How to Enable sudo Using Windows Settings
Enable sudo in Windows 11 through Settings by opening the Settings app via Start menu or Windows key + I, navigating to System > For Developers, and toggling the Enable sudo switch to On, where you can also select your preferred operational mode.
- Open the Settings app. You can do this by:
- Clicking the Start button and then Settings, or
- Pressing Windows key + I on your keyboard.
- In Settings, click on System on the left side.
- On the right side, find and click For Developers.

- Find the option for Enable sudo and turn the switch to On to enable it .
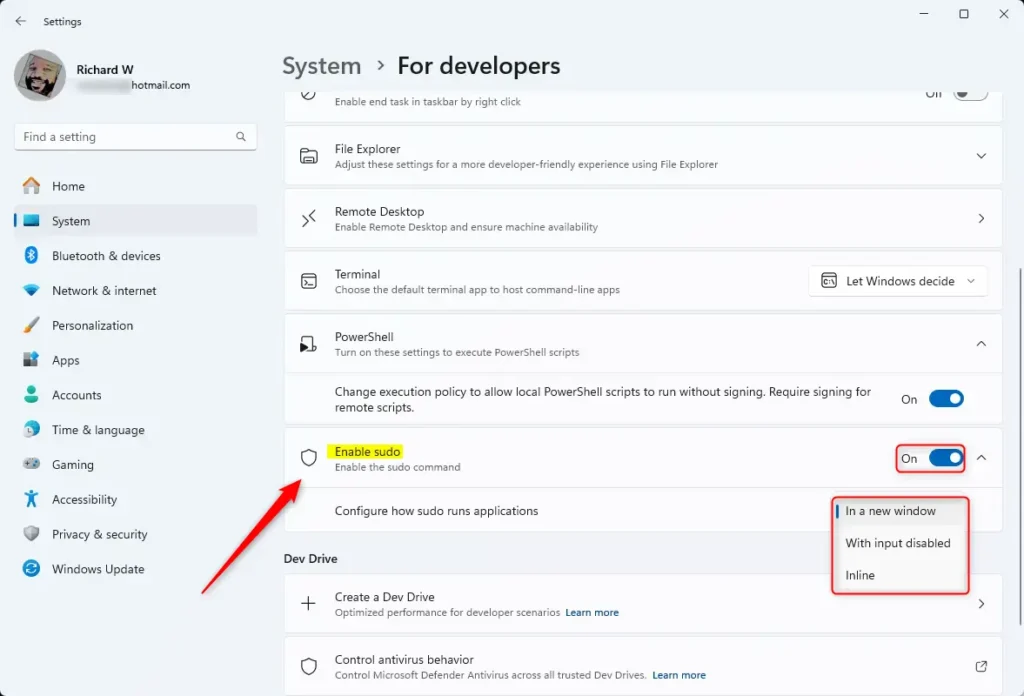
You can also pick how you want sudo to work by selecting one of the three modes from the dropdown:
- In a new window
- With input disabled
- Inline
- To turn off sudo, just switch the toggle to Off.
How to Enable or Disable sudo Using Windows Terminal (Command Prompt)
You can also turn on or off sudo by typing commands in the Windows Terminal app:
Enable sudo in “In a new window” mode:
sudo config --enable forceNewWindowEnable sudo in “With input disabled” mode:
sudo config --enable disableInputEnable sudo in “Inline” mode:
sudo config --enable normalDisable sudo command:
sudo config --enable disableEnable or Disable sudo Using Windows Registry Editor
If you are comfortable using the Registry Editor, you can also change sudo settings there. %📂%SC0%%
- Open the Registry Editor.
- Go to this folder path:
Computer\HKEY_LOCAL_MACHINE\SOFTWARE\Microsoft\Windows\CurrentVersion\Sudo - Look for a value named Enabled on the right side. Double-click it to change its number.
- Use these numbers to choose a mode:
- 1 – “In a new window” mode
- 2 – “With input disabled” mode
- 3 – “Inline” mode
- 0 – Disable sudo
- If you don’t see Enabled, right-click on a blank space, choose New → DWORD (32-bit) Value, name it Enabled, and set its value to one of the numbers above.

- After making changes in Registry, restart your computer for them to take effect.

Summary
Turning on sudo in Windows 11 helps you run commands as admin easily from the command line. This makes your work faster and helps keep your computer safer by not needing to log in as an administrator all the time. For more details, you can visit the official Microsoft blog.
Frequently Asked Questions
What Are the Different Ways sudo Can Work?
Was this guide helpful?

About the Author
Richard
Tech Writer, IT Professional
Richard, a writer for Geek Rewind, is a tech enthusiast who loves breaking down complex IT topics into simple, easy-to-understand ideas. With years of hands-on experience in system administration and enterprise IT operations, he’s developed a knack for offering practical tips and solutions. Richard aims to make technology more accessible and actionable. He's deeply committed to the Geek Rewind community, always ready to answer questions and engage in discussions.


No comments yet — be the first to share your thoughts!