How to Find your Lost Windows 11 Device

You can find your lost Windows 11 device using the built-in ‘Find my device’ feature.
This tool helps you locate your PC from afar, showing its last known spot on a map. It’s a crucial security feature, designed to give you peace of mind if your laptop or desktop goes missing.
Windows 11’s ‘Find my device’ capability requires you to enable it before your device is lost. Once activated, it uses your Microsoft account to track your PC. You can even lock your device remotely to protect your personal files.
Use the “Find my device” setting in Windows 11’s Privacy & Security menu. Ensure you are signed in with a Microsoft account and have administrator privileges. This feature allows you to remotely locate your PC on a map.
Get Your Device Ready for Tracking
Your Windows device needs the ‘Find my device’ setting turned on before you can track it if it gets lost.
Step 1Make Sure You Use a Microsoft Account
You must use a Microsoft account to find your device because the ‘Find my device’ feature links your computer to that account.
- Action: Check your account type.
Explanation: Go to Start > Settings. Under Accounts, click Your info. If you see an option to “Switch to a Microsoft account,” you are using a local account. If it shows your Microsoft account email, you are all set. - Action: Switch to a Microsoft account if needed.
Explanation: If you need to switch, follow the steps in Settings > Accounts > Your info. You will need to enter your Microsoft account email and password. You can create a new Microsoft account if you don’t have one.
Tip: Using a Microsoft account also helps you sync your settings and preferences across different devices. It makes using services like OneDrive more convenient.
Step 2Turn On “Find my device”
You need to turn on the ‘Find my device’ setting in Windows 11 after logging in with your Microsoft account to track your PC.
- Action: Open the Find my device settings.
Explanation: This is a little different for Windows 10 and Windows 11.
- For Windows 11: Go to Start > Settings > Privacy & Security > Find my device.
- For Windows 10: Go to Start > Settings > Update & Security > Find my device.
- Action: Turn the setting to “On”.
Explanation: You will see a switch or button that says “Find my device.” Make sure it is set to “On.” If it’s already on, you do not need to do anything else here.
Warning: For ‘Find my device’ to function, your device must be powered on, connected to the internet (via Wi-Fi or Ethernet), and have sufficient battery to transmit its location. If your laptop is dead or offline, you won’t be able to track it.
Tip: Even if other users on your device have disabled location services for their apps, ‘Find my device’ can still operate. This is because it utilizes location services for the entire system. However, those using the device will be notified when ‘Find my device’ is actively trying to locate it.
Step 3Be an Administrator
You need to be an administrator on your Windows device to use the ‘Find my device’ feature for tracking.
- Action: Check your account permissions.
Explanation: On the Windows device you want to track, go to Start > Settings > Accounts > Your info. Look under your account name. It will say if you are an “Administrator” or a “Standard user.”
Tip: If you don’t have administrator rights, you’ll need to ask the person who manages the device (like your IT department at work or the primary account holder at home) to turn on ‘Find my device’ for you or grant you administrator access.
Important Note: ‘Find my device’ doesn’t work for work or school accounts. It also doesn’t apply to non-Windows devices like iPhones, Android phones, or Xbox consoles. For those, you’ll need to use their specific tracking services (like Find My iPhone or Google Find My Device).
Find Your Missing Windows Device
So, the worst has happened – your device is missing. Don’t panic! If you’ve set up ‘Find my device’ correctly, you can try to locate it. You do this remotely from another device, like a different computer, a tablet, or your smartphone.
Step 4Go to the Microsoft Devices Website
You can find your lost Windows device by going to the Microsoft Devices website online using your web browser.
- Action: Open a web browser and go to the Microsoft devices page.
Explanation: Type this address into your browser’s address bar and press Enter:
https://account.microsoft.com/devices - Action: Log in with your Microsoft account.
Explanation: Use the exact same Microsoft account email and password that you use on the Windows device you are trying to find. This is very important for the system to know your device.
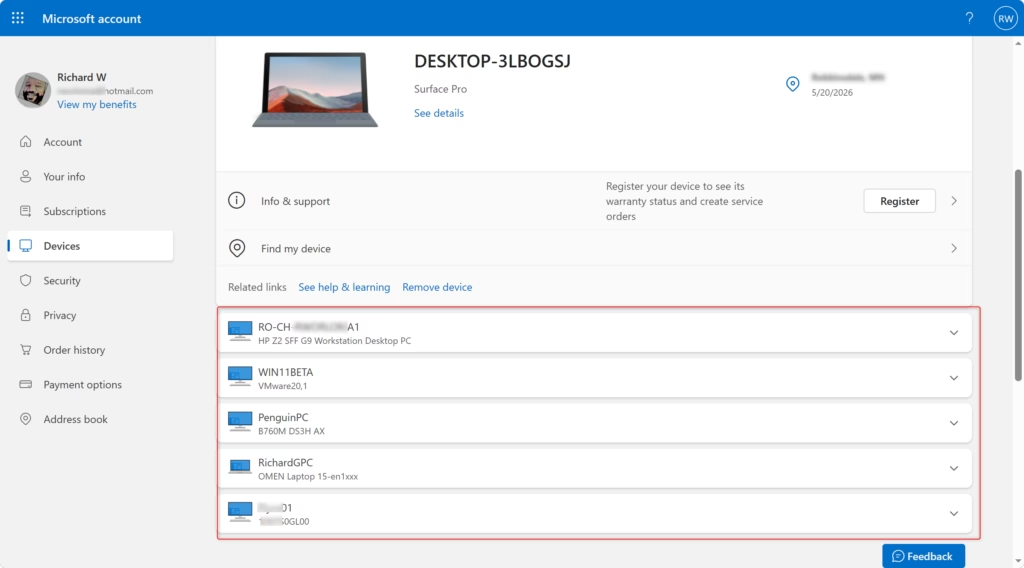
Tip: If you’ve forgotten your Microsoft account password, use the ‘Forgot my password’ link on the login page. You might need access to a recovery email or phone number associated with your account.
Step 5Find Your Device on the Map
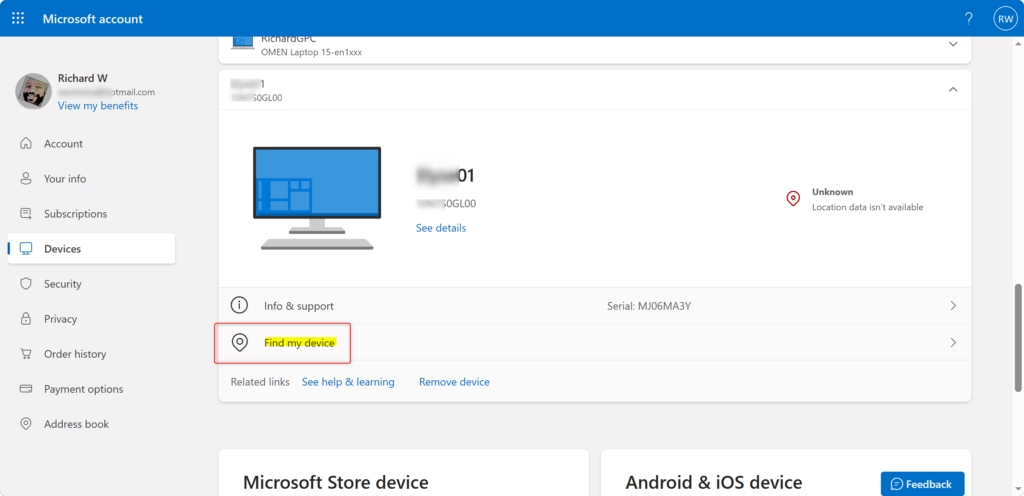
After logging into the Microsoft Devices website, you can find your lost Windows device on a map by selecting it from your list of devices.
- Action: Select the “Find my device” tab.
Explanation: Look for a tab or section called “Find my device” or something similar. Click on it.
- Action: Choose the device you want to find.
Explanation: From the list of your devices, select the one that is missing. It might be named something like “My Laptop” or “Desktop PC.”
- Action: Click “Find”.
Explanation: After choosing your device, you should see a button that says “Find.” Click this button.
- Explanation: The website will try to find your device and show its current or last known location on a map. This might take a few minutes.
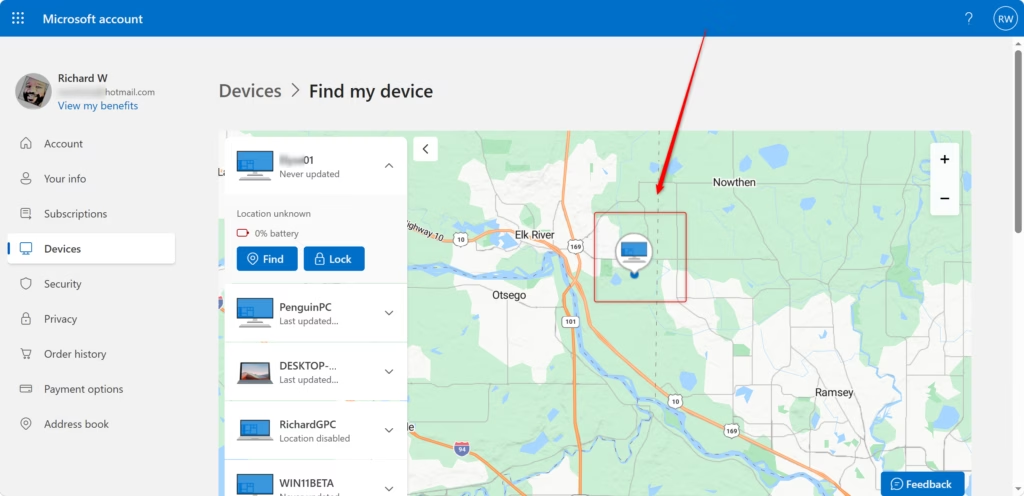
Warning: The location displayed indicates where the device last reported its position when it was online and had location services enabled. If the device is now offline, powered down, or has had its location services deactivated, you might see an outdated location or no location information at all.
Tip: If you share a computer and aren’t certain whether you’re an administrator, you can verify by navigating to Start > Settings > Accounts > Your info on that specific device.
Reference:
https://support.microsoft.com/en-us/accounts-billing/security/find-and-lock-a-windows-device
Summary
To find your lost Windows 11 device, make sure you’re using a Microsoft account and have ‘Find my device’ turned on in settings, then go to the Microsoft Devices website to locate it.
How do I use Find My Device on 🪟 Windows 11?
You use ‘Find My Device’ on Windows 11 by first making sure it’s turned on in your settings, then logging into your Microsoft account on another device to see your PC’s location on a map.
Should I enable Find My Device in 🪟 Windows 11?
Yes, you should enable Find My Device in Windows 11. This built-in feature allows you to locate your lost or stolen PC remotely by showing its last known location on a map. It's a crucial security measure that provides peace of mind and helps protect your personal data.
How do I find my device info on 🪟 Windows 11?
To find your device info on Windows 11, go to Settings > System > About. Here you'll see details like your device name, processor, installed RAM, and system type. For specific hardware details, you can also use the System Information tool by searching for 'msinfo32' in the Start menu.
How do I find devices in 🪟 Windows 11?
To find devices connected to your Windows 11 PC, go to Settings > Bluetooth & devices > Devices. This lists paired Bluetooth devices and other connected hardware. If you're looking for a lost Windows 11 device, use the 'Find my device' feature by logging into your Microsoft account online.
Was this guide helpful?

About the Author
Richard
Tech Writer, IT Professional
Richard, a writer for Geek Rewind, is a tech enthusiast who loves breaking down complex IT topics into simple, easy-to-understand ideas. With years of hands-on experience in system administration and enterprise IT operations, he’s developed a knack for offering practical tips and solutions. Richard aims to make technology more accessible and actionable. He's deeply committed to the Geek Rewind community, always ready to answer questions and engage in discussions.



No comments yet — be the first to share your thoughts!