How to Rename Bluetooth Devices in Windows 11
Want to make your Bluetooth devices easier to spot in Windows 11? Renaming them is a great way to do that.
Bluetooth is a wireless technology that connects your PC to devices like headphones, keyboards, and speakers, no cables needed. Once paired, these devices let you play audio or transfer data.
Often, a Bluetooth device might show up with a generic or confusing name in Windows 11’s settings. Giving it a custom name, like “My Awesome Headphones” instead of “WH-1000XM4,” makes managing multiple devices much simpler, especially if you have several that look alike.
Open Control Panel, go to Devices and Printers, right-click your Bluetooth device, select Properties, and type the new name in the Bluetooth tab. Click OK to save the change.
Why rename your Bluetooth devices?
- Makes it easier to find and connect to the right device.
- Helps you tell apart devices if you have several similar ones.
- Keeps your Bluetooth devices organized and easy to manage.
Steps to rename a Bluetooth device in 🪟 Windows 11
Follow these steps to rename your Bluetooth device:
Step 1Open the Devices and Printers window
- Click the Start button or press the Windows key on your keyboard.
- Type
Control Paneland open it. - In Control Panel, select Devices and Printers. (If you want detailed help opening Devices and Printers, click here.)
Step 2Find your Bluetooth device
- Look for the device you want to rename in the list.
- Right-click on the device icon and choose Properties.
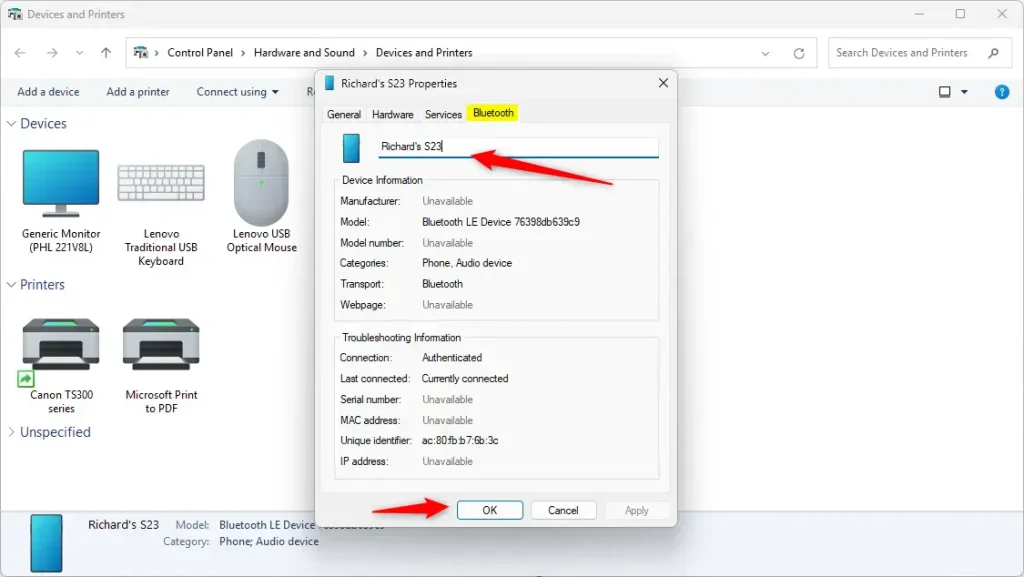
Step 3Rename your device
- In the Properties window, click the Bluetooth tab.
- You will see a box with the device’s current name.
- Click inside the box, delete the old name, and type the new name you want.
- Click OK to save your changes.
Renaming your Bluetooth device in Windows 11 is simple once you find the right spot in the device’s properties.
Renaming your Bluetooth device in Windows 11 is simple once you find the right spot in the device’s properties.
Tip: To make sure the new name shows up right away, disconnect and reconnect your Bluetooth device. If needed, you can also restart your PC.
Summary
Renaming your Bluetooth devices makes them much easier to spot. This is a lifesaver if you have a lot of similar-looking devices. With these steps in Windows 11, you’ll have your devices renamed in no time. If you have questions or need help, feel free to ask!
How to rename Bluetooth device name in 🪟 Windows 11?
In Windows 11, right-click the device you want to rename, then click Properties. You can then rename the Bluetooth device. Click Apply and OK. Disconnect and reconnect the Bluetooth device to refresh the name.
How do I change the default name of a Bluetooth device?
From there, you can choose the device name and type any name that suits you. Then, click the save button, and your device name will be saved.
Was this guide helpful?

About the Author
Richard
Tech Writer, IT Professional
Richard, a writer for Geek Rewind, is a tech enthusiast who loves breaking down complex IT topics into simple, easy-to-understand ideas. With years of hands-on experience in system administration and enterprise IT operations, he’s developed a knack for offering practical tips and solutions. Richard aims to make technology more accessible and actionable. He's deeply committed to the Geek Rewind community, always ready to answer questions and engage in discussions.


No comments yet — be the first to share your thoughts!