How to Run Apps as Administrator in Windows 11
Running an app as administrator in Windows 11 gives it elevated permissions to make system-wide changes.
This means the application can access protected files or modify critical system settings that standard user accounts normally cannot.
For example, many software installers require administrator privileges to correctly place files and register components on your PC. You’ll often need to do this for older programs too.
You can easily run an app as administrator in Windows 11 by right-clicking its shortcut or executable file. Then, simply select “Run as administrator” from the context menu.
Right-click an app’s shortcut or executable file and select “Run as administrator.” For permanent elevation, right-click the app, select Properties, go to the Compatibility tab, and check “Run this program as an administrator.
Why run as an administrator?
Some programs need extra permissions to change important system settings, and running them as an administrator gives them these needed powers.
What happens when done?
When you run an app as an administrator, you give it full access to make changes to your system that a normal user can’t, like changing important Windows settings.
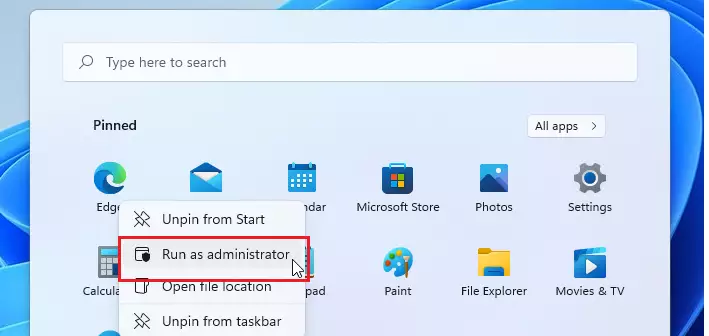
How to run an app as an administrator once
You can run an app as an administrator just one time by right-clicking its icon and picking ‘Run as administrator’. This is useful if an app needs extra permissions for a specific task but you don’t want it to always have them.
- Find the app icon on your desktop or in your Start menu.
- Right-click the icon.
- Select Run as administrator.
- Alternatively, select the app and press Ctrl+Shift+Enter on your keyboard.
Note: You’ll need admin privileges for this step.
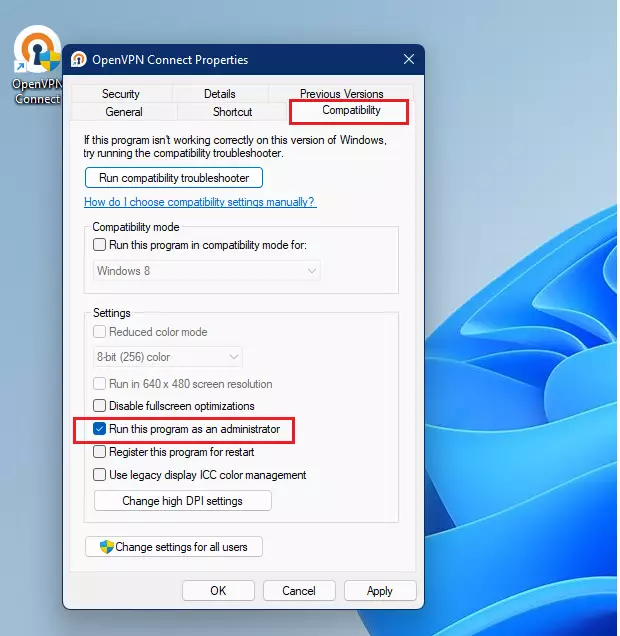
How to always run an app as an administrator
To always run an app as an administrator, you’ll want to change its compatibility settings. This involves right-clicking the app, choosing ‘Properties’, and then ticking the box that says ‘Run this program as an administrator’.
- Right-click the app icon and select Properties.
- Click on the Compatibility tab.
- Check the box that says Run this program as an administrator.
- Click OK to save your changes.
Note: You’ll need admin privileges for this step.

Pinning an Admin-Elevated Shortcut
You can create a special shortcut that always runs your app as an administrator, allowing you to pin it to your taskbar for quick access with elevated rights.
Security Risks and UAC
Running apps as an administrator carries security risks, which is why Windows has User Account Control (UAC) prompts to ask for your permission before making changes.
Command Line Alternative
You can also use the command prompt to launch a program with high privileges. Use the following command structure:
runas /user:Administrator "C:\Path\To\Your\App.exe"
Summary
Running an app as an administrator gives it special power to change system files, which you can do temporarily or permanently through app settings, but always be careful about security.
Is it safe to run all applications as an administrator?
No, it is not safe. Running every app as an administrator removes the safety barriers Windows provides. If a malicious program gains these rights, it can install viruses, steal data, or corrupt your system files. Only grant these permissions to trusted software that requires them to function properly.
Why does Windows ask for permission every time I open an app?
Windows asks for permission via the UAC prompt to ensure that you are aware an application is attempting to make system-level changes. This prevents background malware from silently modifying your computer settings or installing unauthorized software without your explicit consent and knowledge.
Was this guide helpful?

About the Author
Richard
Tech Writer, IT Professional
Richard, a writer for Geek Rewind, is a tech enthusiast who loves breaking down complex IT topics into simple, easy-to-understand ideas. With years of hands-on experience in system administration and enterprise IT operations, he’s developed a knack for offering practical tips and solutions. Richard aims to make technology more accessible and actionable. He's deeply committed to the Geek Rewind community, always ready to answer questions and engage in discussions.

No comments yet — be the first to share your thoughts!