How to Enable or Disable Battery Limit on Microsoft Surface Devices

Battery Limit is a setting in Surface UEFI that you can turn on or off on supported Surface devices running Windows 10 or Windows 11. Turn it on to help preserve long-term battery health. This tutorial shows how, and what to expect afterwards.
Boot into Surface UEFI by holding Volume Up while pressing Power, click Boot configuration, toggle Enable Battery Limit on or off, then click Exit and Restart now. The change takes effect after restart and persists across Windows reinstalls.
What is Battery Limit?
Surface Battery Limit is a built-in firmware setting that caps charging at 50% capacity. Holding a lithium-ion (rechargeable) battery at full charge for long periods wears it out faster. Limiting the charge level reduces that wear.
The feature matters most for devices that stay plugged in all the time. Cash registers, security scanners and information kiosks are typical examples. Not every Surface model has the option. If you can’t find it in the steps below, your model or firmware version probably doesn’t support it.
Why Would You Use This?
Constant power connections degrade lithium-ion cells over time. Because the firmware stops charging at 50%, the battery spends its life at a gentler charge level. The limit is enforced by the firmware, not by Windows, so it applies no matter which apps are running.
If the device is already above 50% when you enable the limit, charging pauses until the level drops below that threshold. The battery won’t be drained to 50% on purpose. It only stops taking a charge until normal use brings it down.
With the limit on, you only ever get about half the battery’s capacity when you unplug. That suits kiosks and desk-bound devices. It is a poor fit for a laptop you carry around all day, so turn it off before a long trip away from a charger.
For more tips on keeping your Surface battery in good shape, check out Microsoft's guide to Caring for your Surface battery to get the most from your device.
How to Enable or Disable Battery Limit
- Boot into Surface UEFI (the firmware settings screen). One way is to shut the Surface down completely, press and hold the Volume Up button, press and release the Power button, and keep holding Volume Up until the Surface logo disappears and the UEFI screen appears.
- Click or tap Boot configuration in the left panel. The boot options appear on the right.
- Set Enable Battery Limit to on or off, depending on what you need. Off is the default. If you don't see this option, your Surface model doesn't support it.
- Click or tap Exit in the left panel, then click or tap Restart now. The Surface restarts and returns to Windows 10 or Windows 11 with your change saved.
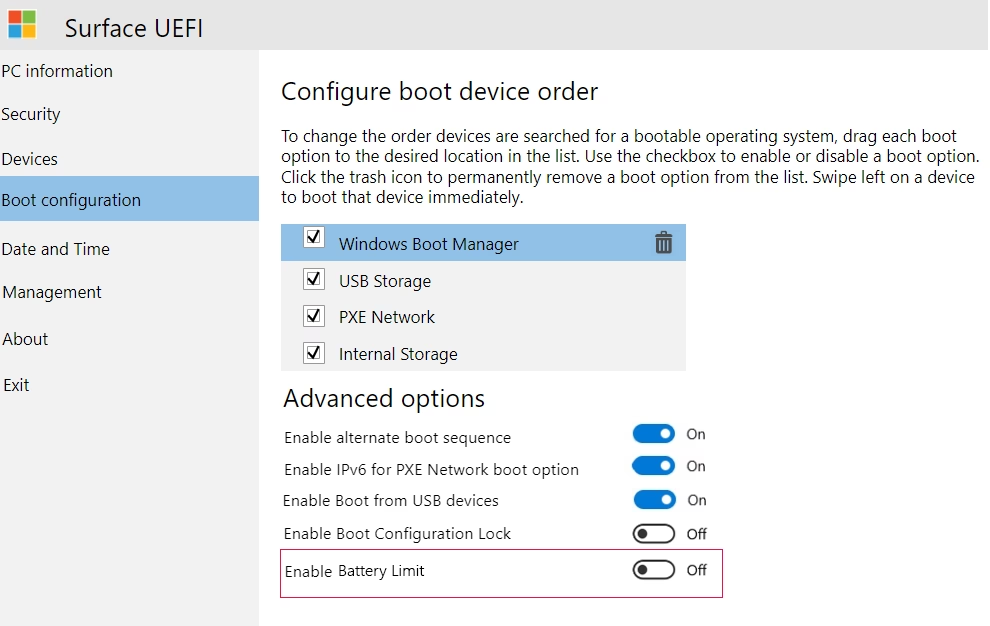
To undo the change later, repeat the same steps and set Enable Battery Limit back to its previous state. The setting lives in firmware, so a Windows reinstall or reset doesn't change it.
Leaving UEFI without using Restart now may mean your change isn't applied.
Summary
The Surface battery limit lives in the device firmware, not in Windows settings. It caps charge levels at 50% to extend battery lifespan during continuous power connection. Once it's enabled, no further action is needed.
Have a question about this guide?
Answered by AI from this guide. Good questions may be added to this page — please don't include personal details.
Did this guide fix your problem?

About the Author
Richard
Tech Writer, IT Professional
Richard is a writer at Geek Rewind who turns complex IT tasks into clear, step-by-step guides. He draws on years of hands-on experience in system administration and enterprise IT operations, focusing on Windows, Linux and WordPress: the problems people actually run into, and the fixes that work. His server and WordPress guides come from systems he runs himself. Richard builds and maintains the platform behind Geek Rewind, from its Ubuntu servers and Nginx configuration to its custom WordPress plugins. Many new tutorials start with readers' questions, and he's always glad to answer them in the comments.
No comments yet — be the first to share your thoughts!