How to Turn Your Windows Startup Sound on or off in Windows 11

- 3 ways to do it
- Needs administrator rights
- Group Policy needs Windows 11 Pro, Enterprise or Education
- Includes a restart or sign-out
The Windows 11 startup sound is the short chime that plays while your PC boots. Whether it plays out of the box depends on your PC and how Windows was set up, so check the setting instead of assuming. You can turn it on or off from the Sounds control panel in a few clicks.
This works whether you want the chime to tell you the PC has finished starting, or you want a silent boot.
Open Settings, go to Personalization Themes Sounds, and check or uncheck the Play Windows Startup sound checkbox. Click OK and restart your computer. The sound will play or stay silent on the next boot.
Why Change the Startup Sound?
You might turn the chime on so you know the PC is up when the screen is slow to wake. You might turn it off to keep a shared space like an office or classroom quiet. Either way, the setting is built into Windows and needs no extra software.
This article covers three methods:
- Method 1 uses the Settings app and the classic Sounds window. It is the quickest and works on every edition.
- Method 2 uses the Registry Editor, a database of low-level Windows settings. Use it if the checkbox in Method 1 is missing or won’t stick.
- Method 3 uses the Local Group Policy Editor, a tool for managing system configuration. It is only available on Windows 11 Pro, Enterprise and Education.
Try the methods in that order. Start with Method 1 and move on only if you need to.
Method 1Using Windows Settings (The Easy Way)
This method works on most systems, on Home and Pro alike, and you don’t need to edit anything in the registry. It does need a standard Windows 11 Settings app, so use Method 2 or 3 if Settings won’t open.
Open Settings
- Press Win+I on your keyboard. Or click the Start button and then click the small gear icon.
- The Settings window opens. If nothing happens, the Start menu route is the fallback.
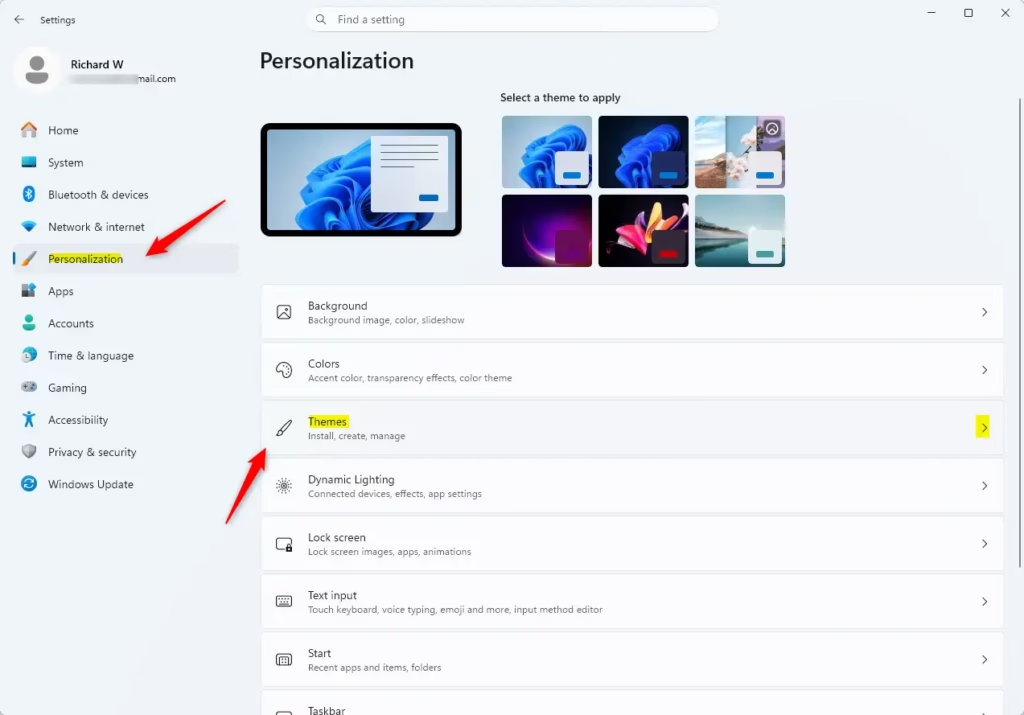
Go to Personalization and Themes
- In the Settings window, click Personalization in the left menu.
- On the right side, click Themes.
You should now see the theme options for your desktop, including the Sounds tile.
Find Sound Settings
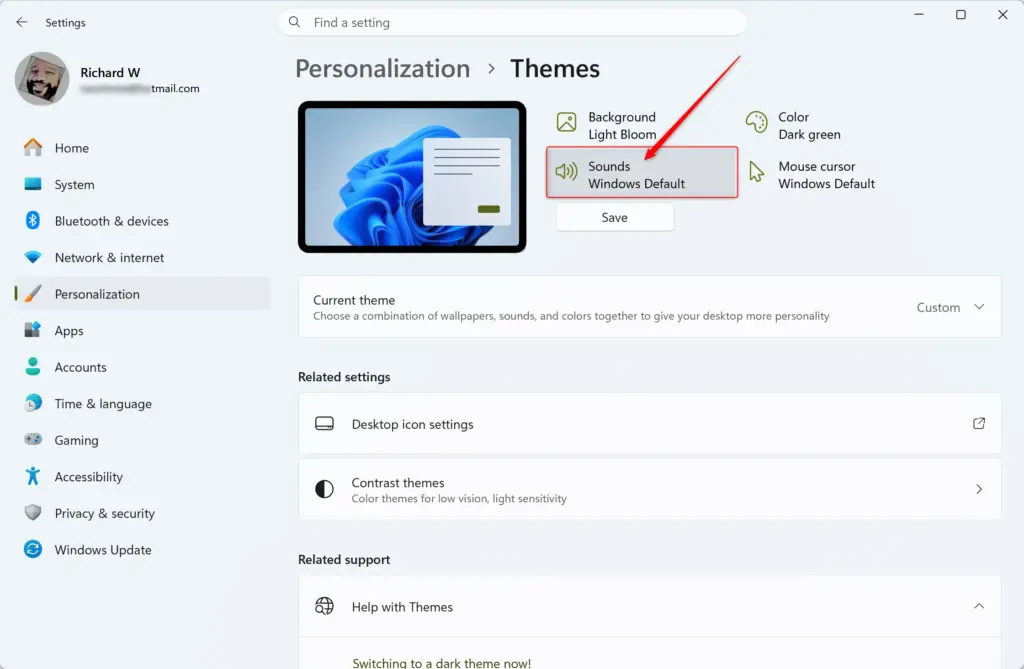
- Under the Themes section, find the Sounds option and click it.
This opens the classic Sounds control panel, an older Windows window for managing system sounds. From here you control both the startup and shutdown audio. The window can open behind Settings, so check your taskbar if you don’t see it.
Turn the Startup Sound On or Off
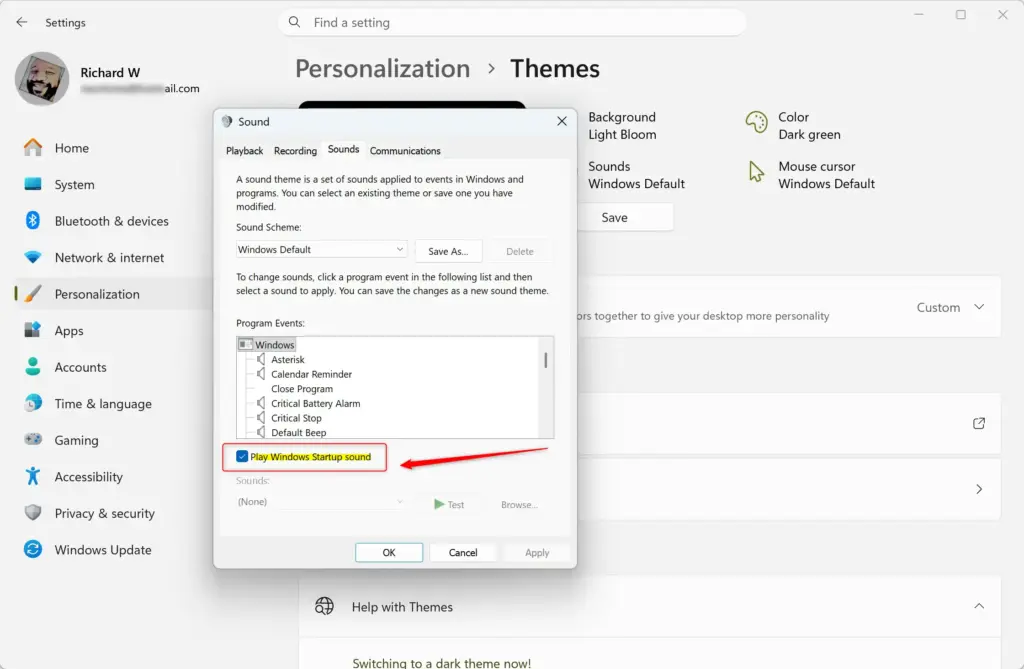
- In the Sounds window, make sure the Sounds tab is selected.
- Look for the checkbox labeled Play Windows Startup sound near the bottom, under the Program Events list.
- Set the checkbox the way you want it:
- To turn the sound ON, check the box.
- To turn the sound OFF, uncheck the box.
If the checkbox is greyed out or changes back after a restart, a registry value or a Group Policy setting is probably overriding it. In that case, use Method 2 or Method 3.
- Click OK to save your changes.
The Sounds window closes. If you click Apply first, the window stays open, and OK then closes it.
Close Settings
- Close the Settings window.
- Restart your computer.
The sound will be on or off according to your selection. The startup sound plays during boot, so you won’t hear a change until the next start. To undo this method, open the Sounds window again and flip the checkbox back.
Method 2Using the Registry Editor (For More Control)
Take care here, because a wrong edit can cause system instability. You also need administrator permission, which means rights to make system-wide changes. If you are on a standard account, Windows will ask for an administrator password.
Back up the registry before you change anything. In Registry Editor, click File, then Export, choose a location, and save the file. If something goes wrong, you can double-click that file to restore the saved settings.
Enable the Startup Sound with Registry Editor
Open Registry Editor
Use this method if the standard Settings app does not work for you. Open Registry Editor by searching for it in the Start menu and approving the User Account Control prompt. You should see a two-pane window with a folder tree on the left and values on the right.
Go to the Correct Location
- Click the address bar at the top of the Registry Editor.
- Copy and paste this path into it:
HKEY_LOCAL_MACHINE\SOFTWARE\Microsoft\Windows\CurrentVersion\Authentication\LogonUI\BootAnimation - Press Enter.
The left pane jumps to that key, and its values appear on the right.
Change the Setting
- On the right side, look for an entry called DisableStartupSound.
- If it isn't there, right-click an empty spot in the right pane and select New.
- Choose DWORD (32-bit) Value. This is the data type Windows uses for simple on/off and number settings.
- Name the new entry DisableStartupSound.
- Double-click DisableStartupSound.
- To enable the startup sound, set Value data to
0. If it currently shows 1, change it to 0. - Click OK to save.
The entry should now show the new value in the Data column.
Check Another Location (Important!)
Now check a second location. Paste this path into the address bar and press Enter: HKEY_LOCAL_MACHINE\SOFTWARE\Microsoft\Windows\CurrentVersion\Authentication\LogonUI\BootAnimation
- Look for an entry named UserSetting_DisableStartupSound on the right side.
- If it exists, double-click it. To turn the sound ON, set its Value data to
0. - If it doesn't exist, create it the same way as before. Right-click an empty spot, select New, then DWORD (32-bit) Value, and name it
UserSetting_DisableStartupSound. - Double-click the new entry and set its value to
0. - Click OK.
Close and Restart
- Close the Registry Editor.
- Restart your computer.
You should hear the startup sound on the next boot. If you don't, check the Method 1 checkbox as well, and make sure your speakers or headphones are not muted.
Disable the Startup Sound with Registry Editor
Open Registry Editor
This method forces the chime to stay off at boot by setting the same registry values to their "off" numbers. It works well if the Settings menu doesn't give you the control you need. You edit the same two keys you used above, so the steps will look familiar.
Go to the Locations
Go to the two paths from the previous steps, one after the other. As before, paste each path into the Registry Editor address bar and press Enter:
Change the Values
- In both locations, find or create the DWORD value. In the first location it is DisableStartupSound. In the second location it is UserSetting_DisableStartupSound. To create one, right-click an empty spot in the right pane, select New, then DWORD (32-bit) Value, and name it.
- Double-click DisableStartupSound.
- To turn the sound OFF, set the Value data to
1. - Click OK.
- Go to the second location and double-click UserSetting_DisableStartupSound.
- Set its Value data to
1. - Click OK.
Close and Restart
Close the Registry Editor and restart your PC. The next boot should be silent.
0 (for enabled) or 1 (for disabled) as needed.You can also delete the DisableStartupSound and UserSetting_DisableStartupSound entries. When these are deleted, Windows uses the setting from Method 1. If you exported a backup earlier, you can also restore it by double-clicking the saved file.
Method 3Using Group Policy Editor (For Pro, Enterprise, and Education Editions)
This method needs Windows 11 Pro, Enterprise or Education. It does not work on Windows 11 Home, because Home does not include the Local Group Policy Editor. If gpedit.msc won't open, you are probably on Home, so use Method 1 or 2 instead.
The Local Group Policy Editor changes system-wide policies, and a policy set here can override both the Registry Editor values and the Settings app checkbox. Keep that in mind if your earlier changes seem to be ignored.
Open Local Group Policy Editor
- Press Windows key + R to open the Run box.
- Type gpedit.msc and press Enter.
- Click Yes if the User Account Control prompt appears.
The Local Group Policy Editor opens with a folder tree on the left.
Navigate the Policy Tree
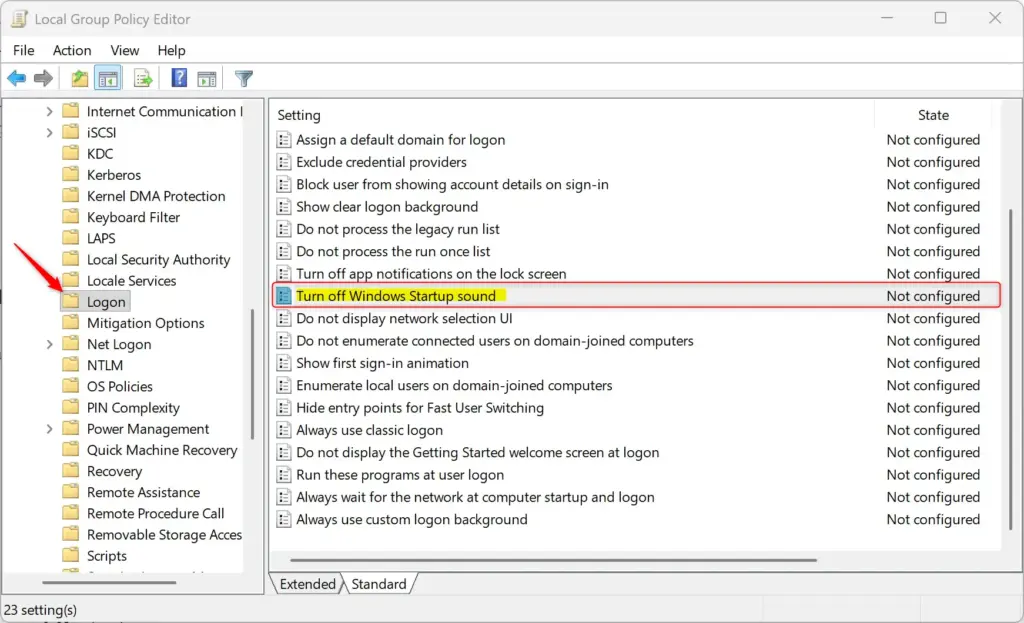
In the left pane, expand the folders in this order:
Computer Configuration Administrative Templates System Logon
Click Logon once. A long list of policies appears in the right pane.
Find the Startup Sound Policy
- In the right pane, find the policy named Turn off Windows Startup sound.
- Double-click it to open its settings window.
This policy controls whether the startup sound plays when you boot your Windows 11 computer.
Configure the Policy
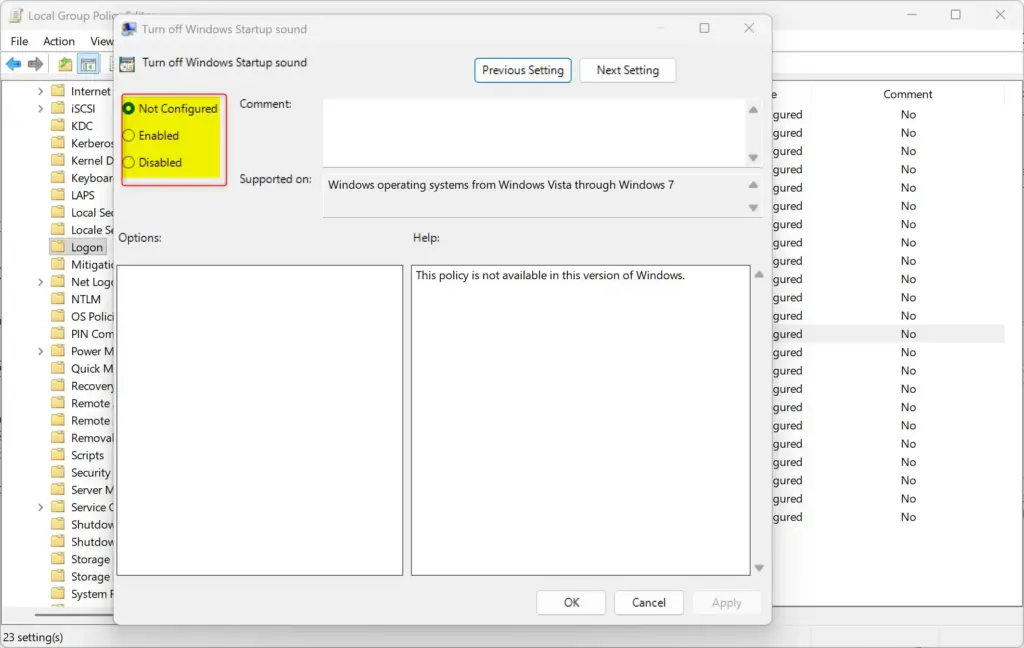
The policy has three states: Not Configured, Enabled and Disabled. Because the policy is named "Turn off", the labels work backwards from what you might expect. Pick the one that matches what you want:
- To Always Enable Startup SoundSelect Disabled. This means the policy to turn off the sound is disabled, so the sound is allowed.
- To Always Disable Startup SoundSelect Enabled. This tells Windows to turn off the sound, and it can override or hide the option in the Settings app.
- To Let You Choose (Default)Select Not Configured. This turns off the Group Policy setting, letting you use the checkbox in the Settings app (Method 1) or the Registry Editor (Method 2).
Choose Not Configured any time you want to undo this method.
- Click OK.
The window closes, and the policy now shows its new state in the right pane.
Close and Restart
- Close the Local Group Policy Editor.
- Restart your computer for the change to take effect.
Summary
Your computer will now play or mute the startup audio according to the method you selected. If the result isn't what you expected, check Method 3 first, since a Group Policy setting wins over the other two. After that, check the registry values, and then the checkbox in the Sounds window.
Have a question about this guide?
Answered by AI from this guide. Good questions may be added to this page — please don't include personal details.
Did this guide fix your problem?

About the Author
Richard
Tech Writer, IT Professional
Richard is a writer at Geek Rewind who turns complex IT tasks into clear, step-by-step guides. He draws on years of hands-on experience in system administration and enterprise IT operations, focusing on Windows, Linux and WordPress: the problems people actually run into, and the fixes that work. His server and WordPress guides come from systems he runs himself. Richard builds and maintains the platform behind Geek Rewind, from its Ubuntu servers and Nginx configuration to its custom WordPress plugins. Many new tutorials start with readers' questions, and he's always glad to answer them in the comments.
No comments yet — be the first to share your thoughts!