
This article explains how to copy or transfer files from a USB flash or thumb drive to a Windows 11 computer.
A USB or portable drive is a common way of easily transferring files from one computer to another.
Windows 11 supports many types of USB and portable drives, from USB 2.0/3.0 to USB-C to pen drives and more, depending on whether your computer has a port or external USB adapters available.
A lot of computers already have built-in USB ports available. You may purchase an external adapter if your laptop lacks enough USB ports. Once a USB drive is connected to your computer, ensure it’s properly plugged in and working.
Transfer files from a USB flash drive to Windows 11
Once you have the correct USB ports available for the thumb drive with your files, insert the drive into the USB port. A USB-C drive goes into the USB-C port, and a USB 2.0/3.0 goes into the standard USB port.
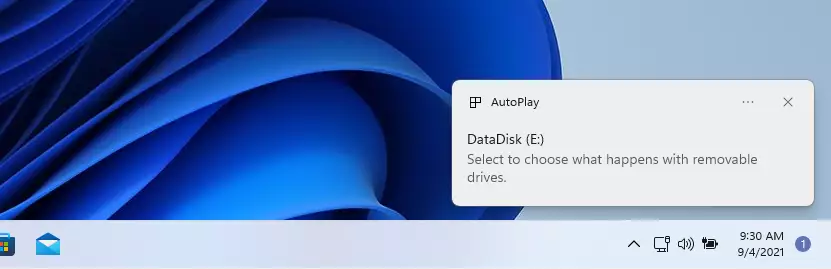
Depending on your computer settings, Windows 11 will notify you to choose what to do with the files, similar to the notification below.
“Select to choose what happens with removable drives.“
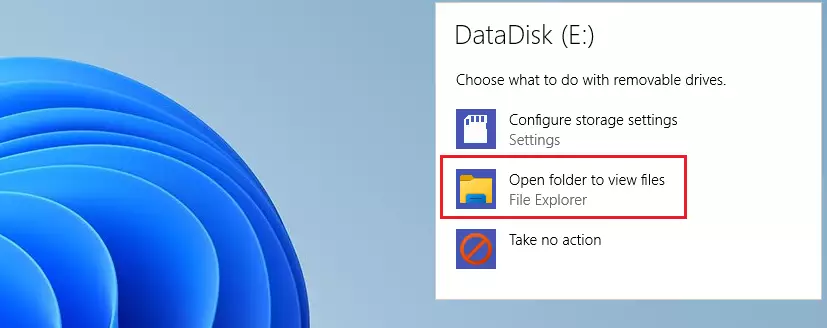
The new pop-up should have options on what to do with the drive inserted. At this point, click Open folder to view files.
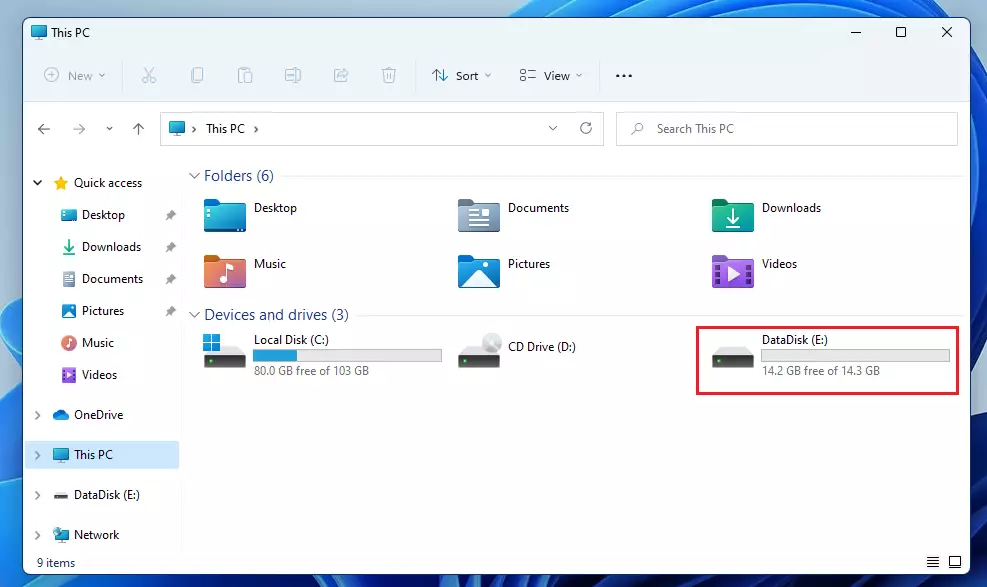
Sometimes, you may not get a prompt, and File Explorer will automatically open and show you the drive’s content. If File Explorer doesn’t open the memory card or drive automatically, click on This PC on the left, then double-click a newly attached drive with the letters E, F, G, or H.
You can transfer a single file or all the files on the memory card to your computer. If you’re transferring all the files, press CTRL + A on your keyboard to select all the files. You can also read this post to learn how to select files.
Once you’ve selected the file or all the files, press the Windows key and E on your keyboard. A new window of File Explorer will open up. Browse where you want to put the copied files, then press the CTRL + V on your keyboard to paste the file(s).
You may also use the mouse to select and copy/paste files to Windows 11. Read the post below to learn how to choose items on Windows 11 to copy and paste.
How Select Files and Folders in Windows 11
That should do it.
Conclusion:
Transferring files from a USB flash drive to a Windows 11 computer is straightforward. Here are the key points to remember:
- Ensure your USB drive is correctly connected to a working USB port.
- Windows 11 may prompt you with options upon connecting the drive; choose to open the folder to view files.
- If the prompt doesn’t appear, manually access the drive through File Explorer by selecting “This PC.”
- Select the files you want to transfer using CTRL + A or your mouse.
- Paste the files into your desired location using CTRL + V or the right-click context menu.
- Familiarize yourself with keyboard shortcuts to streamline the process.
Following these steps, you can efficiently transfer files to your Windows 11 computer.
Leave a Reply