

This article explains how to change a user password using the Command Prompt or Windows Terminal with PowerShell in Windows 11.
Windows allows users to change or reset passwords from the Windows Settings app or Control Panel.
There are other ways one can change one’s account password in Windows. For example, if you have a local account, you can use PowerShell or Windows commands to reset your account password from Command Prompt or Windows Terminal.
A good reason to reset or change a local password in Windows 11 is if the account has been compromised or the Password is no longer a secret. You’ll need to change it so that it’s secured again.
For new users, using the Windows Settings app is the easiest way to reset your account password. However, if Windows Command Prompt or PowerShell is your thing, you can also use those tools to change or reset your Password.
How to change your Password from the command prompt in Windows 11
As mentioned above, Windows allows users to change or reset their passwords in multiple ways. One can use the Windows Settings app or the Control Panel to reset their Password in Windows 11.
For advanced users or those who want to try other ways to reset their Password, the Command Prompt or Windows Terminal can also be used.
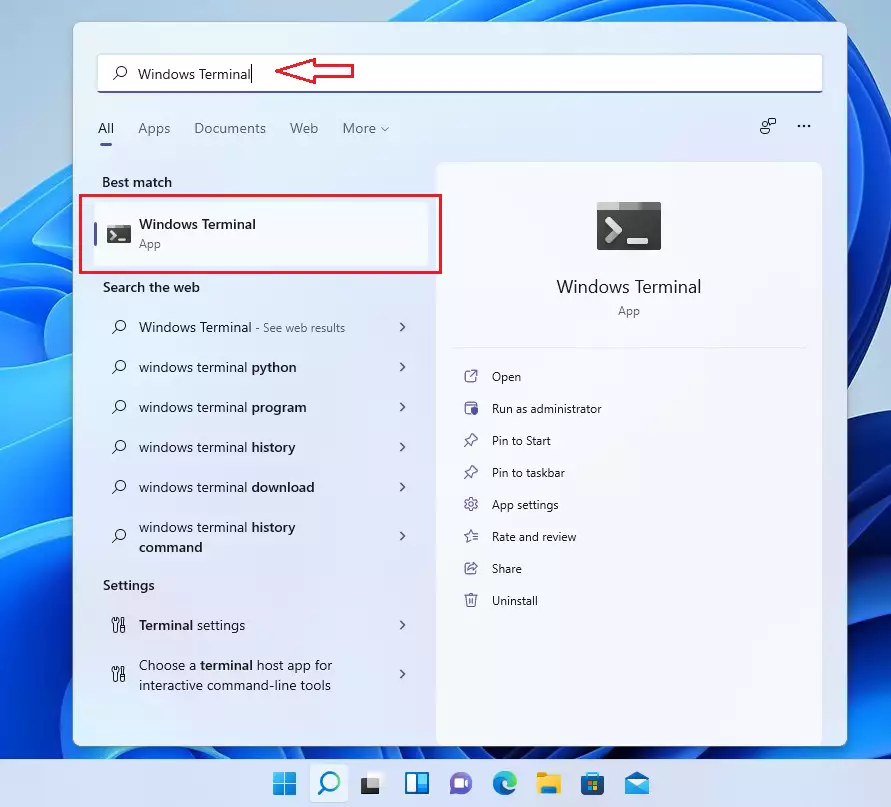
To change your Password via Windows Terminal using commands, go to the Start menu, then search for Windows Terminal.
Under Best Match, select and open Windows Terminal.
Once Windows Terminal opens, select a new tab with Command Prompt. By default, Windows Terminal opens with the PowerShell tab.
Run the commands below to list all available users on the computer.
net user
You will see a similar screen as the one below:

The list of users will be longer depending on how many users are active on the computer.
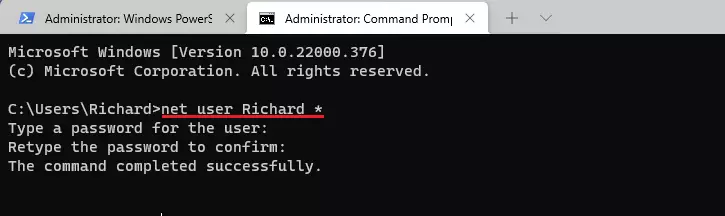
To change your Password, run the format of the command below, replacing USERNAME with your account name.
net user USERNAME *
When you run the commands above, you should see a similar screen as the one below if it was successful.
If you get a system error, open Widows Terminal as administrator.
How to change Password with PowerShell commands in Windows 11
Above, we showed you how one could change their Password in Windows using Windows commands via Windows Terminal.
Another way to change or reset their Password using commands is via PowerShell. You can use Windows Terminal to run PowerShell commands using the PowerShell console tab.
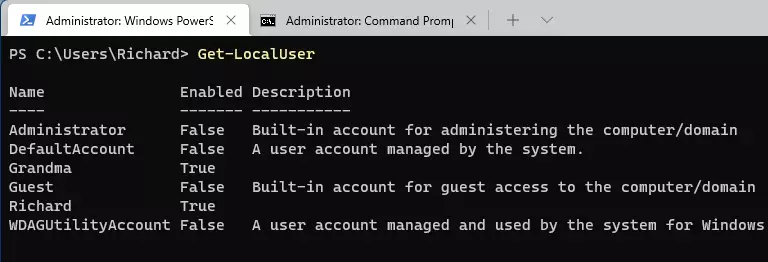
Open Windows Terminal; by default, the PowerShell tab is selected. Then, run the commands below to list available users on the system.
Get-LocalUser
It would be best to get a screen similar to the one below.
To change your Password using PowerShell, you’ll need to store the Password in a variable and then use the variable to change your Password.
Run the commands below to create a new password and store it in a variable called $ Password.
$Password = Read-Host "Enter the new password" -AsSecureString
With the variable stored, run the commands below to change your Password with the stored Password in the $Password variable.
Note: Replace USERNAME with your account name.
$UserAccount = Get-LocalUser -Name "USERNAME"
$UserAccount | Set-LocalUser -Password $Password
You can log off and try the new Password.
Those with a Microsoft account can use the link below to reset their Password.
How to reset your Microsoft account password
That should do it!
Conclusion:
- Changing your password using the Command Prompt or PowerShell in Windows 11 provides an alternative to the graphical interface.
- These methods are particularly useful for advanced users or those familiar with command-line tools.
- Ensuring your password is secure is vital in protecting your account from unauthorized access.
- For new users, utilizing the Windows Settings app may be the easiest option for password management.
- Regularly updating your password is a good practice to maintain account security.

Leave a Reply