How to Change Screen Saver Grace Period to Require Sign-in in Windows 11

This tutorial shows you how to change the screen saver grace period in Windows 10 and Windows 11. You set how many seconds Windows waits before password protection kicks in. The steps below were written for Windows 11, and the Registry Editor works the same way in Windows 10. It also works in both Home and Pro editions.
Open Registry Editor, navigate to 🗝️HKEY_LOCAL_MACHINE\
Why Change the Screen Saver Grace Period?
The screen saver grace period is the short time Windows waits after your screen saver starts before it asks for your password again. The default is 5 seconds. If someone walks up to your PC while the screen saver is running, they can get in during those few seconds without a password. Shortening the grace period makes sure the computer locks properly when you step away.
During the grace period, anyone can move the mouse, touch the screen or press a key and go straight back to the desktop without signing in. Only after the grace period ends does Windows show the sign-in screen.
The delay exists to avoid pointless password prompts. Say the screen saver starts while you are reading a long document. You nudge the mouse a second later and carry on, with no need to type your password. That is the case the 5-second window is meant for.
What Happens When You Change It?
When you change the grace period, you control how long Windows waits before asking for your password once the screen saver appears. If you set it to 0 seconds, Windows asks for your password the moment the screen saver starts. That is the most secure choice, because nobody gets even a brief window of access.
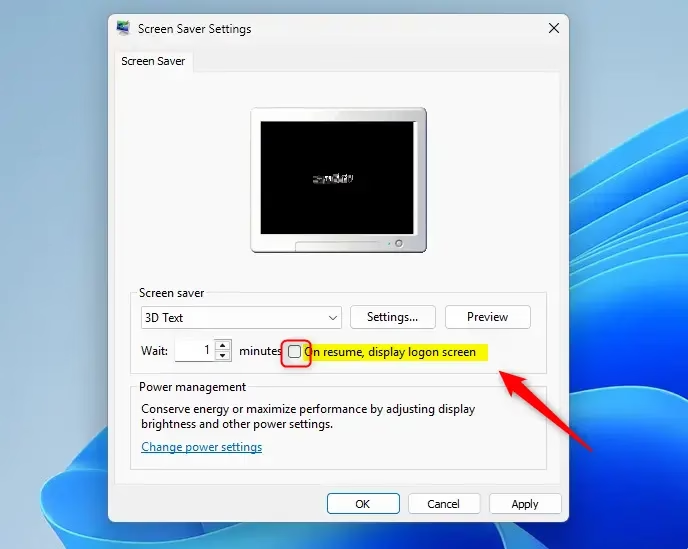
In the Screen Saver Settings window, the On resume, display logon screen box must be ticked. You can reach that window from Settings Personalization Lock screen Screen saver If the box is not ticked, the screen saver never asks for a password and this setting has no effect.
Before you start, make sure you are signed in with an administrator account. You will also need to approve a User Account Control prompt. As a precaution, you can back up the registry first. In Registry Editor, choose File Export and save a copy.
How to Change the Screen Saver Grace Period
Take care to change only the value described below.
- Press the Start button, type
regedit.exein the search box and press Enter. Click Yes if User Account Control asks for permission. Registry Editor opens. - In the left pane, go to this location. You can also paste it into the address bar at the top of the window and press Enter:
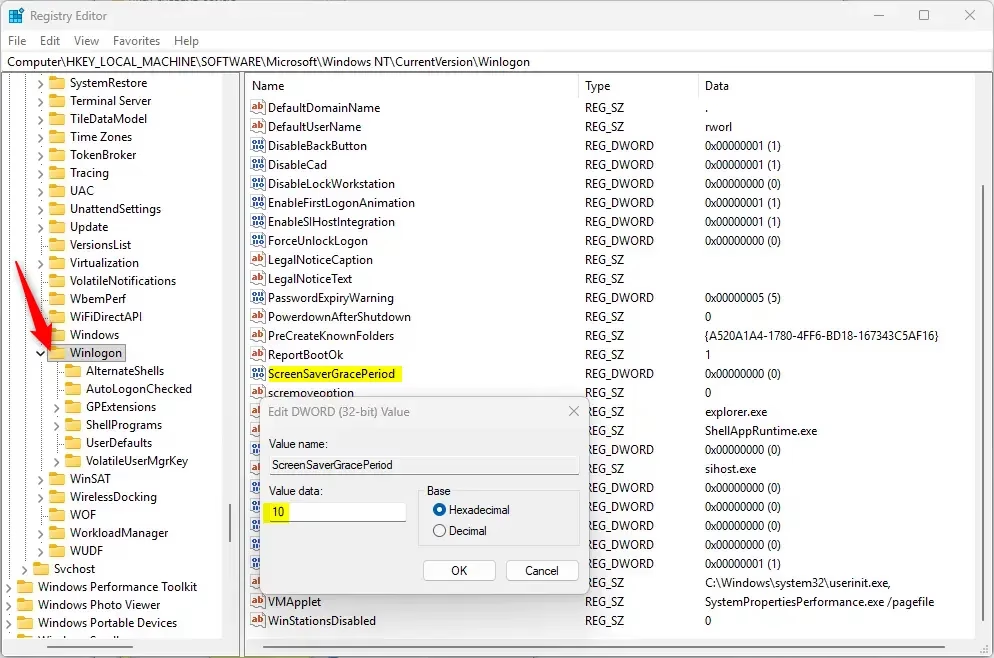
HKEY_LOCAL_MACHINE\SOFTWARE\Microsoft\Windows NT\CurrentVersion\Winlogon - In the right pane, look for an entry called
ScreenSaverGracePeriod. If it is already there, skip ahead to the next step. If it is not, create it:- Right-click an empty area in the right pane.
- Select New DWORD (32-bit) Value. A new entry appears with its name highlighted for editing.
- Type
ScreenSaverGracePeriodas the name. - Press Enter to create it.
- ⚠️ Admin privileges required: Double-click the
ScreenSaverGracePeriodentry. An edit window opens. Then:- Under Base, select Decimal.
- In the Value data box, enter a number between 0 and 2147483. This is the grace period in seconds.
- Enter 0 for immediate password protection with no delay.
- Click OK to save. The new number now shows in the Data column.
- Close Registry Editor.
- To test it, start your screen saver and wait for it to appear. Then wake the PC after your grace period has passed. You should see the sign-in screen. If the old delay still applies, sign out and back in, or restart the PC, and test again.
To undo the change, open the same entry and set it back to 5, which is the Windows default. You can also delete the entry. Right-click it, choose Delete and confirm.
Summary
The screen saver grace period is the short time Windows waits after your screen saver locks before asking for your password. The default is five seconds. You can change this security setting by editing the Windows Registry, specifically the 'ScreenSaverGracePeriod' value. Set it to 0 if you want the password prompt to appear immediately.
Have a question about this guide?
Answered by AI from this guide. Good questions may be added to this page — please don't include personal details.
Did this guide fix your problem?

About the Author
Richard
Tech Writer, IT Professional
Richard is a writer at Geek Rewind who turns complex IT tasks into clear, step-by-step guides. He draws on years of hands-on experience in system administration and enterprise IT operations, focusing on Windows, Linux and WordPress: the problems people actually run into, and the fixes that work. His server and WordPress guides come from systems he runs himself. Richard builds and maintains the platform behind Geek Rewind, from its Ubuntu servers and Nginx configuration to its custom WordPress plugins. Many new tutorials start with readers' questions, and he's always glad to answer them in the comments.
No comments yet — be the first to share your thoughts!