How to Enable or Disable Auto Enhance During Video Playback in Windows 11

- 5 steps
- Includes a restart or sign-out
Auto Enhance is a built-in video feature in Windows 11 version 23H2 and later. It sharpens picture quality and boosts clarity during video playback. Windows turns it on automatically whenever your PC runs on wall power.
Apps such as Microsoft Edge, Photos, and Microsoft Store streaming apps use this system to improve what you see. Turning Auto Enhance off stops the sharpening process. It can also help save internet data if you stream video on a limited plan. Some PCs may not offer the option at all, because it depends on your hardware.
This tutorial covers two ways to switch it on or off: the Settings app, and the Registry Editor. Settings is the easier route and works the same on Windows 11 Home and Pro.
To turn Auto Enhance on or off in Windows 11 version 23H2 or later, press Win+I, then go to Apps Video playback and switch “Process video automatically to enhance it (depends on your device hardware)” On or Off. The change saves immediately with no restart. If the switch is greyed out, your hardware does not support it.
Option One
Turn On or Off Auto Enhance in Settings
- Press
Win+Ito open Settings. You should see the Settings window with a list of categories on the left. - Click Apps on the left side.
- Click Video playback on the right side. The video options for your PC will open.
- Find the setting labeled “Process video automatically to enhance it (depends on your device hardware).” Turn it On to enable Auto Enhance, or Off to disable it. Choose whichever suits you.
- Close Settings when you’re done. The change is saved as soon as you flip the switch, so you don’t need to restart.
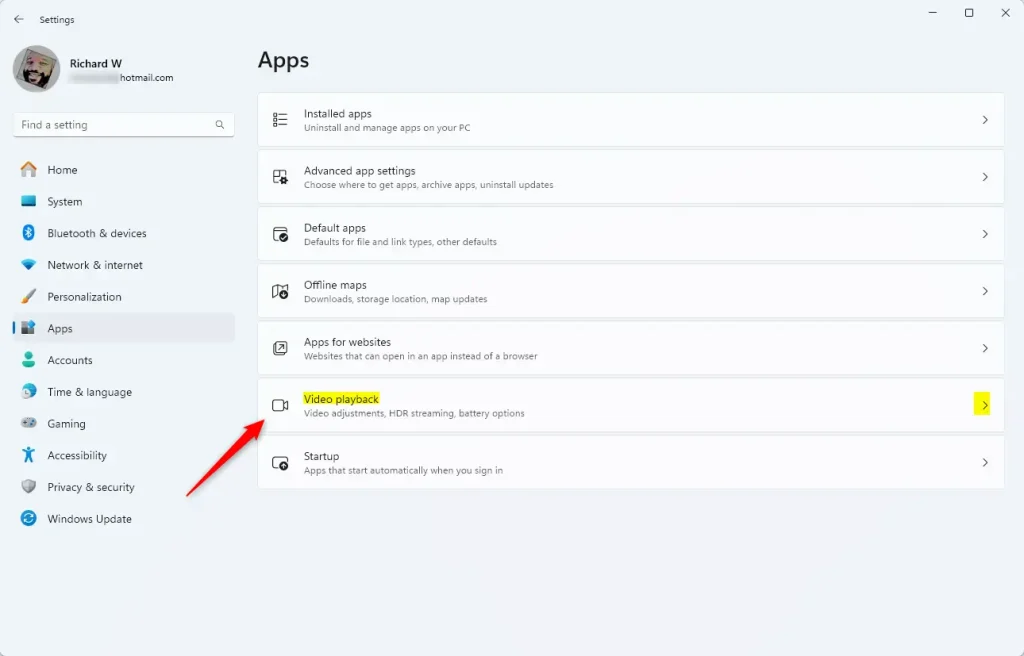
The main Settings app is the quickest way to manage video enhancement. Flipping the switch takes just a couple of clicks. If you change your mind, return to the same page and flip the switch back.
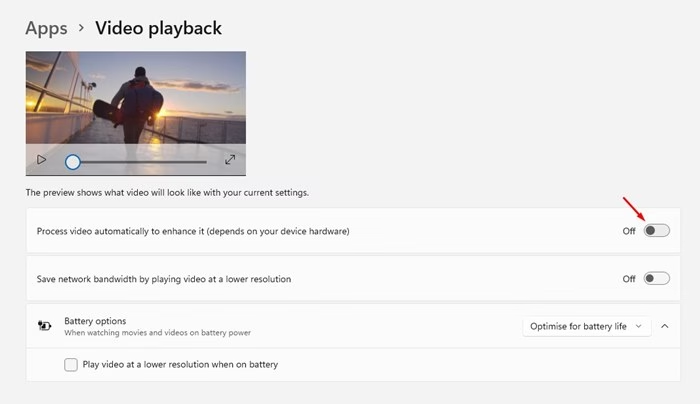
The wording and availability can also differ between Windows 11 builds, and the feature is intended for version 23H2 and later. Check Settings Windows Update if you’re on an older build. Open apps may need to be closed and reopened before they use the new setting.
Option Two
Turn On or Off Auto Enhance using the Registry
This is useful if you prefer not to use the standard Settings page. Editing the registry incorrectly can cause problems, so back up the registry or create a restore point before you start. Use the code below exactly as shown.
Turn On Auto Enhance
Use the following code to enable the feature.
reg add "HKEY_CURRENT_USER\Software\Microsoft\Windows\CurrentVersion\VideoSettings" /v EnableAutoEnhanceDuringPlayback /t REG_DWORD /d 1 /fTurn Off Auto Enhance
This serves as the default configuration.
Use the following code to disable the feature. To undo it later, apply the code from the Turn On Auto Enhance section above.
reg add "HKEY_CURRENT_USER\Software\Microsoft\Windows\CurrentVersion\VideoSettings" /v EnableAutoEnhanceDuringPlayback /t REG_DWORD /d 0 /fAfter you apply either change, open Settings Apps Video playback to check the switch. If it hasn't updated, sign out and back in, or restart your PC.
Summary
Windows 11 provides a video enhancement tool that you can control through the Settings app or the Registry. For most people, the Settings app is the simpler choice. The Registry method gives you another route if you need it.
Have a question about this guide?
Answered by AI from this guide. Good questions may be added to this page — please don't include personal details.
Did this guide fix your problem?

About the Author
Richard
Tech Writer, IT Professional
Richard is a writer at Geek Rewind who turns complex IT tasks into clear, step-by-step guides. He draws on years of hands-on experience in system administration and enterprise IT operations, focusing on Windows, Linux and WordPress: the problems people actually run into, and the fixes that work. His server and WordPress guides come from systems he runs himself. Richard builds and maintains the platform behind Geek Rewind, from its Ubuntu servers and Nginx configuration to its custom WordPress plugins. Many new tutorials start with readers' questions, and he's always glad to answer them in the comments.
No comments yet — be the first to share your thoughts!