How to Change Windows 11 File Sharing Encryption Level

- 3 ways to do it
- Needs administrator rights
- Includes a restart or sign-out
The encryption level for file sharing connections controls how strongly Windows 11 scrambles data when you share files or printers over a network. It applies to the connection between your PC and the other devices on that network, so it matters most on a home or office LAN.
Windows 11 uses strong 128-bit encryption by default. In practice that makes it very hard for anyone who intercepts the traffic to read your shared files. Leave it alone unless you have a reason to change it.
The usual reason is an older device. Old NAS boxes, printers, media players and legacy Windows machines may fail to connect to a share that demands 128-bit encryption. If you see connection errors only with older gear, lowering the encryption level can help with compatibility. The trade-off is security, so lower it only if you have to, and set it back to 128-bit once the old device is retired or updated.
This guide covers three ways to change the setting: the Settings app, the Control Panel, and the Registry Editor. Try them in that order. You need an administrator account for all three. The steps work the same on Windows 11 Home and Pro.
Open Settings Network & internet Advanced network settings Advanced sharing settings, expand All networks, then select your encryption level under File sharing connections: choose 128-bit encryption (recommended) for security or 40- or 56-bit encryption for older device compatibility. Changes save automatically.
Option 1Change Encryption Using Windows Settings (🪟 Windows 11 Version 22H2 and newer)
On Windows 11 version 22H2 and newer, file sharing settings live in the Settings app. This is the easiest route because you do not need any advanced tools. Not every build shows the encryption option on this page. If you cannot find File sharing connections at step 5, move on to the Control Panel or Registry Editor methods below.
- Open Settings. Press
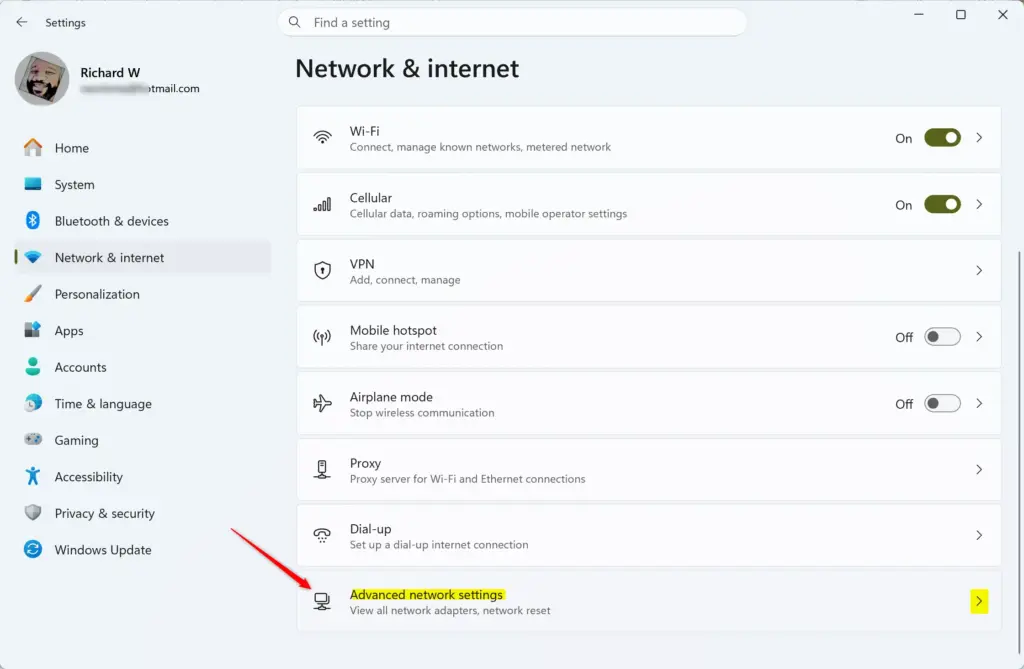
Windows key + Ion your keyboard. The Settings window opens. - Click Network & internet in the left-hand menu. Then, on the right side, click Advanced network settings.
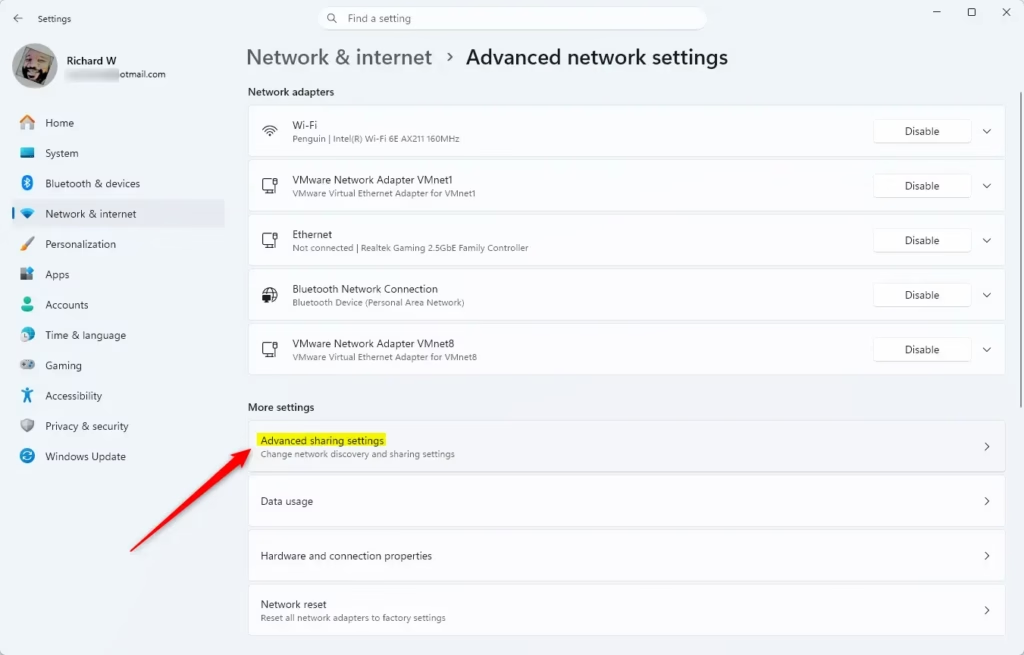
- Scroll down the Advanced network settings page and click Advanced sharing settings. You now see sharing profiles such as private networks, public networks and all networks.
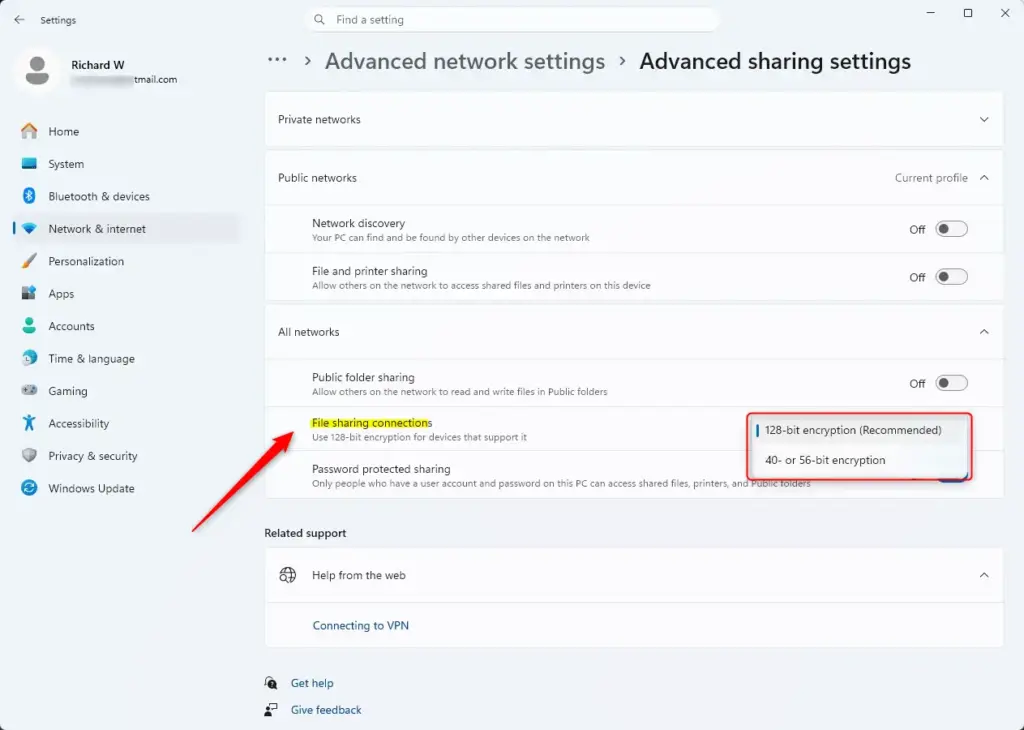
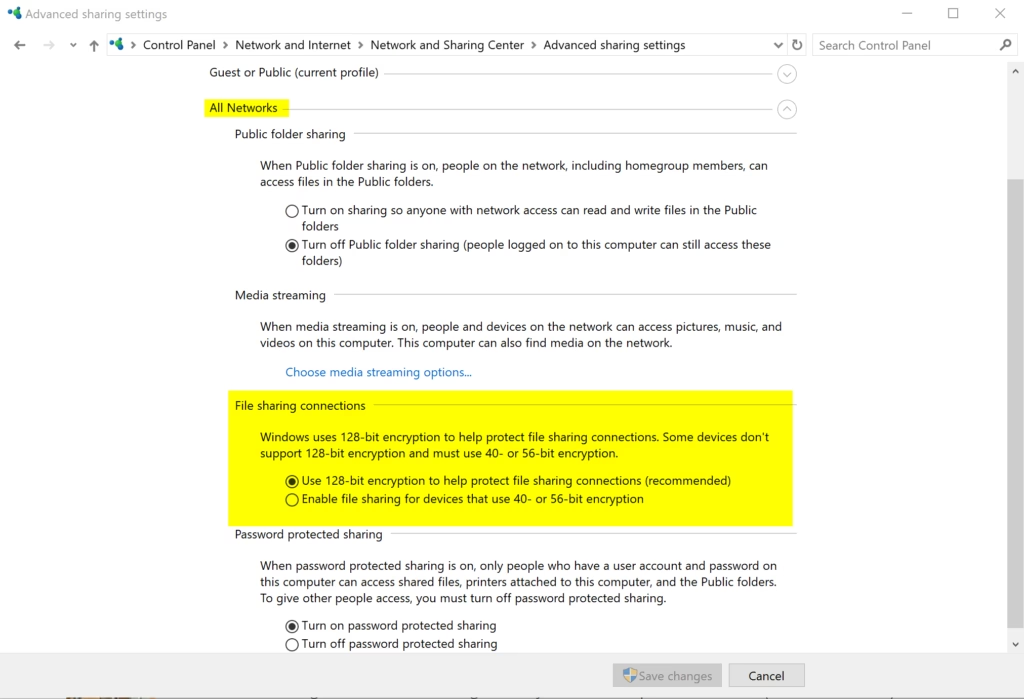
- Click the arrow next to All networks to expand it. More options appear underneath.
- Find the File sharing connections menu and choose your encryption level. You have two choices:
- 128-bit encryption (recommended)This is the most secure option and is usually the default. Use it if your devices support it.
- 40- or 56-bit encryptionChoose this if you have trouble connecting with older devices or specific network hardware. It is less secure but works with more devices.
- Close the Settings window. Your changes are saved automatically.
To undo the change, repeat the steps and select 128-bit encryption (recommended) again. After changing the level, try reconnecting from the device that was failing. If it still cannot connect, the cause is probably something else, such as the sharing protocol version or the credentials.
Option 2Change Encryption Using Control Panel (Older 🪟 Windows 11 Versions)
The Control Panel is the older way to reach the same setting. It is the route for builds where the option is still shown there. Open the Control Panel from the Start menu and set the view to large or small icons so the network and sharing items are easy to find.
- Open Control Panel . Click the Start button , type
Control Panel, and click the Control Panel app in the search results.💡TipSet View by (top right) to Large icons or Small icons to see all options.If it is set to Category, click Network and Internet first.
- Click the Network and Sharing Center icon. The page that opens shows your active networks.
- On the left side of the Network and Sharing Center, click Change advanced sharing settings. The sharing profiles appear.
- Click the arrow next to All networks to show more options.
- Under the File sharing connections section, choose one of these by clicking the circle next to it:
- 128-bit encryption (recommended)
- 40- or 56-bit encryption
- Click the Save changes button at the bottom. Without this, your setting is not applied.
If you do not see the File sharing connections option, you are likely on a newer Windows 11 version (22H2 or later), where the setting is in the Settings app instead. If it is missing there too, use the Registry Editor method below.
- Close the Control Panel window.
To undo the change, come back to this page, select 128-bit encryption (recommended) and click Save changes again.
Option 3Manually Change Encryption Using Registry Editor
The Registry Editor lets you set the encryption level by hand when the Settings and Control Panel options are missing or do not stick. It works on Home and Pro. It is also the least forgiving method, because a wrong value in the registry can cause problems that are hard to trace. Take a few minutes to make a backup first.
Before you start: back up the registry. Open Registry Editor, click File Export, set Export range to All, give the file a name and save it somewhere safe. You can restore it later by double-clicking the .reg file. A restore point is also worth creating if System Protection is turned on for your drive.
While you are in there, write down the existing data of any value you change. That gives you an exact way back if something goes wrong.
To Use 128-bit Encryption (Default and Recommended)
Use these steps to set or confirm 128-bit encryption, which is the Windows 11 default. You will edit two values under the 🗝️HKEY_LOCAL_MACHINE\
- Open Registry Editor. Click the Start button , type
regedit, and click Registry Editor. Click Yes if a User Account Control (UAC) prompt appears. The Registry Editor window opens with a folder tree on the left. - Go to the correct registry path. In the left pane, browse to this location:
HKEY_LOCAL_MACHINE\SYSTEM\CurrentControlSet\Control\Lsa\MSV1_0You can also copy and paste this path into the address bar at the top of the Registry Editor and press Enter.
- Find or create the NtlmMinClientSec value. In the right pane, look for a value called
NtlmMinClientSec. If it is there, double-click it. If not, right-click an empty space, selectNew, and then chooseDWORD (32-bit) Value. Name it exactlyNtlmMinClientSec. The value should look like this:- Value Name
NtlmMinClientSec - Value Type
REG_DWORD - Value Data
20000000(in hexadecimal)
20000000into the Value data box and click OK. Make sure Base is set to Hexadecimal. - Value Name
- Find or create the NtlmMinServerSec value. Look for a value called
NtlmMinServerSec. If it is not there, create it as a newDWORD (32-bit) Value, the same way as in the previous step. The value should look like this:- Value Name
NtlmMinServerSec - Value Type
REG_DWORD - Value Data
20000000(in hexadecimal)
20000000into the Value data box and click OK.💡TipThe hexadecimal value20000000tells Windows to use 128-bit encryption.This is the most secure setting.
- Value Name
- Close Registry Editor.
- Restart your computer. This helps make sure the changes are applied correctly.
To undo these edits, import the backup .reg file you exported earlier, or put each value back to the data you noted before changing it. If you created a value yourself and it did not exist before, you can right-click it and choose Delete.
To Use 40- or 56-bit Encryption (Less Secure, More Compatible)
Use these steps only if an older network device cannot connect at 128-bit and the other methods did not help. They lower the level to 40- or 56-bit. The registry location is the same 🗝️HKEY_LOCAL_MACHINE\
- Open Registry Editor. Press
Windows key + R, typeregedit, and press Enter. Click Yes on the UAC prompt. The Registry Editor window opens. - Go to the correct registry path. Navigate to this path:
HKEY_LOCAL_MACHINE\SYSTEM\CurrentControlSet\Control\Lsa\MSV1_0 - Find or create the NtlmMinClientSec value. In the right pane, find the
NtlmMinClientSecvalue, or create it as aDWORD (32-bit) Valueif it does not exist. The value should look like this:- Value Name
NtlmMinClientSec - Value Type
REG_DWORD - Value Data
0(in hexadecimal)
0in the Value data box and click OK. - Value Name
- Find or create the NtlmMinServerSec value. Find the
NtlmMinServerSecvalue, or create it as aDWORD (32-bit) Valueif needed. The value should look like this:- Value Name
NtlmMinServerSec - Value Type
REG_DWORD - Value Data
0(in hexadecimal)
0in the Value data box and click OK.Warning: Setting these values to
0allows older, weaker encryption methods (40- or 56-bit) to be used. This makes your file sharing connections much less secure. - Value Name
- Close Registry Editor.
- Restart your computer. This is needed for the registry changes to work.
After the restart, test the connection from the older device. To go back to the secure setting, follow the previous section again and set both values to the 128-bit data, or import your backup. Do this as soon as the compatibility problem is solved.
Summary
File sharing encryption protects data sent across your local network, and you can adjust it to suit your devices. Newer Windows 11 builds use the Settings app, older builds use the Control Panel, and the Registry Editor covers the cases where neither option is available. Keep 128-bit encryption unless an older device truly cannot connect. If you do lower it, treat that as a temporary fix and restore 128-bit when you can.
Have a question about this guide?
Answered by AI from this guide. Good questions may be added to this page — please don't include personal details.
Did this guide fix your problem?

About the Author
Richard
Tech Writer, IT Professional
Richard is a writer at Geek Rewind who turns complex IT tasks into clear, step-by-step guides. He draws on years of hands-on experience in system administration and enterprise IT operations, focusing on Windows, Linux and WordPress: the problems people actually run into, and the fixes that work. His server and WordPress guides come from systems he runs himself. Richard builds and maintains the platform behind Geek Rewind, from its Ubuntu servers and Nginx configuration to its custom WordPress plugins. Many new tutorials start with readers' questions, and he's always glad to answer them in the comments.
No comments yet — be the first to share your thoughts!