How to Change Alt+Tab Tabs in Windows 11

For alt tab settings in Windows 11, open Settings System Multitasking and change the option that shows tabs from apps when you press Alt+Tab. You can show your 20, 5 or 3 most recent tabs, or turn tab previews off and see only open windows.
Alt+Tab is the keyboard shortcut for switching between open apps. This tutorial covers four ways to change the tab setting: the Settings app, the Registry Editor for your own account, Local Group Policy Editor, and the Registry Editor for every user on the PC. Start with the Settings app unless you have a reason not to. The other three methods are for cases where Settings doesn’t help, or where you need to set the value for more than one account.
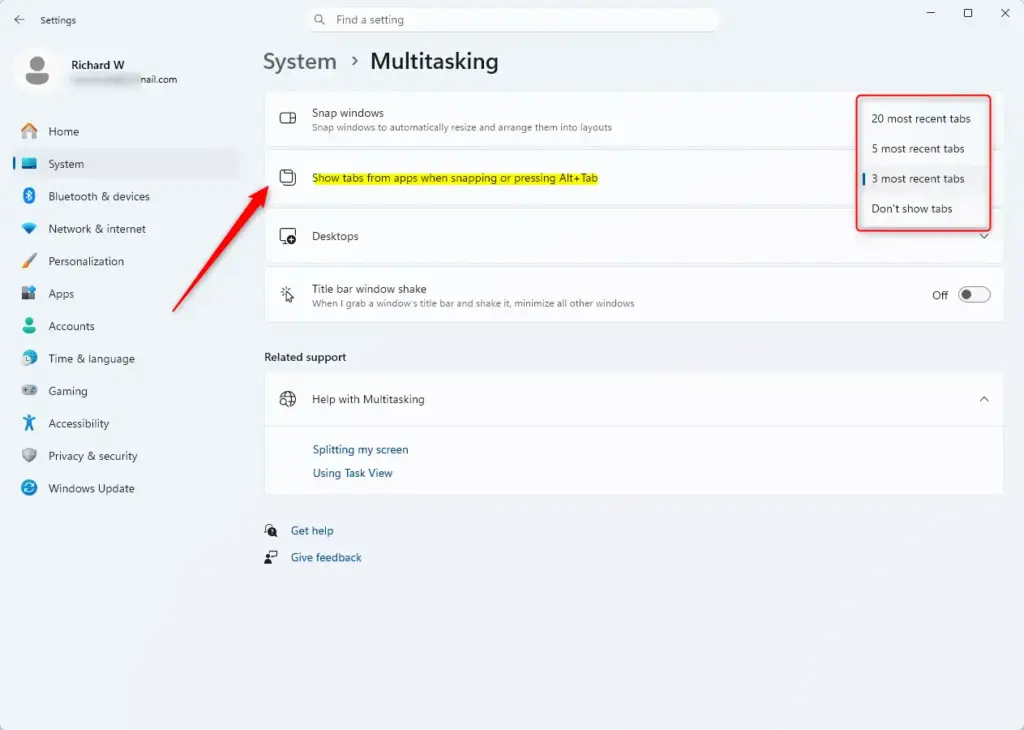
Open Settings System Multitasking and use the dropdown for “Show tabs from apps when snapping or pressing Alt+Tab” to choose 20, 5 or 3 most recent tabs, or Don’t show tabs. The change applies immediately, with no restart needed. Windows 11 Alt+Tab tabs settings also control Snap Assist.
Understanding Alt+Tab and Snap Assist Previews
Alt+Tab shows small previews of your open windows so you can pick one quickly. Snap Assist helps you arrange windows on screen. In Windows 11, both can also show tabs from apps such as Microsoft Edge, so you can jump straight to a specific tab instead of just the browser window.
The setting you change here controls both features at once. If you change it for Alt+Tab, Snap Assist follows the same value. You can’t set one without the other.
Option 1Adjusting Tab Previews Through Windows Settings (Easiest Method)
The Settings app is the simplest method and the one most people need. It changes the setting for your own account only, and it works on both Home and Pro. You don’t need to restart afterwards. These steps change the Windows 11 Alt+Tab tabs from the Settings app.
- Open Settings . Press Win+I, and the main Settings app opens. You can also open it from the Start menu .
- Select System in the left sidebar. The System pages appear on the right.
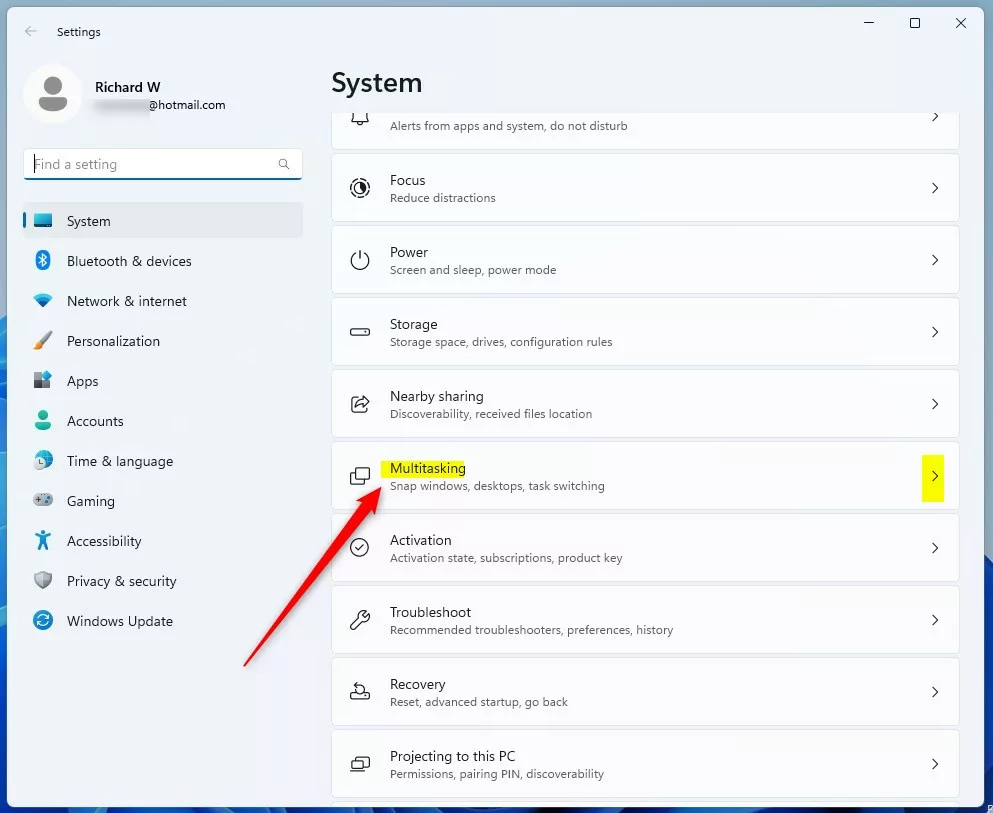
- Click Multitasking. The page lists several multitasking options. If you don’t see it right away, scroll down the list of System pages.
- Expand the Desktops section. Click Desktops to open it. The name is misleading, because this section also holds the Alt+Tab and snapping option. On some builds the option sits elsewhere on the page, so scroll if you don’t see it.
- Click the dropdown for Show tabs from apps when snapping or pressing Alt+Tab. The exact wording of the entries can vary slightly between Windows 11 builds. You should see a list of choices. If the dropdown is missing or greyed out, an administrator may have set the value with a policy. See Option 3 or Option 4 below.
- Choose how many tabs you want. The options are:
- 20 most recent tabs: The most Windows will show. This suits you if you keep many browser tabs open and want quick access to them.
- 5 most recent tabs: A good middle ground. You get a decent number without crowding the screen.
- 3 most recent tabs (default): This is most likely what you have now. It keeps the preview clean.
- Don’t show tabs: Turns tab previews off completely. Alt+Tab then shows only your open windows, not individual tabs.
- Test the change and close Settings. Close the Settings window, then press Alt+Tab or drag a window to the edge of the screen. The preview should now show the number of tabs you chose. To undo the change, go back to the same dropdown and choose the earlier value.
Option 2Using the Registry Editor for Current User Settings
You can use Registry Editor to change the Alt+Tab tab setting for your own user account. It’s useful when the Settings app doesn’t show the option or doesn’t apply your choice. This works on Home and Pro, and the change affects only the account you are signed in with.
Follow the steps exactly. Before you start, back up the registry: in Registry Editor, choose File Export, set the export range to All, give the file a name, and save it. To restore it later, double-click the saved file.
Step-by-Step Registry Editing:
These steps set the Windows 11 Alt+Tab tabs value for your own account in the registry.
- Press Windows key + R. The Run dialog opens.
- Open Registry Editor. Type
regeditand press Enter or click OK. If a User Account Control (UAC) prompt appears, click Yes. Registry Editor opens with a folder tree on the left. - Go to the Advanced key. The setting lives under the Advanced key in your user profile. Paste HKEY_CURRENT_USER\SOFTWARE\Microsoft\Windows\CurrentVersion\Explorer\Advanced into the address bar at the top of the Registry Editor window and press Enter. You can also click through the folders one by one. The right pane then shows the values stored in that key.
HKEY_CURRENT_USER\SOFTWARE\Microsoft\Windows\CurrentVersion\Explorer\Advanced - Look for the MultiTaskingAltTabFilter value in the right pane. This entry controls how many tabs appear when you switch tasks. If it exists, double-click
MultiTaskingAltTabFilterand skip to the step that sets the value data. - Create the value if it is missing. Right-click an empty space in the right pane, select New, then DWORD (32-bit) Value. Name it exactly
MultiTaskingAltTabFilter, then double-click the new value. An edit window opens. - Set Base to Hexadecimal. This is usually the default, so you may not need to change anything.
- Type a number in Value data. Use one of these:
- 0 (zero): Show the 20 most recent tabs.
- 1: Show the 5 most recent tabs.
- 2: Show the 3 most recent tabs (the default).
- 3: Show no tabs.
- Click OK. The value in the right pane should now show your number.
- Restart your PC, or sign out and back in. Windows then reloads the setting. To undo the change, set the value data back to 2 or delete the value you created.
Option 3Using Group Policy Editor for All Users (Windows Pro/Enterprise/Education Only)
Local Group Policy Editor is a tool for managing system-wide rules. It lets an administrator set the Alt+Tab tab behaviour for every user account on the PC. It is only available in Windows 11 Pro, Enterprise and Education. To open it, press the Windows key, type gpedit.msc, and press Enter.
If you run Home, use Option 4, which makes the registry edits for all users instead.
Steps to Configure Group Policy:
These steps use a policy to set the Windows 11 Alt+Tab tabs for every user on the PC.
- Press Windows key + R. The Run dialog opens.
- Open Group Policy Editor. Type
gpedit.mscand press Enter. Click Yes if a UAC prompt appears. The Local Group Policy Editor window opens. - Expand the folders in the left pane. Follow this path:
The right pane then lists the policies in that folder.User Configuration>Administrative Templates>Windows Components>Multitasking - Double-click Configure the inclusion of app tabs into Alt-Tab. Its settings window opens.
- Select Enabled. This turns the rule on for all user accounts and activates the dropdown in the window.
- Pick your limit from the dropdown. The choices are:
- Open windows and 20 most recent tabs in apps
- Open windows and 5 most recent tabs in apps
- Open windows and 3 most recent tabs in apps
- Open windows only (this means no tabs will be shown)
- Click Apply, then OK. The policy is saved.
- Close Group Policy Editor. Changes usually take effect immediately, but a restart or sign-out may be needed on some PCs.
To let users choose for themselves (the default behaviour), select Not Configured in the policy window instead, then click Apply and OK. Users can then change the setting in the Settings app (Option 1) or in the Registry Editor for their own account (Option 2). Use this choice any time you want to undo a policy you set earlier.
Option 4Using the Registry Editor for All Users
If you run Windows 11 Home, this is the way to set the Alt+Tab tab behaviour for everyone who signs in to the PC. It writes the same policy that Group Policy would write in Pro. You need an administrator account, and the change affects the whole machine. Back up your registry before you begin.
Warning: Changing the registry can cause system instability if you make a mistake. Follow the steps exactly. Back up the registry first with File Export in Registry Editor, if you can.
Steps for All Users Registry Edit:
These steps set the Windows 11 Alt+Tab tabs value for all users from the registry.
- Press Windows key + R. The Run dialog opens.
- Open Registry Editor. Type
regeditand press Enter. Click Yes on the UAC prompt. Registry Editor opens. - Go to the Policies key. Policies are stored in a specific location. Navigate to:
HKEY_CURRENT_USER\SOFTWARE\Policies\Microsoft\Windows\Explorer - Check whether the
Explorerkey exists underWindows. If it does, select it and go to the next step. If it doesn't, you need to create it. - Create the key if it is missing. Right-click the
Windowskey, select New Key, and name itExplorer. The new key appears in the left pane. Select it. - Look for MultiTaskingAltTabFilter in the right pane of the
Explorerkey. If theMultiTaskingAltTabFiltervalue exists, double-clickMultiTaskingAltTabFilterand skip to the step that sets the value data. - Create the value if it is missing. Right-click an empty space, select New DWORD (32-bit) Value, and name it
MultiTaskingAltTabFilter. Then double-click it. - Set Base to Hexadecimal. This setting sits in the local machine hive, at HKEY_LOCAL_MACHINE\SOFTWARE\Microsoft\Windows\CurrentVersion\Policies\Explorer.
- Enter a number in Value data. These numbers differ from the per-user registry method in Option 2:
- 1: Show the 20 most recent tabs.
- 2: Show the 5 most recent tabs.
- 3: Show the 3 most recent tabs.
- 4: Show no tabs.
- Click OK. The value in the right pane should now show your number.
- Restart your computer. A restart is typically required for these all-user registry changes to apply fully. After you sign back in, press Alt+Tab to check the result.
Note: You might also see entries in HKEY_CURRENT_USER\Software\Policies\Microsoft\Windows\Explorer. These policies can sometimes override each other. For system-wide control, the HKEY_LOCAL_MACHINE path is generally more definitive.
To reset to default: If you want to go back to letting users choose their own settings (like in Option 1), delete the MultiTaskingAltTabFilter value from the registry key above. Alternatively, set its value data to 0 (zero) in the HKEY_CURRENT_USER path and make sure it isn't set in the HKEY_LOCAL_MACHINE path.
Conclusion
You now know how to change how many tabs show up when you use Alt+Tab or Snap Assist in Windows 11. For most people the Settings app is enough. Use the registry or Group Policy only when you need to set it for another account, or for every user on the PC. If you ever want the original behaviour back, choose 3 most recent tabs in Settings, or remove the policy or registry value you added.
Frequently asked questions
How to change Windows tab?
Open Settings System Multitasking Under Alt+Tab, pick how many tabs from your browser and other apps appear when you press Alt+Tab: 20 open tabs, 5 open tabs, or 3 open tabs. Choose Windows only to hide tabs and show only open windows. The change takes effect right away.
How to make it so alt + tab doesn't switch Windows?
Windows does not offer a setting to turn off Alt+Tab. You can stop it from showing browser tabs by opening Settings System Multitasking and selecting Windows only under Alt+Tab. Alt+Tab then cycles through open windows only. Turning it off entirely requires a third-party tool, which this guide does not cover.
How to change alt+tab settings in Windows registry?
Open Registry Editor and go to HKEY_CURRENT_USER\Software\Microsoft\Windows\CurrentVersion\Explorer\Advanced. Back up the key first, since a wrong edit can cause problems. Change the MultiTaskingAltTabFilter DWORD value: 0 shows 20 tabs, 1 shows 5, 2 shows 3, and 3 shows windows only. If it is missing, create it as a 32-bit DWORD.
How to add tabs to home screen 🪟 Windows 11?
Use Microsoft Edge to add a website to Start. Open the site, select Settings and more, go to More tools, then choose Apps and Install this site as an app. Windows adds it to the Start menu. Find it in the All apps list and pin it there.
How to show all your browser tabs in alt+tab on 🪟 Windows 11?
Open Settings System Multitasking and set Alt+Tab to 20 open tabs. Alt+Tab then shows your open Microsoft Edge tabs next to your open windows. Only Microsoft Edge tabs appear this way. Tabs from Chrome and Firefox do not show in Alt+Tab.
How to see multiple tabs in Windows?
Use Task View, Snap Assist, or the tabs built into your apps. Press Win+Tab to open Task View and see all open windows at once. Microsoft Edge and File Explorer both have tabs. In File Explorer, press Ctrl+T to open a new tab.
Still have a question?
Answered by AI from this guide. Good questions may be added to this page — please don't include personal details.
Did this guide fix your problem?

About the Author
Richard
Tech Writer, IT Professional
Richard is a writer at Geek Rewind who turns complex IT tasks into clear, step-by-step guides. He draws on years of hands-on experience in system administration and enterprise IT operations, focusing on Windows, Linux and WordPress: the problems people actually run into, and the fixes that work. His server and WordPress guides come from systems he runs himself. Richard builds and maintains the platform behind Geek Rewind, from its Ubuntu servers and Nginx configuration to its custom WordPress plugins. Many new tutorials start with readers' questions, and he's always glad to answer them in the comments.
No comments yet — be the first to share your thoughts!