
This article explains enabling or disabling Enhanced Sign-in Security in Windows 11.
The Windows Hello feature provides a more personal and secure way to sign into Windows. With Windows Hello, one can use a PIN, facial recognition, or fingerprint to sign into their devices securely.
When you sign in with Windows Hello, your biometric data is stored securely. Malicious users and attackers constantly try to develop new ways to access your device and sensitive information. To stop them, you need a secure sign-in process that begins at the biometric sensor and ends where your profile is stored.
To add a layer of security to your biometric data, you can enable Enhanced Sign-in Security (ESS), which uses specialized hardware and software components, for example, Virtualization Based Security (VBS) and Trusted Platform Module 2.0.
To use ESS, your device must meet the following requirements:
- Device with Virtualization-Based Security (VBS), including Device Guard Enablement and Trusted Platform Module 2.0
- Biometric sensor hardware that supports ESS
- Biometric sensor drivers compatible with ESS
- Device firmware with a Secure Devices (SDEV) ACPI table configured by the device manufacturer for the included biometric hardware
Turn on Enhanced Sign-in Security
As mentioned, Windows includes an Enhanced Sign-in Security feature for compatible devices.
Here’s how to turn it on or off.
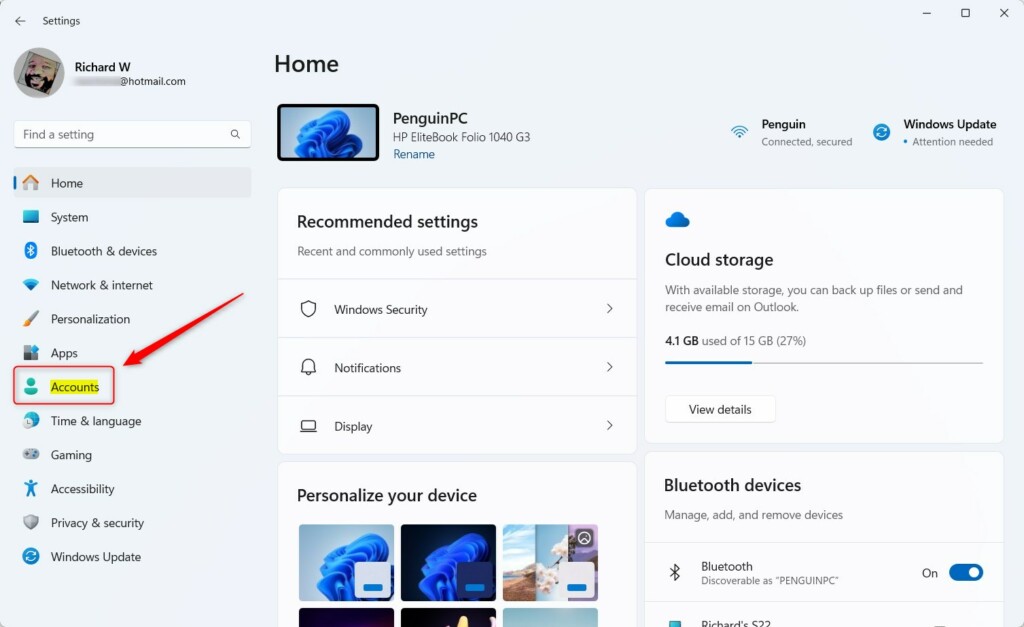
First, open the Windows Settings app.
You can do that by clicking on the Start menu and selecting Settings. Or press the keyboard shortcut (Windows key + I) to launch the Settings app.
When the Setting app opens, click the Accounts button on the left.
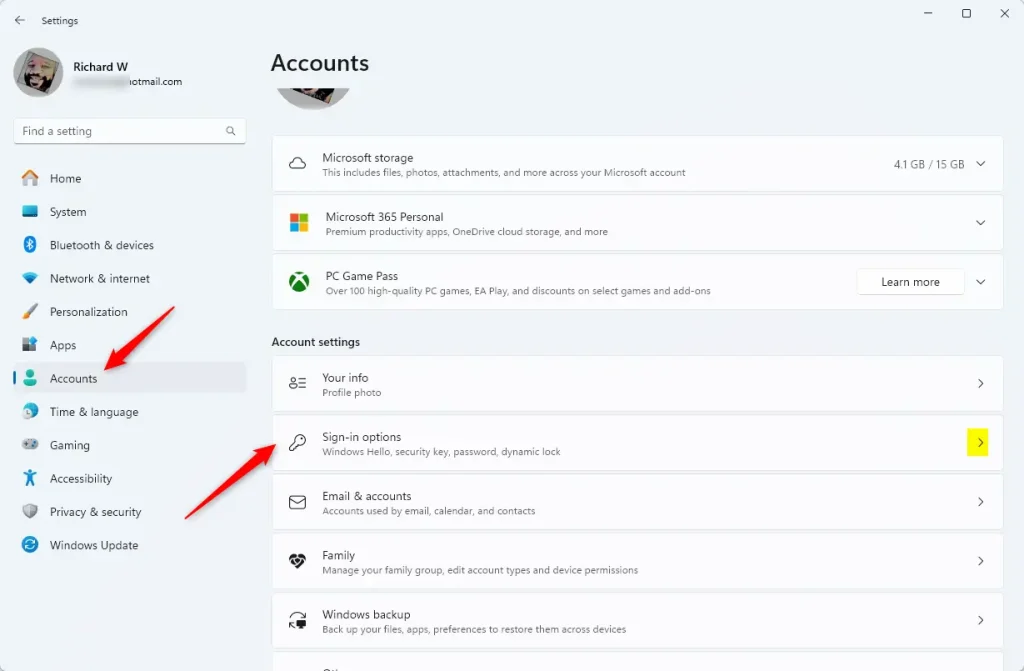
On the right, select the Sign-in options tile to expand it.
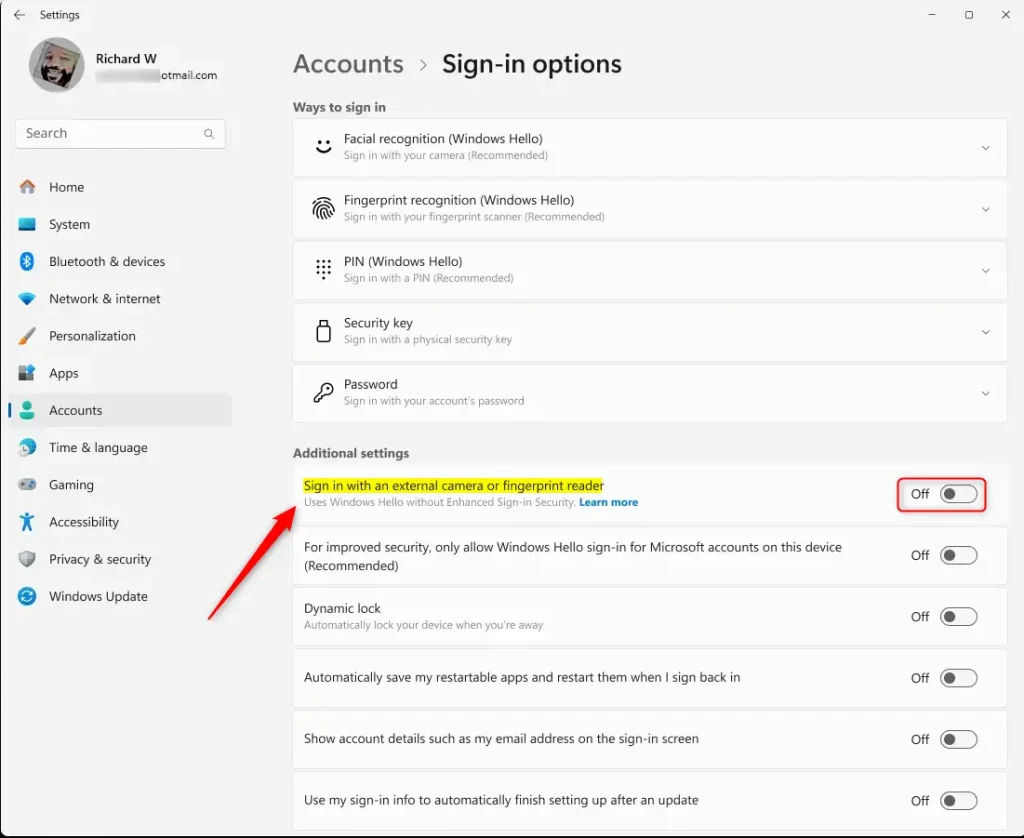
On the Account > Sign-in options settings pane, select the “Sign in with an external camera or fingerprint reader” tile under Additional settings. Then, toggle the button to the On or Off position to enable or disable it.
Note: You won’t see the settings if your device doesn’t meet the requirements.
Close the Settings app after making your changes.
Enable ESS using the Registry Editor
Another way to enable or disable ESS in Windows is to use the Windows Registry editor.
First, open the Windows Registry and navigate to the folder key path below.
Computer\HKEY_LOCAL_MACHINE\SOFTWARE\Microsoft\Windows\CurrentVersion\WinBio
Next, double-click the (REG_DWORD) “SupportPeripheralsWithEnhancedSignInSecurity” name on the WinBio key’s right pane to open it.
Then, enter a value 0 to turn on the Enhanced Sign-in Security feature.
Enter 1 to turn it off.
If you do not see the “SupportPeripheralsWithEnhancedSignInSecurity” item, right-click a blank area and create a new DWORD (32-bit) registry item.
Then, enter 1 or 0 to enable or disable it.
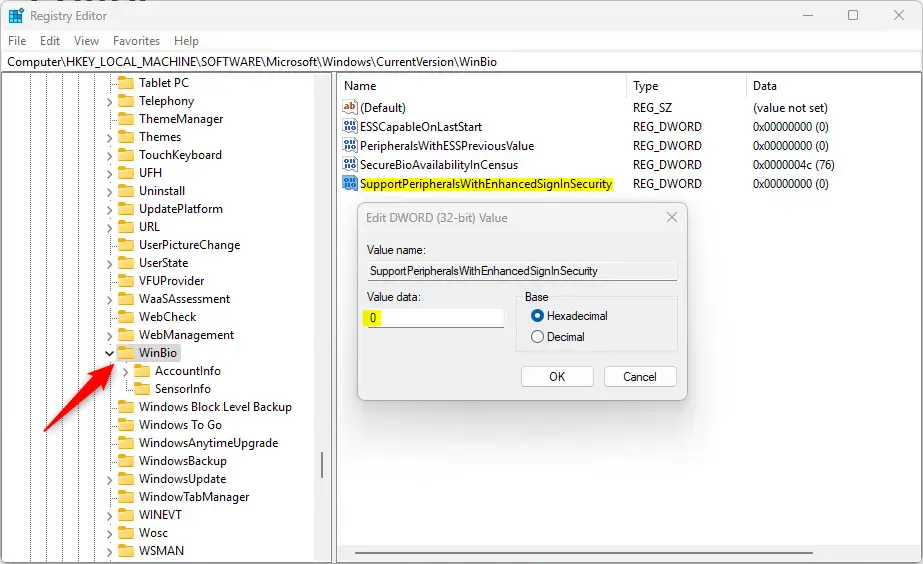
Save your changes and restart your computer.
When Enhanced Sign-in Security (ESS) is enabled, users will have to sign in next time with their password or PIN and set up their face and fingerprint again.
That should do it!
Reference:
Conclusion:
Enabling or disabling Enhanced Sign-in Security (ESS) in Windows 11 is a straightforward process that enhances the security of your device. Here are the key takeaways:
- Enhanced Security: ESS adds an extra layer of security to your sign-in process by utilizing advanced hardware and software.
- Requirements: Ensure your device meets the necessary hardware and software requirements for enabling ESS.
- Settings Access: You can easily toggle ESS from the Windows Settings app or the Windows Registry Editor.
- User Setup: Once ESS is enabled, you must reconfigure your biometric sign-in methods, including face and fingerprint recognition.
- Protection Against Attacks: ESS helps safeguard your biometric data from potential malicious users and attackers.
Following the outlined steps can enhance your device’s security and ensure a personalized sign-in experience.


Leave a Reply