How to Enable or Disable Windows Hello Biometrics for Domain Users


You can enable or disable Windows Hello biometrics for domain users (accounts connected to a network, like at work or school) in Windows 11 by configuring Group Policy settings.
Windows Hello makes signing in convenient and secure with features like facial recognition, fingerprint scanning, and PIN entry. Many new PCs come with it already installed.
IT administrators set organizational security policies that can block fingerprint scanning and facial recognition on computers joined to a network. These central policies stop users from turning on Windows Hello biometrics, which offers better security.
This guide shows you exactly how to manage Windows Hello biometrics for domain-joined accounts on Windows 11. You’ll understand how to control these settings afterward.
Configure Windows Hello biometrics for domain users via Group Policy Editor or Registry Editor. Navigate to Administrative Templates > Windows Components > Biometrics in Group Policy, then adjust the “Allow domain users to log on using biometrics” setting. Alternatively, in Registry Editor, modify the “Enabled” DWORD value under 🗝️HKEY_LOCAL_MACHINESOFTWAREPoliciesMicrosoftBiometrics.
Turn On or Off Windows Hello Biometrics Using Local Group Policy Editor
The Local Group Policy Editor, a Windows tool, directly controls advanced settings. This tool manages whether Windows Hello biometrics function for domain users.
Step 1Open Local Group Policy Editor
Press Windows key + R on your keyboard. Type gpedit.msc and press Enter.
Step 2Find the Biometrics Settings
The Local Group Policy Editor tool, which changes computer settings, displays a navigation path on its left. Administrators use this path to manage Windows Hello biometrics. This path controls fingerprint or face login functionality for users on network computers, impacting over 100 million devices globally.
Computer Configuration → Administrative Templates → Windows Components → Biometrics
Step 3Change the Setting
You can control if domain users can sign in with Windows Hello biometrics by changing the ‘Allow domain users to log on using biometrics’ setting. This setting is found in the Biometrics folder within your computer’s settings.
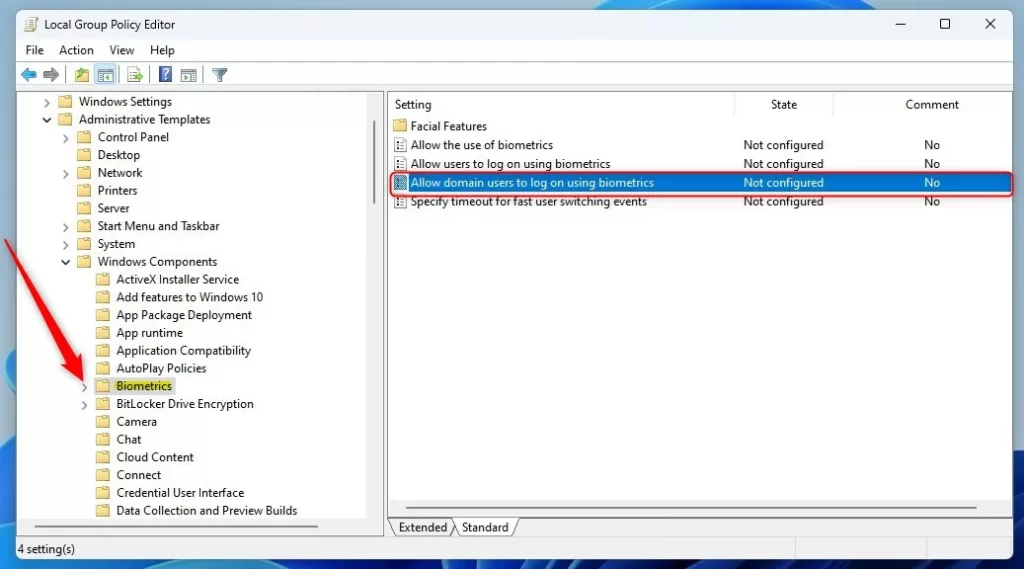
Now select one of these options:
- Not Configured – This means biometrics are allowed.
- Enabled – Biometrics will be allowed for domain users.
- Disabled – Biometrics will NOT be allowed for domain users.
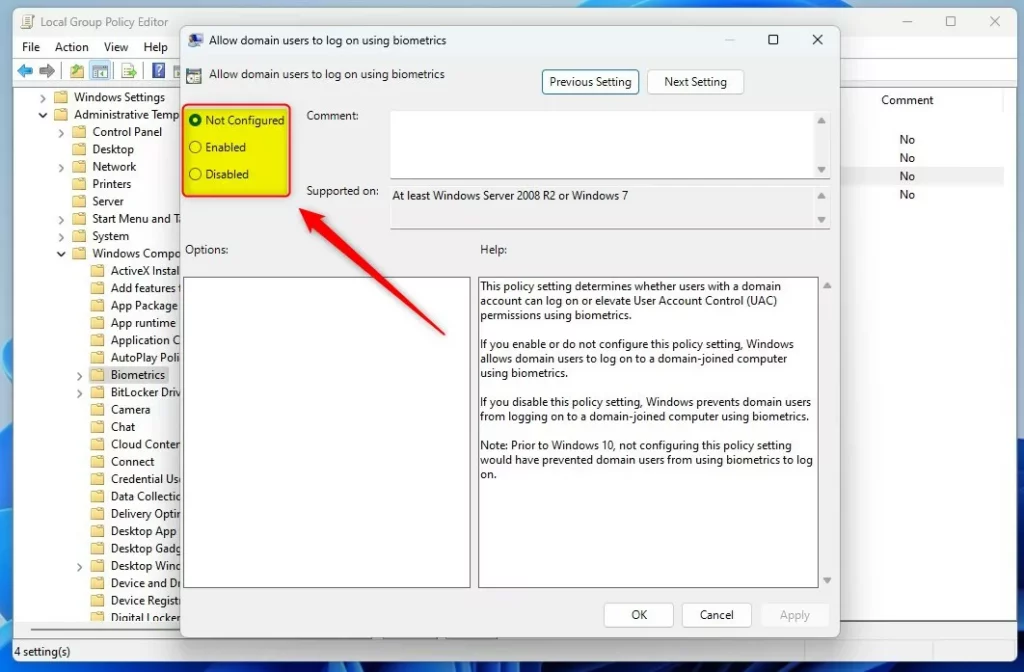
Clicking OK saves the biometric setting changes. Restarting the computer applies these biometric changes for domain users, ensuring Windows Hello fingerprint and facial recognition settings are active or inactive as intended.
Turn On or Off Windows Hello Biometrics Using Registry Editor
If you can’t use the Local Group Policy Editor (for example, on Windows Home editions), you can change the setting by editing the Windows Registry.
Step 1Open Registry Editor
Press Windows key + R. Type regedit and press Enter.
This guide, "How to Open Registry Editor in Windows 11," provides additional information. Registry Editor in Windows 11 allows advanced users to change system settings by editing the Windows Registry, a database that stores low-level settings for the operating system and applications.
Step 2Navigate to the Biometrics Key
Go to this folder path:
If the Biometrics folder does not appear under the Microsoft folder, create this folder. This action ensures that Windows Hello biometrics settings can be properly managed for domain users. The presence of the Biometrics folder is required for the subsequent configuration steps.
- Right-click on Microsoft → New → Key.
- Name the new key Biometrics.
Step 3Create or Edit the “Enabled” Value
To set up Windows Hello biometrics for domain users with the Registry Editor, you’ll create or edit a value called ‘Enabled’ in the Biometrics folder. This lets you turn biometrics on or off for domain accounts.
Name this new value Enabled.
Double-click the Enabled value. Set the Base to Decimal. Then set the Value data to:
- 1 to turn ON biometrics for domain users.
- 0 to turn OFF biometrics for domain users.
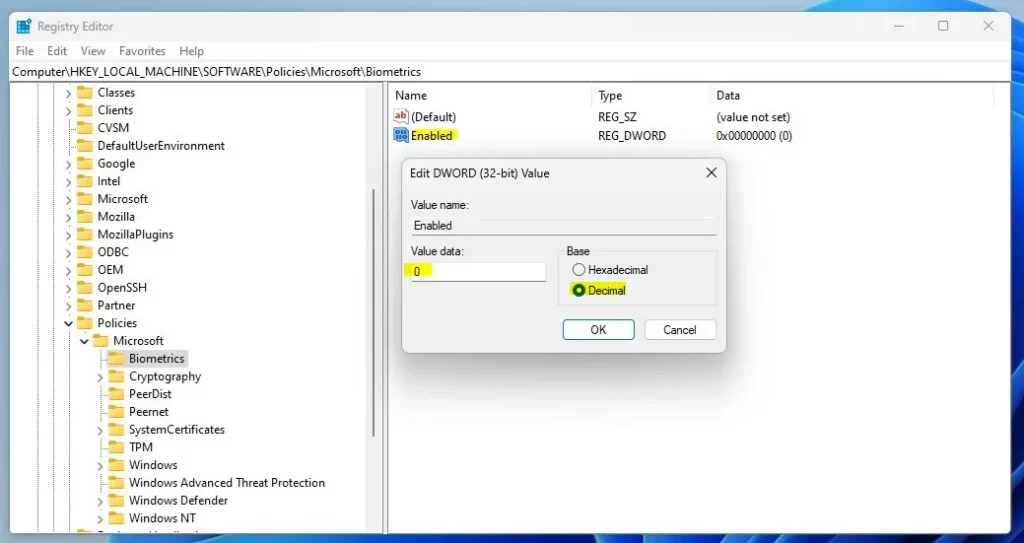
Press OK and close the Registry Editor.
Restart your computer to apply these changes.
Summary
Windows Hello biometrics offers secure sign-in using face, fingerprint, or PIN. Administrators can manage these sign-in options for domain users on a PC. If a PC joins a domain, these sign-in options might be turned off by default. Users can easily turn Windows Hello biometrics on or off.
If your PC is part of a domain (like work or school), these sign-in options might be turned off by default.
You can turn Windows Hello biometrics on or off for domain users by using either the Local Group Policy Editor or the Registry Editor.
Remember to restart your computer after making any changes.
If you want to learn more about Windows Hello features, here are some helpful guides:
How to Sign In with a PIN in Windows 11
Was this guide helpful?

About the Author
Richard
Tech Writer, IT Professional
Richard, a writer for Geek Rewind, is a tech enthusiast who loves breaking down complex IT topics into simple, easy-to-understand ideas. With years of hands-on experience in system administration and enterprise IT operations, he’s developed a knack for offering practical tips and solutions. Richard aims to make technology more accessible and actionable. He's deeply committed to the Geek Rewind community, always ready to answer questions and engage in discussions.



No comments yet — be the first to share your thoughts!