Setup PHP Timezone in Nginx on Ubuntu 24.04

Setting the PHP timezone in Nginx on Ubuntu 24.04 fixes incorrect timestamps by matching your web apps to your local time instead of UTC. PHP uses UTC unless you tell it otherwise, and a fresh Ubuntu 24.04 server is usually set to UTC as well. Database entries, logs and scheduled tasks can then show the wrong time.
You fix this in two places. First, set the server’s system timezone. Then edit the php.ini configuration file so PHP uses your city or region. PHP reads its own setting, so changing the system timezone alone does not change what your PHP code reports. Once both are set, comments, posts and order history show the times your users expect.
To set the PHP timezone in Nginx on Ubuntu 24.04, first run sudo timedatectl set-timezone with your zone, such as America/Chicago. Then open /etc/php/8.3/fpm/php.ini with sudo nano and set date.timezone to the same zone. PHP does not read the system timezone, so this php.ini change is required. Restart PHP-FPM afterwards.
Set up Ubuntu timezone
This section shows how to check the current timezone and change it from the terminal. You need a user with sudo rights for the change. Reading the current timezone needs no special rights.
To find out which timezone your server is configured for, run the command below.
timedatectl
The output should look similar to the example below. Look for the time zone line. It shows the zone name, its abbreviation and the offset from UTC. A fresh install usually shows Etc/UTC.
               Local time: Tue 2025-02-18 14:51:49 CST
           Universal time: Tue 2025-02-18 20:51:49 UTC
                 RTC time: Tue 2025-02-18 20:51:50
                Time zone: America/Chicago (CST, -0600)
System clock synchronized: yes
              NTP service: active
          RTC in local TZ: no
If the server already shows the correct time zone, there is nothing to change here. Skip ahead to the PHP section.
If the timezone is wrong, use the steps below to change it.
First, list all the time zones available on your server by running the command below. The list is long, so scroll through it or filter it for your country or city.
sudo timedatectl list-timezones
The command prints every available time zone in the format Continent/City, or Country/City. Zone names are case-sensitive and use underscores instead of spaces, for example America/New_York.
Africa/Abidjan
Africa/Accra
Africa/Addis_Ababa
Africa/Algiers
Africa/Asmara
Africa/Asmera
Africa/Bamako
Africa/Bangui
.....
Once you find the zone you want, run the command below to apply it. The change takes effect straight away, and the server does not need a reboot.
sudo timedatectl set-timezone America/Chicago
Replace the highlighted Continent or Country/City in the command with your own zone. If the command reports that the time zone is invalid, check the spelling and capitalization against the list you just printed.
Alternatively, run the command below to choose your server's time zone from a menu instead of typing the name.
sudo dpkg-reconfigure tzdata
A text menu opens in the terminal. Use the up and down arrow keys to select your region, press Enter, then select the city or zone in the next screen and press Enter again.
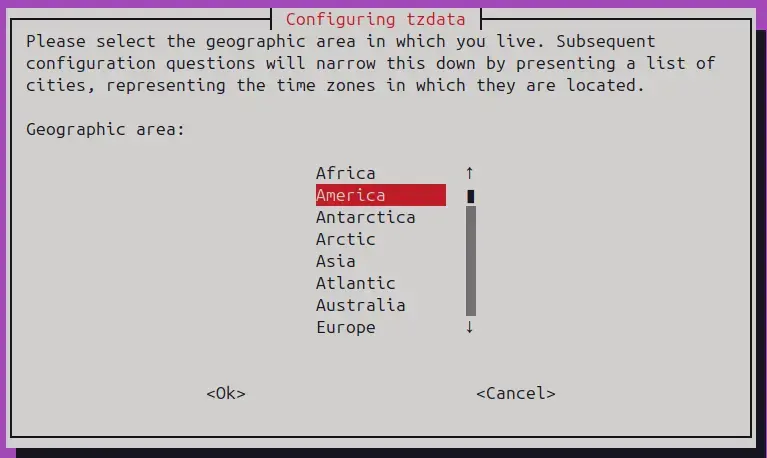
When you confirm your choice, the terminal prints a summary showing the new local time and zone. This means the server's time zone is now updated. You can run the check command from the start of this section again to confirm it.
Set PHP timezone
Next, tell PHP which timezone to use. This means editing the php.ini file for your PHP version. Match the value to the server time you set above, so your applications and the system agree. If you leave the setting empty, PHP falls back to UTC.
To change the PHP timezone, run the command below to open each php.ini file at these locations. On Ubuntu, PHP-FPM, which Nginx uses for web requests, and the PHP command line each have their own php.ini. Update both if you want scripts run from the terminal or cron to use the same timezone as your website.
Replace the highlighted version number (8.3) with the PHP version installed on your server. Ubuntu 24.04 ships with PHP 8.3 by default, but a version from another repository may differ.
sudo nano /etc/php/8.3/fpm/php.ini
sudo nano /etc/php/8.3/cli/php.ini
In the file, find the date section shown below and update the timezone line inside it. The line may start with a semicolon, which means it is commented out. Remove the semicolon so the setting takes effect.
[Date]Set the value to the same zone you chose for the server, for example the Continent/City name from the earlier list.
[Date]
; Defines the default timezone used by the date functions
; https://php.net/date.timezone
date.timezone = America/Chicago
Save the file and exit the editor.
Alternatively, run the command below to update the timezone in one step instead of digging through the php.ini file. Edit the command first so it uses your own timezone and your PHP version.
sudo sed -i "s|;date.timezone.*|date.timezone = America/Chicago|" /etc/php/8.3/fpm/php.inisudo sed -i "s|;date.timezone.*|date.timezone = America/Chicago|" /etc/php/8.3/cli/php.ini
Restart PHP to apply the settings. PHP-FPM only reads php.ini when it starts, so the change does not show up until you do this. Scripts run from the command line pick up the new value the next time they start.
sudo systemctl restart nginx
sudo systemctl restart php8.3-fpm
Verify the Configuration
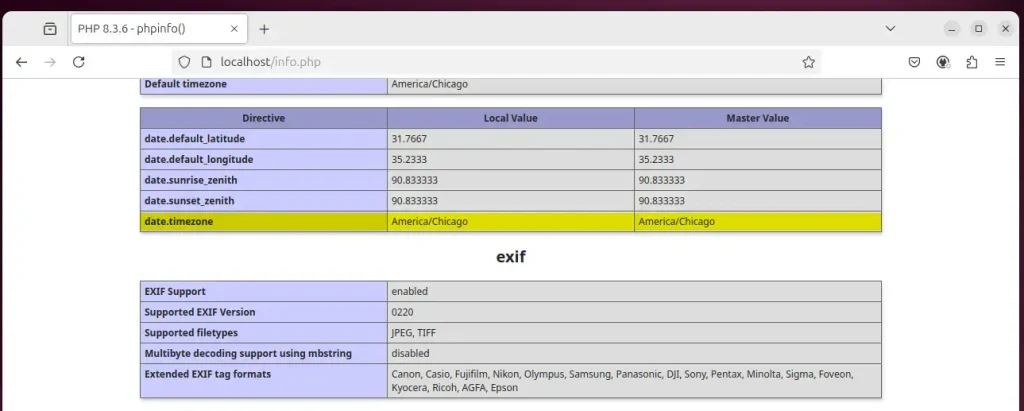
Now test the setup to confirm that Nginx and PHP are using the new timezone. Create a simple test script that shows the PHP configuration, then open it in your web browser.
   <?php
   phpinfo();
   ?>
http://localhost/info.php) and look for the date.timezone setting.It should show the timezone you entered. If it still shows UTC, check that you edited the php.ini for the PHP-FPM version Nginx uses and that you restarted PHP. Delete the test file when you are done, because the page exposes details about your server that you don't want public.
If the browser downloads the file or shows the raw PHP code instead of the PHP test page, Nginx is not passing PHP requests to PHP-FPM yet. You need to enable PHP handling in the Nginx server block.
Open the default Nginx server block by running the command below.
sudo nano /etc/nginx/sites-available/default
Then edit the highlighted lines as shown below, save the file and exit. The PHP-FPM socket path in these lines must match the PHP version installed on your server. If your server runs a different version than 8.3, adjust it.
        # pass PHP scripts to FastCGI server
        #
        location ~ .php$ {
                include snippets/fastcgi-php.conf;
        #
        #       # With php-fpm (or other unix sockets):
                fastcgi_pass unix:/run/php/php8.3-fpm.sock;
        #       # With php-cgi (or other tcp sockets):
        #       fastcgi_pass 127.0.0.1:9000;
        }
Restart Nginx and test again. The page should now load and show the timezone you set.
That should do it!
Conclusion:
- Setting the correct timezone in PHP and on your Ubuntu server is essential for accurate date and time handling in your applications.
- Make sure the server's timezone is configured correctly to prevent discrepancies in timestamps.
- Updating the
php.inifile or using thesedcommand provides a quick way to set the PHP timezone. Restart PHP afterwards so it takes effect. - Verifying the configuration with a simple PHP info script confirms that the changes have been applied. Remove the script once you have checked.
- Check the timezone settings now and then, especially after a PHP upgrade, so time-sensitive applications keep working reliably.
Have a question about this guide?
Answered by AI from this guide. Good questions may be added to this page — please don't include personal details.
Did this guide fix your problem?

About the Author
Richard
Tech Writer, IT Professional
Richard is a writer at Geek Rewind who turns complex IT tasks into clear, step-by-step guides. He draws on years of hands-on experience in system administration and enterprise IT operations, focusing on Windows, Linux and WordPress: the problems people actually run into, and the fixes that work. His server and WordPress guides come from systems he runs himself. Richard builds and maintains the platform behind Geek Rewind, from its Ubuntu servers and Nginx configuration to its custom WordPress plugins. Many new tutorials start with readers' questions, and he's always glad to answer them in the comments.
No comments yet — be the first to share your thoughts!