

Is your WSL Ubuntu acting up on Windows 11? Don’t worry! This guide will show you how to fix it. You can either repair it to keep your files safe, or reset it to start completely fresh. Let’s look at both options.
WSL lets you run Linux right inside Windows without needing extra software. You can use many Linux commands and tools easily.
Sometimes the Ubuntu app inside WSL stops working properly. You can repair it to fix problems without losing your files. If that doesn’t work, you can reset it to start over (but this will erase your data).
How to Repair WSL Ubuntu
Why repair? Repairing restores some settings but keeps your files and data safe.
What happens? Ubuntu will work normally again without you losing any of your work.
Follow these simple steps:
- Open the Settings app. Click the Start menu and choose Settings, or press Windows key + I on your keyboard.
- In Settings, click Apps on the left side.
- Click on Installed apps on the right.
- Scroll down and find the Ubuntu app in the list.
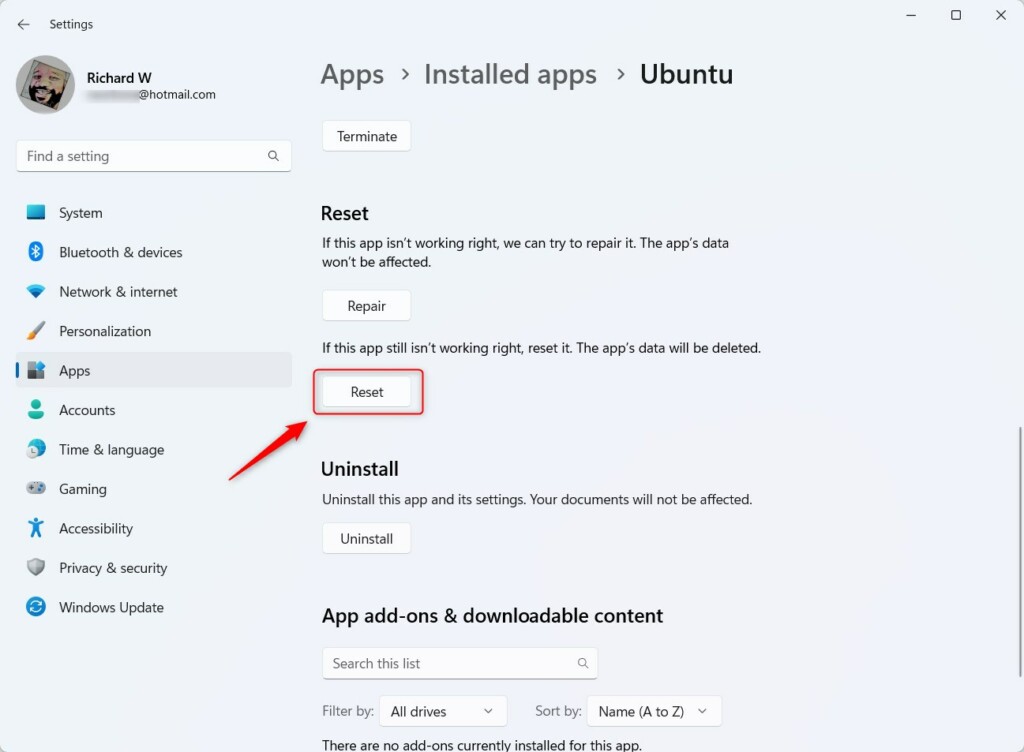
- Click the three dots next to Ubuntu, then select Advanced options.
- On the new page, scroll down and click the Repair button.
- Wait a little while for Windows to fix the app. When done, try opening Ubuntu again.

The Repair button fixes Ubuntu without losing your data.
How to Reset WSL Ubuntu
Why reset? If repairing doesn’t help, resetting gives you a completely fresh start.
What happens? This will delete all your files and settings inside Ubuntu. Only do this if you have backups or don’t mind losing your data.
To reset Ubuntu, follow the same steps as repairing (Settings > Apps > Installed apps > Ubuntu > Advanced options), but this time click the Reset button.
Reset deletes all data and gives you a fresh Ubuntu installation.
Wait until the reset finishes, then open Ubuntu again to check if it works better.
Alternative: Reset WSL Ubuntu Using Windows Terminal
You can also reset Ubuntu using the Windows Terminal app as an administrator:
- [REQUIRES ADMIN PRIVILEGES] Open Windows Terminal as admin:
- Click the Start menu and type Windows Terminal.
- Right-click it and choose Run as administrator.
- In the terminal window, type this command and press Enter to see all installed WSL Linux distributions:
wsl --list - To reset Ubuntu, type this command and press Enter:
wsl --unregister Ubuntu - This will remove Ubuntu from WSL, and you can reinstall it fresh from the Microsoft Store.
Summary
- WSL Ubuntu can be fixed by repairing or resetting it on Windows 11.
- Repairing keeps your files and resets some settings.
- Resetting deletes all your Ubuntu files and settings, giving you a clean start.
- Use the Windows Settings app for easy repair and reset options.
- Or use Windows Terminal as an admin to remove and reinstall Ubuntu.
- If you want to learn more about WSL and installing Ubuntu, check out this helpful guide: How to Install WSL on Windows 11.

Leave a Reply