How to Rename Physical Disks in Windows 11 Storage Pool
If you use multiple hard drives together on your Windows 11 PC, you might have a Storage pool. This lets you combine several disks into one big virtual drive, making it easier to manage your files.
Storage Spaces is the Windows feature that helps you create and manage these storage pools.
One useful thing you can do is give each physical disk in your storage pool a special name. This helps you tell them apart, especially if you have many disks or if some are similar.
Why Rename Your Disks?
- Make it easier to find a specific disk.
- Helps when you need to replace or fix a disk.
- Prevents confusion between disks from different brands or sizes.
How to Rename Physical Disks Using Control Panel
Follow these simple steps:
- Open the Control Panel on your Windows 11 computer.
- Go to: Control Panel > System and Security > Storage Spaces.
- Click the Change settings button at the top of the Storage Spaces page.
- Find your Storage pool and click to expand it.
- Under Physical drives, click the Rename link next to the disk you want to rename.
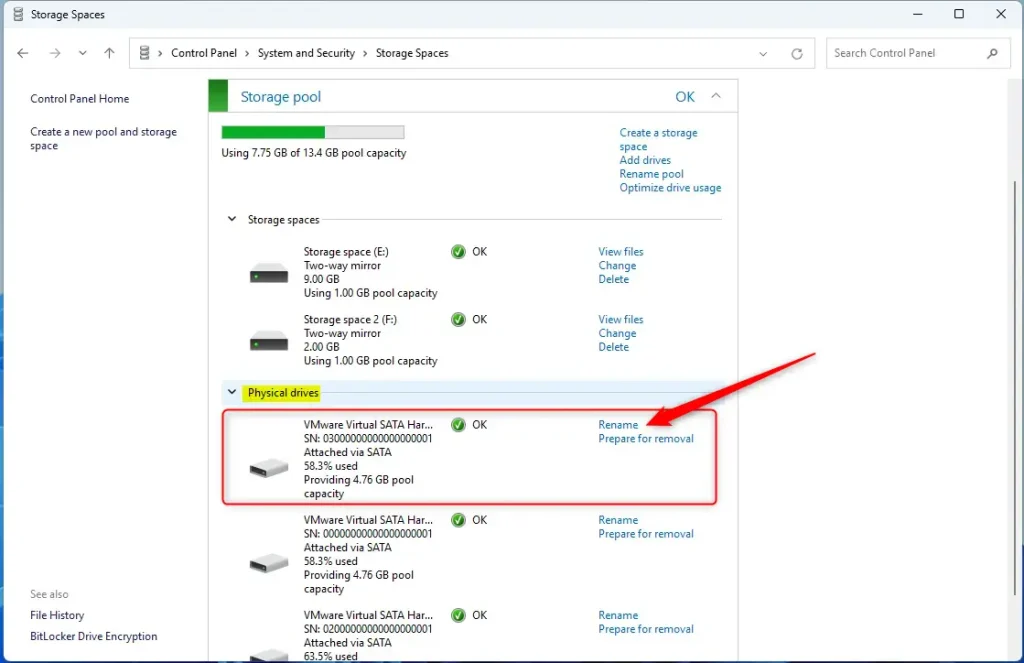
- A box will pop up asking for a new name. Type a unique name for your disk and click Rename drive.

When done, close the Control Panel. Your disk will now show the new name.
How to Rename Physical Disks Using PowerShell
If you like using commands, PowerShell is another way to rename your disks.
- Open PowerShell as Administrator (search for PowerShell, right-click, and choose “Run as administrator”). ⚠️ Requires admin privileges
- Type this command to see all your physical disks:PowerShell
Get-PhysicalDisk | Select-Object FriendlyName, SerialNumber, UniqueID - Look for the disk you want to rename by its name or ID.
- Use one of these commands to rename the disk (replace the names and IDs with your own):PowerShell
Set-PhysicalDisk -FriendlyName "OldDiskName" -NewFriendlyName "NewDiskName"OR
PowerShellSet-PhysicalDisk -UniqueId "DiskUniqueID" -NewFriendlyName "NewDiskName" - Example: If your disk is named SAMSUNG HD5555 or its unique ID is 1234567890, and you want to rename it to SAMSUNG HD1, you would type:PowerShell
Set-PhysicalDisk -FriendlyName "SAMSUNG HD5555" -NewFriendlyName "SAMSUNG HD1"OR
PowerShellSet-PhysicalDisk -UniqueId "1234567890" -NewFriendlyName "SAMSUNG HD1" - Press Enter, and your disk will be renamed.
Summary
What is this about? Renaming your physical disks in a Storage pool helps you keep track of your drives easily and identify them when you need to fix or replace one.
How do you do it? You can rename disks in two ways: through the easy-to-use Control Panel or by using PowerShell commands.
What should you remember? Always use unique names for your disks to avoid confusion.
That’s it! Now you know how to rename your physical disks in a Storage pool on Windows 11.
Was this guide helpful?

About the Author
Richard
Tech Writer, IT Professional
Richard, a writer for Geek Rewind, is a tech enthusiast who loves breaking down complex IT topics into simple, easy-to-understand ideas. With years of hands-on experience in system administration and enterprise IT operations, he’s developed a knack for offering practical tips and solutions. Richard aims to make technology more accessible and actionable. He's deeply committed to the Geek Rewind community, always ready to answer questions and engage in discussions.


No comments yet — be the first to share your thoughts!