How to pause or resume Recall snapshots in Windows 11


Recall snapshots in Windows 11 take a picture of your computer screen every few seconds to build a searchable visual history of your past activity. This background feature lets you find previous apps, websites, and documents simply by typing normal words into a search box .
Pausing Recall stops Windows from saving your screen during sensitive tasks like online banking or entering passwords. You can pause the feature at any time from the taskbar , and Windows turns it back on automatically at midnight.
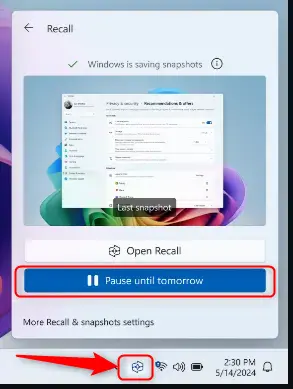
Click the Recall icon in the system tray and select “Pause until tomorrow” to temporarily disable snapshots. Click the icon again and select “Resume snapshots” to re-enable the feature.
Pause and resume Recall snapshots
You can pause Recall snapshots at any time to stop Windows from taking pictures of your screen. To pause Recall snapshots, click the Recall icon in your taskbar system tray and pick ‘Pause until tomorrow.’ If you want to start recording again later, click ‘Resume snapshots’ in the same menu or open the Settings app under Privacy & security and click Recall & snapshots.
To check your preferences, open the Windows Settings app, head to Privacy & security, and click on Recall & snapshots.
If Recall snapshots are active, click the Recall icon in your taskbar ’s system tray and choose ‘Pause until tomorrow.’
If paused, click ‘Resume snapshots’ to resume Recall.
Recent Updates
- Recall feature initially launched on Copilot+ PCs.
- Microsoft has responded to privacy concerns by adding more user controls and transparency.
Managing Recall Settings
- You can manage Recall settings through the Windows Settings app. Here you can choose to pause or resume snapshots, view your history, delete snapshots, and configure which apps and websites Recall should not capture.
- To access settings:
- Open
Settings. - Navigate to
Privacy & security. - Select
History.
Manually Resume Snapshots
- Open the Recall app from the Start menu.
- Click the 'Resume snapshots' button.
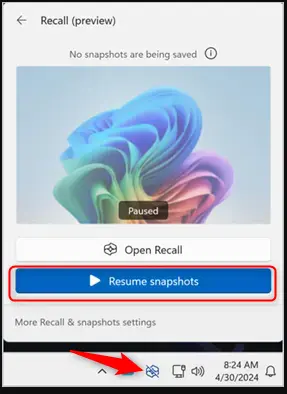
You can manually resume snapshots if you paused them earlier and want Windows to start saving your screen activity again. To manually resume snapshots, open the Recall app from your Start menu and click the 'Resume snapshots' button at the top of the window to turn the background recording back on immediately.
Managing Recall helps protect your personal privacy and free up local storage space.
- Managing Recall snapshots on Windows 11 is essential for privacy and storage management.
- Pausing and resuming snapshots provides control over when Recall captures sensitive information.
- Stay vigilant of storage limits and regularly delete unnecessary snapshots to optimize performance.
- Use the Recall feature to quickly search and retrieve saved snapshots on your PC.
How Windows Recall Works
Recall saves snapshots of screen activity and stores them in a local database on your PC. Searches prompt Recall to analyze these snapshots to find specific items. Microsoft receives zero telemetry from this process. Local device storage preserves overall privacy.
Was this guide helpful?

About the Author
Richard
Tech Writer, IT Professional
Richard, a writer for Geek Rewind, is a tech enthusiast who loves breaking down complex IT topics into simple, easy-to-understand ideas. With years of hands-on experience in system administration and enterprise IT operations, he’s developed a knack for offering practical tips and solutions. Richard aims to make technology more accessible and actionable. He's deeply committed to the Geek Rewind community, always ready to answer questions and engage in discussions.

[…] recall options are available to users, such as disabling saving snapshots, temporarily pausing, filtering applications and websites, deleting snapshots, and […]
[…] are screenshots of your activity on your Windows 11 device. When Recall is enabled, you can temporarily pause it, filter apps and websites, delete your snapshots, and […]
[…] are other options too, like pausing snapshots temporarily, excluding certain apps, or deleting all […]
[…] Pause the snapshots anytime (learn how here). […]