How to Make Everything Bigger on Your Windows 11 PC

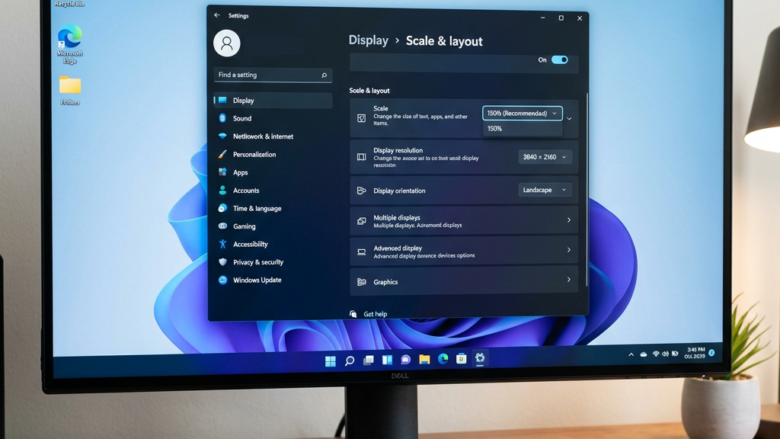
Display scaling in Windows 11 enlarges text, apps, and icons all at the same time, so everything on your screen is easier to read. Changing only the font size leaves buttons and icons small. Scaling raises the size of the whole desktop and keeps app layouts intact, and images stay sharp because Windows redraws them at the larger size instead of stretching them.
The short version: open Settings System Display and choose a larger percentage under Scale. The list usually offers 100%, 125%, 150% and 175%, and sometimes more, depending on your screen resolution. The change helps most on high-resolution monitors, where the default size can cause eye strain.
Making Your Whole Screen Bigger: Scaling Up
Scaling up in Windows 11 makes everything on your screen bigger, not only text. That includes buttons, pictures, menus, and entire windows, so the computer is easier to see and operate. Think of it as reading glasses for your whole PC.
Scaling is different from lowering your screen resolution. Lowering the resolution also makes things bigger, but it makes them look soft and blurry. Scaling keeps the full resolution and simply draws everything larger.
Step 1Go to Display Settings
Start by opening the Settings app. You can do it either of two ways:
- Click the Start button, usually in the bottom-left corner (or centered on the taskbar by default), and then click the gear icon labeled Settings.
- Or press Windows key + I on your keyboard. This is faster and works from almost anywhere.
The Settings window should now be open, with a list of categories down the left side.

Step 2Find Display Options
The scale setting lives in the System section, not under Accessibility. Follow this path: Settings System Display
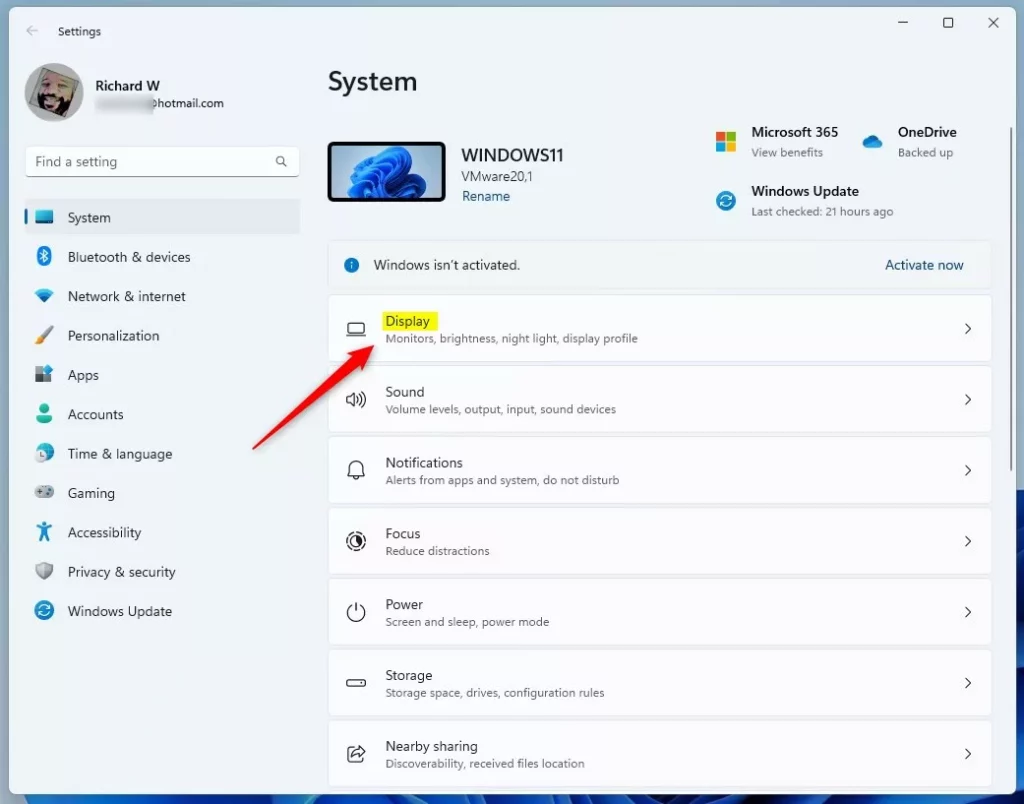
- In the left-hand list, click System. It is usually the first item.
- On the right, click Display. This page controls how items appear on your monitor.
You should now see a preview of your screen or screens at the top, followed by settings such as brightness and a section called Scale & layout.
If you use more than one monitor, click the monitor you want to change in the preview at the top first. Each monitor has its own scale setting.
If you only want larger text and not larger buttons and icons, there is a separate option at Settings Accessibility Text size It is handy, but it does not enlarge everything the way scaling does.
Step 3Find the Scale Setting
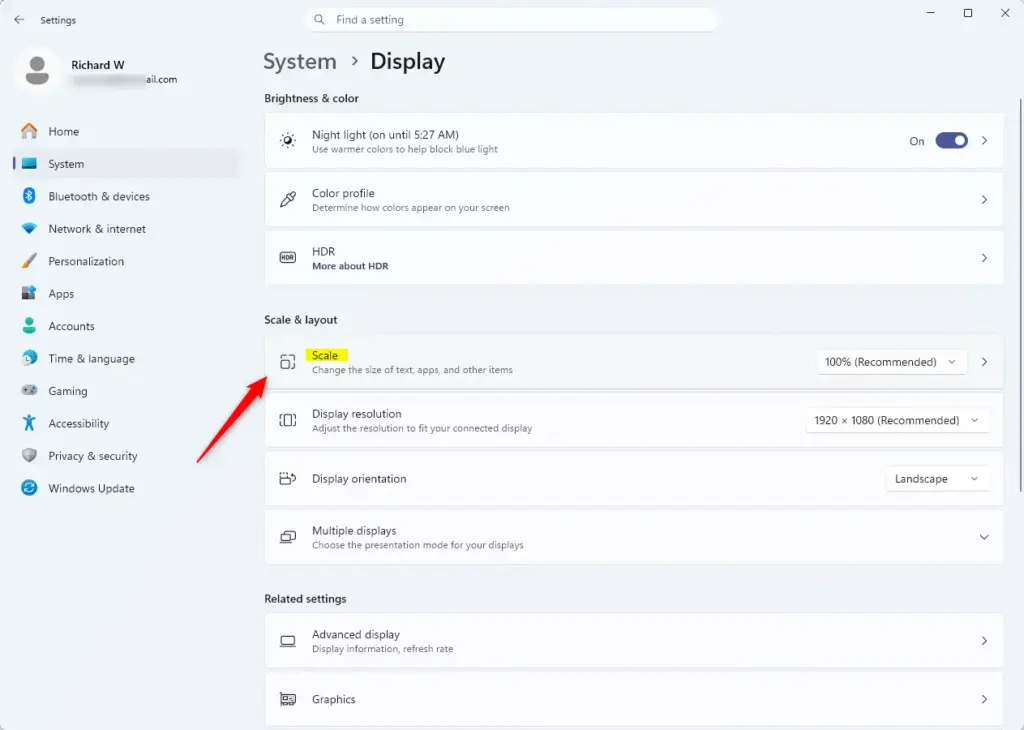
Under Scale & layout, the Scale setting controls the size of all text, apps, icons, and windows on your screen. The default is often 100%, though Windows may already have picked a higher value on high-resolution or laptop screens. Raising it to 125% or 150% makes everything much easier to read without squinting at tiny details.
Scale sets the magnification level for every element on screen. 100% is the baseline size with no enlargement. Higher values such as 125% or 150% expand text, apps, icons, and pictures across the whole interface. A reading of 150% means everything is drawn one and a half times as large as at 100%.
Step 4Pick Your Size
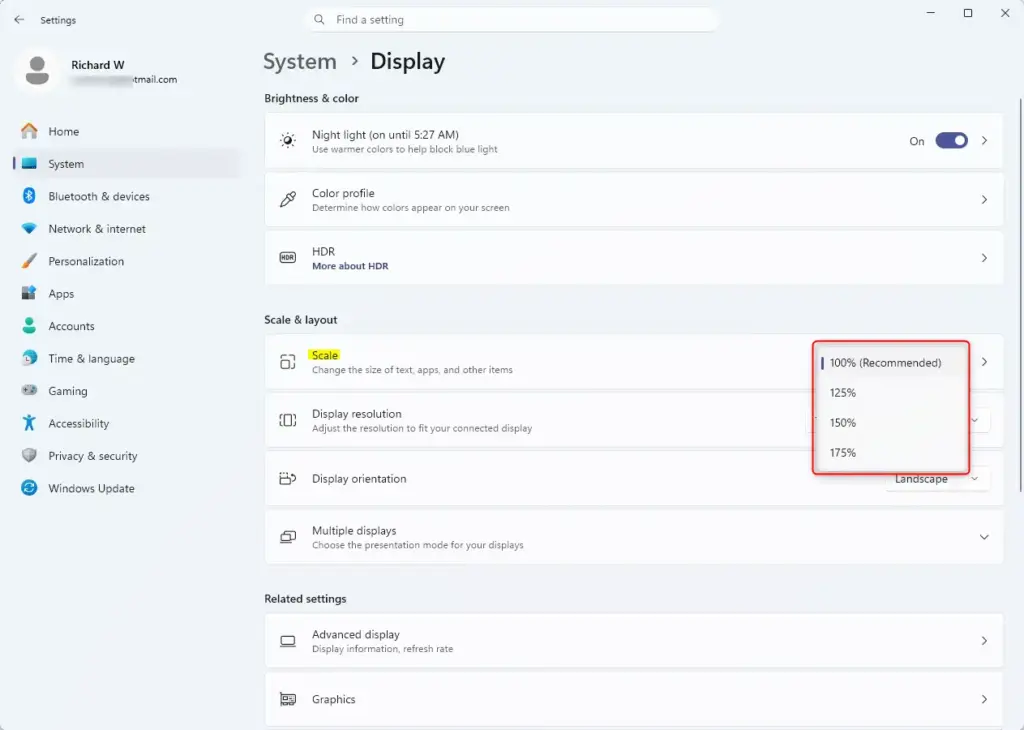
- Click the dropdown menu next to Scale. A list of sizes opens.
- Look for the option marked (Recommended). Windows picks it based on your screen size and resolution, so it is a sensible starting point.
- Click a percentage. 125% is a moderate increase. 150% or higher gives further magnification.
The right choice depends on personal preference and your monitor's resolution. On a small or low-resolution screen, very high values may leave too little room for your windows, and some options may be missing from the list for that reason. If the option you want is greyed out or absent, check that you have selected the correct monitor and that your display driver is installed and up to date.
Step 5Apply the Changes
The new scale applies as soon as you pick it. Your desktop, icons, and windows should grow right away, and the screen may flicker briefly. You do not need to click a separate Apply button.
Some apps, especially older ones, only pick up the new size after you close and reopen them. If the change does not appear everywhere, sign out and back in:
- Click Start, then click your account name or picture.
- Click Sign out.
- Sign back in and check again.
This works for the same reason a restart does, and a full restart is also fine. This works the same in Windows 11 Home and Pro.
Step 6Check Your Screen
Spend a few minutes using the new size before you settle on it. Check these things:
- Open a few apps you use often, such as your browser and File Explorer, and see whether the text reads better.
- Look at the taskbar, buttons, and menus to confirm they are clear and easy to click.
- Make sure windows still fit on your screen and nothing important is cut off.
Keep the current size if 125% feels comfortable. If it is still too small, go back to Settings System Display and choose a higher tier such as 150% for more magnification. To undo the change, set Scale back to the earlier value, such as 100%.
When Scaling Isn't Enough: Use Magnifier
System scaling enlarges the entire display permanently. If you only need to enlarge one area for a moment, such as a small line of text or a detail in an image, use a different tool. Windows Magnifier works like a digital magnifying glass for targeted inspection, and you can switch it off when you are done.
How to Use Magnifier
Magnifier is a built-in Windows 11 tool that lets you zoom in on any part of your screen. The keyboard shortcuts are:
- Press the Windows logo key and the Plus (+) key at the same time to turn Magnifier on. The screen zooms in.
- Keep pressing the same keys to zoom in further.
- Press the Windows logo key and the Minus (-) key to zoom back out.
- To close Magnifier completely, press Windows logo key + Esc.
Magnifier does not change your scale setting, so your desktop goes back to normal once you close it.
Reference:
Conclusion
Adjusting your display scale makes the screen more comfortable to look at by enlarging text, images, and icons together. Picking a suitable percentage, such as 125% or 150%, makes everyday use easier. Find the balance that suits your eyes and your monitor. If you only need a closer look now and then, use Magnifier instead, and you can change the scale again at any time in Settings System Display
Was this guide helpful?

About the Author
Richard
Tech Writer, IT Professional
Richard is a writer at Geek Rewind who turns complex IT tasks into clear, step-by-step guides. He draws on years of hands-on experience in system administration and enterprise IT operations, focusing on Windows, Linux and WordPress: the problems people actually run into, and the fixes that work. His server and WordPress guides come from systems he runs himself. Richard builds and maintains the platform behind Geek Rewind, from its Ubuntu servers and Nginx configuration to its custom WordPress plugins. Many new tutorials start with readers' questions, and he's always glad to answer them in the comments.
No comments yet — be the first to share your thoughts!