How to Install WireGuard VPN Server on Ubuntu Linux


WireGuard VPN Server on Ubuntu Linux sets up a fast and secure private network so you can connect to your home devices from anywhere. WireGuard is a lightweight virtual private network tool that runs directly inside the Linux kernel for top speeds with very little lag.
This setup works on Ubuntu 20.04 and newer versions. You need a computer or cloud server running Ubuntu and a few minutes to copy and paste a handful of commands into the terminal.
Install WireGuard by adding its PPA and running `sudo apt install wireguard`. Then, generate private and public keys with `wg genkey` and `wg pubkey`, followed by creating a `wg0.conf` file for tunnel configuration. Finally, activate the tunnel using `sudo wg-quick up wg0`.
Install WireGuard Server
WireGuard VPN Ubuntu installation requires adding the official software repository and running a quick package installation command in your terminal. You can set this up on your Ubuntu server by updating your system package list and installing the required network tools so the VPN service can run properly.
To add WireGuard PPA and install it from there, run the commands below to get Ubuntu updated and install some essential packages.
sudo apt update
sudo apt install software-properties-common
Next, add the PPA repository and install WireGuard. Press Enter when prompted. This will install the repository file and now the system’s package sources.
The second command installs WireGuard.
sudo add-apt-repository ppa:wireguard/wireguard
sudo apt install wireguard
After installing WireGuard, you should see a similar message as shown below:
wireguard:
Running module version sanity check.
Original module
No original module exists within this kernel
Installation
Installing to /lib/modules/5.3.0-46-generic/updates/dkms/
depmod…
DKMS: install completed.
WireGuard is now installed and ready to be configured.
Configure WireGuard
WireGuard server configuration requires generating cryptographic key pairs and writing a network interface configuration file. You set up these security keys in your server terminal so authorized client devices can securely connect to your private network.
Private and public keys are vital to the operation of a WireGuard VPN for secure communications. You create these WireGuard keys using the `wg genkey` and `wg pubkey` commands.
Run the commands below to generate the public | and private key pair.
wg genkey | sudo tee /etc/wireguard/privatekey | wg pubkey | sudo tee /etc/wireguard/publickey
These essential files will be generated and stored in the /etc/wireguard directory.
After generating the key pair above, your next task will be to create a tunnel device that will be used to route the VPN traffic.
This can be done using the ip or wg command.
You can create a tunnel file and add its configurations for easier management.
Run the commands below to create a tunnel file called wg0.conf
sudo nano /etc/wireguard/wg0.conf
Then copy and paste the lines below into the file and save.
[Interface]
Address = 10.0.2.8/24
SaveConfig = true
ListenPort = 51820
PrivateKey = paste server's private key here
PostUp = iptables -A FORWARD -i %i -j ACCEPT; iptables -t nat -A POSTROUTING -o enp0s3 -j MASQUERADE
PostDown = iptables -D FORWARD -i %i -j ACCEPT; iptables -t nat -D POSTROUTING -o enp0s3 -j MASQUERADE
Save the file and exit.
Details of the file above:
- Address = the server network interface connected to the Internet. It can be IPv4 or IPv6
- PrivateKey = private key creates above stored in the /etc/wireguard/privatekey.
- ListenPort = incoming port WireGuard listens on
- enp0s3 = should match the interface name on the server. Some systems will have different names for their interfaces.
To find your network interface details, run the commands below:
ip addr
It should output similar lines as shown below:
enp0s3: mtu 1500 qdisc fq_codel state UP group default qlen 1000
link/ether 08:00:27:af:cf:6b brd ff:ff:ff:ff:ff:ff
inet 10.0.2.8/24 brd 10.0.2.255 scope global dynamic noprefixroute enp0s3
valid_lft 932sec preferred_lft 932sec
inet6 fe80::4b36:b8a6:fdc9:ee72/64 scope link noprefixroute
valid_lft forever preferred_lft forever
After that, run the command below to activate the tunnel interface and bring it up.
sudo wg-quick up wg0
sudo systemctl enable wg-quick@wg0
That should output similar lines as shown below:
[#] ip link add wg0 type wireguard
[#] wg setconf wg0 /dev/fd/63
[#] ip -4 address add 10.0.2.8/24 dev wg0
[#] ip link set mtu 1420 up dev wg0
[#] iptables -A FORWARD -i wg0 -j ACCEPT; iptables -t nat -A POSTROUTING -o enp0s3 -j MASQUERADE
To validate that the tunnel interface is working, run the commands below:
sudo wg show wg0
You should see a similar output as below:
interface: wg0
public key: vGzuXr0nETkqGLg6abrVSCDe4C6tO5eWcIE8gdpRMAk=
private key: (hidden)
listening port: 51820
Because a VPN needs to forward traffic, you'll need to enable IP forwarding.
To do that, run the commands below to open the configuration file.
sudo nano /etc/sysctl.conf
Then uncomment the line below and save.
#net.ipv4.tcp_syncookies=1

# Uncomment the next line to enable packet forwarding for IPv4
net.ipv4.ip_forward=1
# Uncomment the next line to enable packet forwarding for IPv6
#  Enabling this option disables Stateless Address Autoconfiguration
#  based on Router Advertisements for this host
#net.ipv6.conf.all.forwarding=1
This will save the changes in the /etc/sysctl.conf file and enable the UDP port through the firewall.
sudo sysctl -p
sudo ufw allow 51820/udp
This should complete the WireGuard VPN server setup.
Setup VPN Client
WireGuard VPN client setup involves downloading the official application for your device and importing your server configuration file. You complete this setup by creating a new tunnel connection in the app so your computer or phone can route traffic through your Ubuntu server.
Download the client software from the link below:
https://wireguard.com/install/
Run the installation and open WireGuard for Windows.
Click Add Tunnel -- Add empty Tunnel.
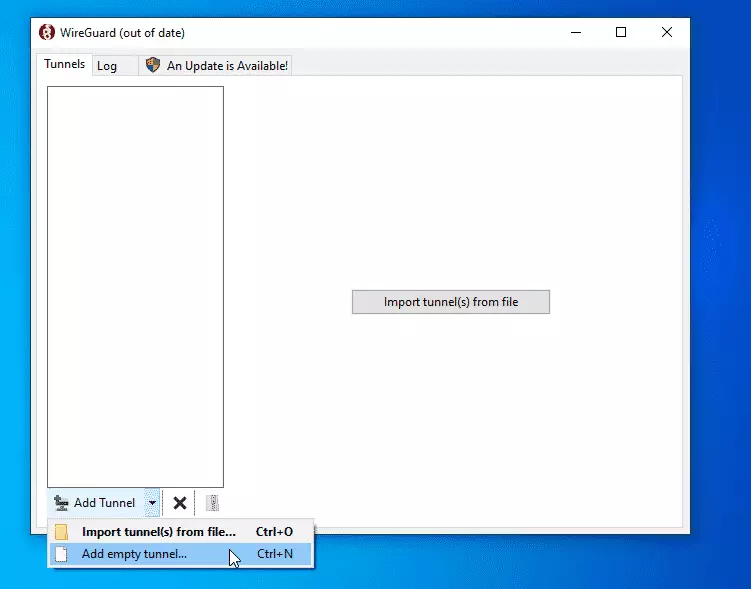
Then, a config pane should open where you set up your connection profile.
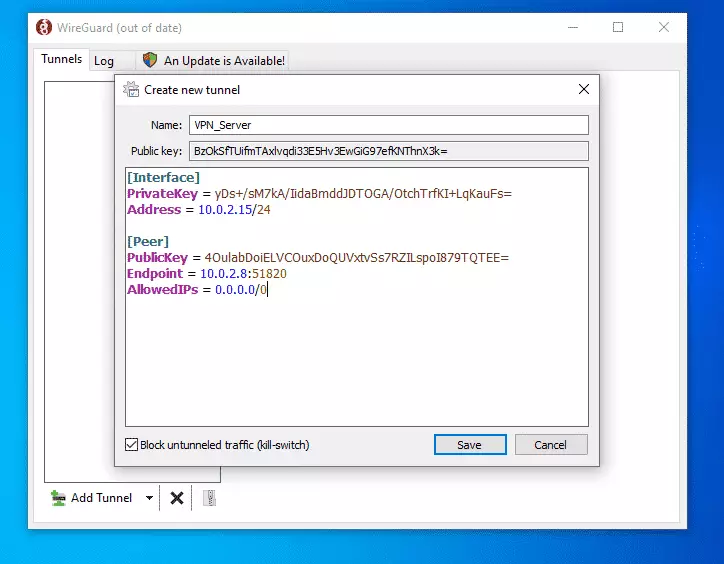
My client has similar provisions as below:
[Interface]
PrivateKey = yDs+/sM7kA/IidaBmddJDTOGA/OtchTrfKI+LqKauFs=
Address = 10.0.2.15/24

[Peer]
PublicKey = 4OulabDoiELVCOuxDoQUVxtvSs7RZILspoI879TQTEE=
Endpoint = 10.0.2.8:51820
AllowedIPs = 0.0.0.0/0
When you're done, click Save.
Add Client Key and IP to Server
The final step is to add the client's public key and IP address to the server. You can do that by running the commands below:
sudo wg set wg0 peer BzOkSfTUifmTAxlvqdi33E5Hv3EwGiG97efKNThnX3k= allowed-ips 10.0.2.15
With the client profile added to the server, you can now connect.
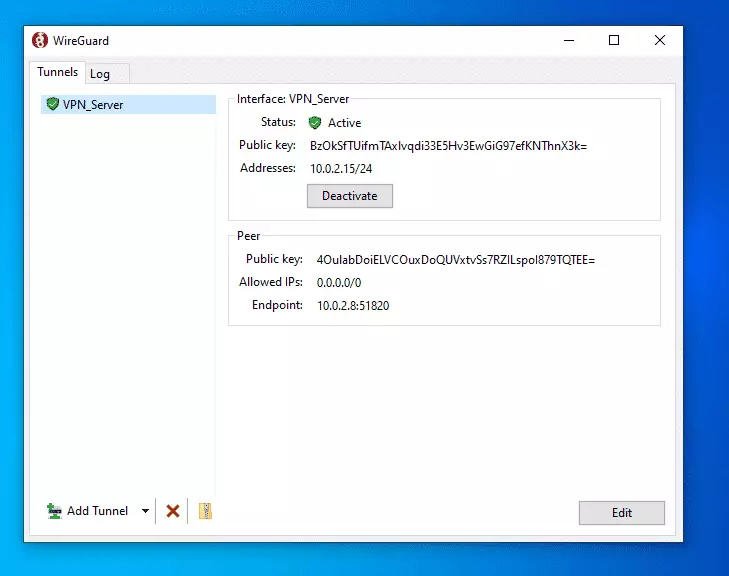
To remove a client profile from the server, run the comment below:
sudo wg set wg0 peer BzOkSfTUifmTAxlvqdi33E5Hv3EwGiG97efKNThnX3k= allowed-ips 10.0.2.15 remove
That should do it.
Conclusion:
This post showed you how to install WireGuard on Ubuntu 18.04 | 20.04. If you find any error above, please use the comment form below to report.
Thanks,
You may also like the post below:
Was this guide helpful?

About the Author
Richard
Tech Writer, IT Professional
Richard, a writer for Geek Rewind, is a tech enthusiast who loves breaking down complex IT topics into simple, easy-to-understand ideas. With years of hands-on experience in system administration and enterprise IT operations, he’s developed a knack for offering practical tips and solutions. Richard aims to make technology more accessible and actionable. He's deeply committed to the Geek Rewind community, always ready to answer questions and engage in discussions.



How can routing be configured. For instance, I want to route only DNS queries.
You could add this at the beginning of the tutorial: `sudo ufw allow ‘Ngnix Full`
Did exactly how its described. But there is no HTTP connection anymore after starting and connecting the client. So somethings goes wrong somewhere. Any idea what I can debug?