How to Install Foswiki on Ubuntu 24.04 with Apache

Download Foswiki files
Download Foswiki files by grabbing the latest archive from the official source and placing the extracted contents into the Apache web root directory. Moving these files to the correct folder on your Ubuntu system allows the web server to serve the wiki pages to your browser.
Download the latest Foswiki archive and place the contents in the correct directory for Apache to access. Extracting the files into the `Foswiki` folder within Apache’s main root sets the foundation, while adjusted file permissions complete the setup.
First, navigate to the `/tmp/` directory and download the Foswiki files. Next, extract the contents into the `Foswiki` folder within Apache's web root directory.
Proper file permissions ensure the Apache web server can securely access and utilize the Foswiki files without compromising system integrity.
Run the commands below to adjust Apache's root folder permissions, allowing the Foswiki application to function as intended.
cd /tmp
wget https://github.com/foswiki/distro/releases/download/FoswikiRelease02x01x09/Foswiki-2.1.9.zip
unzip Foswiki-*.zip
sudo cp -rf Foswiki-2.1.9 /var/www/foswiki
sudo chown -R www-data:www-data /var/www/foswiki/
If permissions become incorrect, the provided shell script `tools/fix_file_permissions.sh` corrects the installation.
This script, usually found at `foswiki/bin/configure`, checks file permissions and module dependencies, which helps prevent common issues with version 1.2.5.
cd /var/www/foswiki/tools
sudo -u www-data perl rewriteshebang.pl
When prompted, press 'y' to confirm and apply the changes.
Configuring Apache is the next crucial step to serve Foswiki content effectively and display web pages correctly to users.
Run the commands below to create an Apache virtual host file for Foswiki.
sudo nano /etc/apache2/sites-available/foswiki.conf
Copy and paste the content block into the Apache server block (the configuration section that defines how Apache handles requests for a specific domain), which controls incoming web traffic for the site.
<VirtualHost *:80>
  ServerName foswiki.example.com
  ServerAdmin admin@example.com
  DocumentRoot /var/www/foswiki

  ScriptAlias /bin /var/www/foswiki/bin
  Alias /pub /var/www/foswiki/pub

  <Directory /var/www/foswiki/>
       Options FollowSymlinks
       AllowOverride All
       Require all granted
  </Directory>

  <Directory /var/www/foswiki/bin>
       Options +ExecCGI  -FollowSymLinks
       AllowOverride None
       SetHandler cgi-script
   </Directory>

       ErrorLog ${APACHE_LOG_DIR}/error.log
       CustomLog ${APACHE_LOG_DIR}/access.log combined
</VirtualHost>
Save the file.
Enable the Foswiki virtual host for Apache and restart the server with `sudo a2ensite foswiki.conf` and `sudo systemctl restart apache2` so the wiki becomes accessible through web browsers.
sudo a2ensite foswiki.conf
sudo a2enmod rewrite
sudo a2enmod cgi
sudo a2enmod access_compat
sudo systemctl restart apache2
Setup Let’s Encrypt SSL/TLS for Foswiki
Setup Let's Encrypt SSL/TLS for Foswiki to secure your site with HTTPS, which encrypts traffic and protects user login data from eavesdropping. You can generate and configure free SSL certificates for your Apache web server using Certbot after pointing your domain to the server.
Securing the Foswiki site with HTTPS (an encrypted protocol for secure communication over a computer network) protects user data and makes the installation safe.
Refer to the post below for more information on installing and creating Let’s Encrypt SSL certificates for Apache.
How to set up Let’s Encrypt SSL certificate for Apache on Ubuntu Linux
After restarting the Apache web server, open a browser and navigate to the server hostname or IP address specified in the Apache server block.
http://foswiki.example.com/bin/view
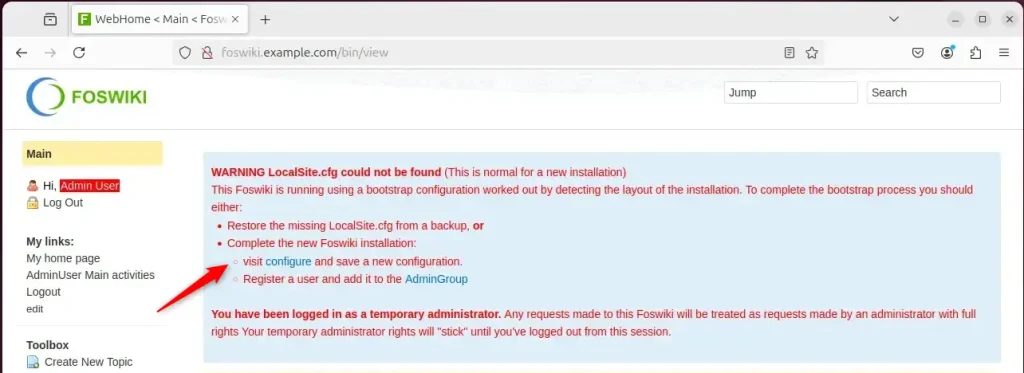
The Foswiki setup wizard should now appear.
Click the configure link to set up the application.
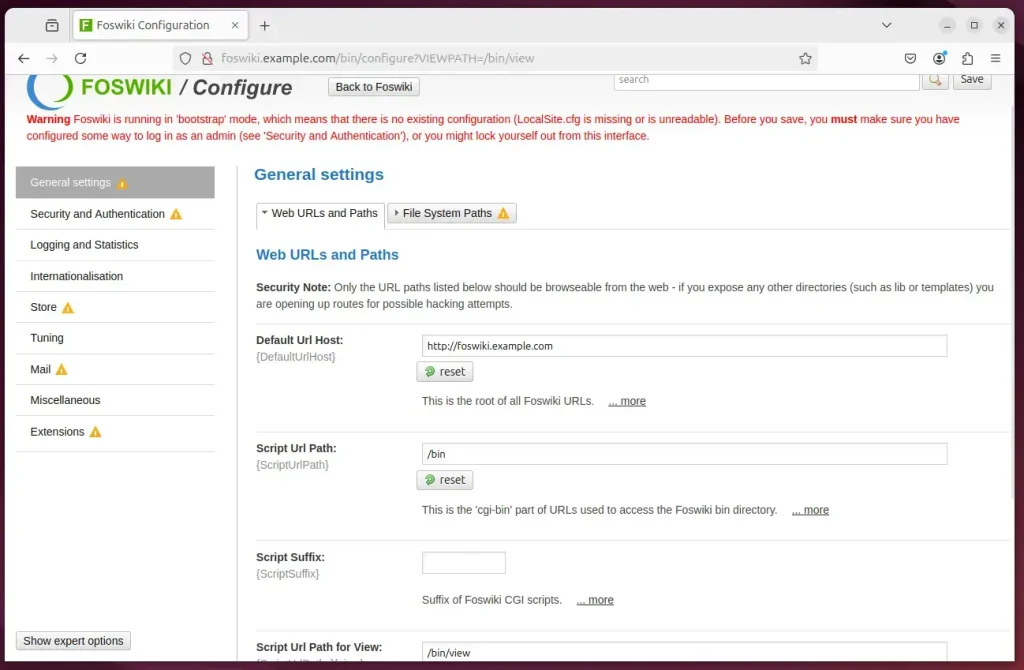
Configure all the necessary settings for the site, then click the Save button located in the upper right corner of the configuration page.
The login section at the top of the left-hand menu indicates whether the session is still using the temporary Admin user. Click the "Log Out" link to exit this account.
The Foswiki installation is now complete, meaning page creation and editing can begin immediately.
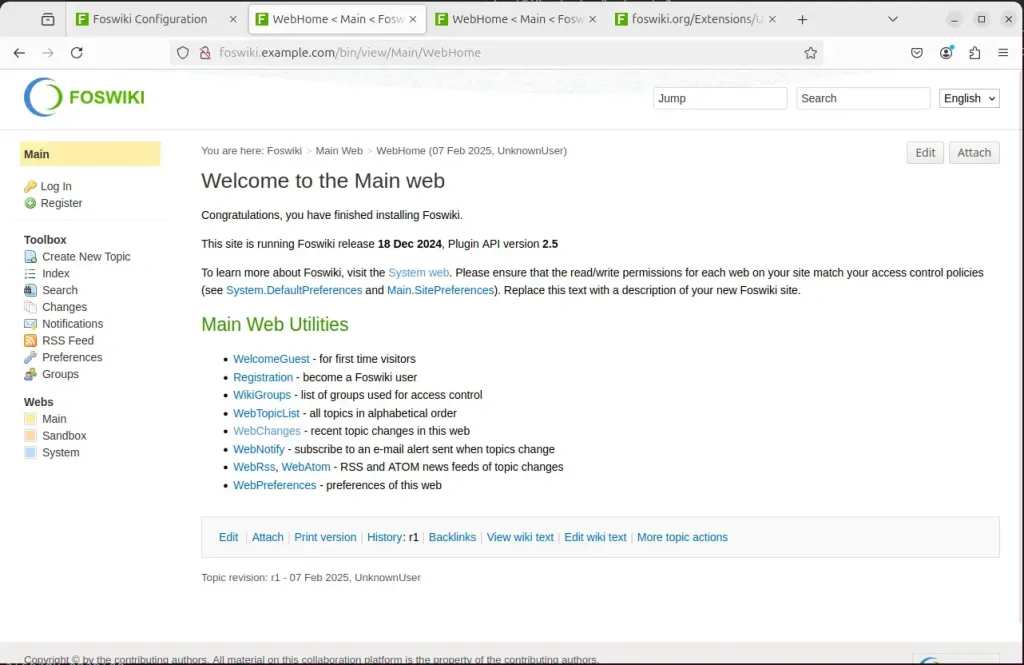
Foswiki is ready for use.
Conclusion:
To summarize, installing Foswiki on Ubuntu 24.04 with Apache involves these key steps:
-
- Install Apache: Ensure a stable HTTP server is set up to host Foswiki.
-
- Install Perl and Dependencies: Foswiki is Perl-based, so installing required Perl modules is essential.
-
- Download and Configure Foswiki: Fetch the latest Foswiki package and set it up in the Apache root directory.
-
- Set Permissions: Adjust file permissions for secure interaction between Apache and Foswiki.
-
- Configure Apache: Create a virtual host file to properly route web traffic to the Foswiki installation.
-
- Secure with SSL: Enhance security by implementing an SSL/TLS certificate using Let’s Encrypt.
-
- Complete Installation: Access the Foswiki setup wizard to finalize configurations and start using the platform.
A secure Foswiki installation, achieved by following these steps, ensures teams collaborate effectively and manage knowledge. This setup handles multiple users without trouble.
Install Perl and Related Modules
Install Perl and related modules on Ubuntu to give Foswiki the programming language and background tools it needs to run properly. You can install all required packages at once using the apt-get command in your terminal, which ensures the application handles text processing and data tasks correctly.
Foswiki requires Perl to run, so installing Perl and its related modules on the Ubuntu system provides the necessary background tools for the application to function correctly.
sudo apt-get install rcs libalgorithm-diff-perl libarchive-tar-perl libauthen-sasl-perl libcgi-pm-perl libcgi-session-perl libcrypt-passwdmd5-perl libdigest-sha-perl libemail-address-xs-perl libemail-mime-perl libencode-perl liberror-perl libfile-copy-recursive-perl libhtml-parser-perl libhtml-tree-perl libio-socket-ip-perl libio-socket-ssl-perl libjson-perl liblocale-codes-perl liblocale-maketext-perl liblocale-maketext-lexicon-perl liblocale-msgfmt-perl libwww-perl liblwp-protocol-https-perl liburi-perl libversion-perl
Download Foswiki files
Download Foswiki files by grabbing the latest archive from the official source and placing the extracted contents into the Apache web root directory. Moving these files to the correct folder on your Ubuntu system allows the web server to serve the wiki pages to your browser.
Download the latest Foswiki archive and place the contents in the correct directory for Apache to access. Extracting the files into the `Foswiki` folder within Apache's main root sets the foundation, while adjusted file permissions complete the setup.
First, navigate to the `/tmp/` directory and download the Foswiki files. Next, extract the contents into the `Foswiki` folder within Apache's web root directory.
Proper file permissions ensure the Apache web server can securely access and utilize the Foswiki files without compromising system integrity.
Run the commands below to adjust Apache's root folder permissions, allowing the Foswiki application to function as intended.
cd /tmp
wget https://github.com/foswiki/distro/releases/download/FoswikiRelease02x01x09/Foswiki-2.1.9.zip
unzip Foswiki-*.zip
sudo cp -rf Foswiki-2.1.9 /var/www/foswiki
sudo chown -R www-data:www-data /var/www/foswiki/
If permissions become incorrect, the provided shell script `tools/fix_file_permissions.sh` corrects the installation.
This script, usually found at `foswiki/bin/configure`, checks file permissions and module dependencies, which helps prevent common issues with version 1.2.5.
cd /var/www/foswiki/tools
sudo -u www-data perl rewriteshebang.pl
When prompted, press 'y' to confirm and apply the changes.
Configuring Apache is the next crucial step to serve Foswiki content effectively and display web pages correctly to users.
Run the commands below to create an Apache virtual host file for Foswiki.
sudo nano /etc/apache2/sites-available/foswiki.conf
Copy and paste the content block into the Apache server block (the configuration section that defines how Apache handles requests for a specific domain), which controls incoming web traffic for the site.
<VirtualHost *:80>
  ServerName foswiki.example.com
  ServerAdmin admin@example.com
  DocumentRoot /var/www/foswiki

  ScriptAlias /bin /var/www/foswiki/bin
  Alias /pub /var/www/foswiki/pub

  <Directory /var/www/foswiki/>
       Options FollowSymlinks
       AllowOverride All
       Require all granted
  </Directory>

  <Directory /var/www/foswiki/bin>
       Options +ExecCGI  -FollowSymLinks
       AllowOverride None
       SetHandler cgi-script
   </Directory>

       ErrorLog ${APACHE_LOG_DIR}/error.log
       CustomLog ${APACHE_LOG_DIR}/access.log combined
</VirtualHost>
Save the file.
Enable the Foswiki virtual host for Apache and restart the server with `sudo a2ensite foswiki.conf` and `sudo systemctl restart apache2` so the wiki becomes accessible through web browsers.
sudo a2ensite foswiki.conf
sudo a2enmod rewrite
sudo a2enmod cgi
sudo a2enmod access_compat
sudo systemctl restart apache2
Setup Let’s Encrypt SSL/TLS for Foswiki
Setup Let's Encrypt SSL/TLS for Foswiki to secure your site with HTTPS, which encrypts traffic and protects user login data from eavesdropping. You can generate and configure free SSL certificates for your Apache web server using Certbot after pointing your domain to the server.
Securing the Foswiki site with HTTPS (an encrypted protocol for secure communication over a computer network) protects user data and makes the installation safe.
Refer to the post below for more information on installing and creating Let’s Encrypt SSL certificates for Apache.
How to set up Let’s Encrypt SSL certificate for Apache on Ubuntu Linux
After restarting the Apache web server, open a browser and navigate to the server hostname or IP address specified in the Apache server block.
http://foswiki.example.com/bin/view
The Foswiki setup wizard should now appear.
Click the configure link to set up the application.
Configure all the necessary settings for the site, then click the Save button located in the upper right corner of the configuration page.
The login section at the top of the left-hand menu indicates whether the session is still using the temporary Admin user. Click the "Log Out" link to exit this account.
The Foswiki installation is now complete, meaning page creation and editing can begin immediately.
Foswiki is ready for use.
Conclusion:
To summarize, installing Foswiki on Ubuntu 24.04 with Apache involves these key steps:
-
- Install Apache: Ensure a stable HTTP server is set up to host Foswiki.
-
- Install Perl and Dependencies: Foswiki is Perl-based, so installing required Perl modules is essential.
-
- Download and Configure Foswiki: Fetch the latest Foswiki package and set it up in the Apache root directory.
-
- Set Permissions: Adjust file permissions for secure interaction between Apache and Foswiki.
-
- Configure Apache: Create a virtual host file to properly route web traffic to the Foswiki installation.
-
- Secure with SSL: Enhance security by implementing an SSL/TLS certificate using Let’s Encrypt.
-
- Complete Installation: Access the Foswiki setup wizard to finalize configurations and start using the platform.
A secure Foswiki installation, achieved by following these steps, ensures teams collaborate effectively and manage knowledge. This setup handles multiple users without trouble.
Foswiki on Ubuntu 24.04 with Apache builds a shared workspace where teams write notes, store project files, and share information. Foswiki is an open-source wiki tool written in the Perl language that lets multiple people edit pages at the same time.
Install Apache2 and necessary Perl modules using `apt`. Download Foswiki, extract it to `/var/www/foswiki`, and set correct file permissions with `chown`. Configure an Apache virtual host in `/etc/apache2/sites-available/foswiki.conf` and enable the site.
Pairing this software with the Apache web server gives you a stable platform that runs on your local server or in the cloud. You need an Ubuntu 24.04 system with administrator access to complete the setup steps.
- First, update your package list by running
sudo apt updatein the terminal. - Install the Apache web server with
sudo apt install apache2. - Start Apache using
sudo systemctl start apache2and make sure it runs on startup withsudo systemctl enable apache2. - Install Perl and all the necessary modules for Foswiki using
sudo apt-get install rcs libalgorithm-diff-perl libarchive-tar-perl libauthen-sasl-perl libcgi-pm-perl libcgi-session-perl libcrypt-passwdmd5-perl libdigest-sha-perl libemail-address-xs-perl libemail-mime-perl libencode-perl liberror-perl libfile-copy-recursive-perl libhtml-parser-perl libhtml-tree-perl libio-socket-ip-perl libio-socket-ssl-perl libjson-perl liblocale-codes-perl liblocale-maketext-perl liblocale-maketext-lexicon-perl liblocale-msgfmt-perl libwww-perl liblwp-protocol-https-perl liburi-perl libversion-perl. - Download the latest Foswiki release from GitHub and extract it into the
/var/www/foswikidirectory. - Set the correct permissions for the Foswiki files by running
sudo chown -R www-data:www-data /var/www/foswikiandsudo chmod -R 755 /var/www/foswiki. - Create an Apache virtual host file for Foswiki at
/etc/apache2/sites-available/foswiki.confwith the provided configuration details. - Enable the Foswiki site and necessary Apache modules with
sudo a2ensite foswiki.conf,sudo a2enmod rewrite, andsudo a2enmod cgi, then restart Apache withsudo systemctl restart apache2. - Open your web browser and go to
http://your_server_ip/bin/viewto run the Foswiki setup wizard and complete the installation.
Install Apache HTTP server on Ubuntu
To install Apache HTTP server on Ubuntu as part of your Foswiki setup, update your system package list and run the standard apt installation command in the terminal. This provides the core web server software needed to serve web pages to visitors before you add Perl and the application files.
Apache is needed as the web server (software that delivers web pages to visitors) for Foswiki to function on your Ubuntu system. Start by updating your local package index in the terminal, then install the Apache web server (the software that serves web pages to visitors).
Open the Ubuntu terminal and run the commands below to install the Apache web server.
sudo apt update
sudo apt install apache2
Controlling the Apache service requires a few standard commands to start, stop, and enable automatic startup whenever the server boots.
sudo systemctl stop apache2
sudo systemctl start apache2
sudo systemctl enable apache2
Test that the Apache web server is running by opening your web browser and navigating to the server’s localhost or IP address.

Seeing the Apache2 Default Page means the Apache HTTP server, version 2.4.57, has been successfully installed and is operational.
Additional help for installing Apache on Ubuntu is available in the link below.
Install Perl and Related Modules
Install Perl and related modules on Ubuntu to give Foswiki the programming language and background tools it needs to run properly. You can install all required packages at once using the apt-get command in your terminal, which ensures the application handles text processing and data tasks correctly.
Foswiki requires Perl to run, so installing Perl and its related modules on the Ubuntu system provides the necessary background tools for the application to function correctly.
sudo apt-get install rcs libalgorithm-diff-perl libarchive-tar-perl libauthen-sasl-perl libcgi-pm-perl libcgi-session-perl libcrypt-passwdmd5-perl libdigest-sha-perl libemail-address-xs-perl libemail-mime-perl libencode-perl liberror-perl libfile-copy-recursive-perl libhtml-parser-perl libhtml-tree-perl libio-socket-ip-perl libio-socket-ssl-perl libjson-perl liblocale-codes-perl liblocale-maketext-perl liblocale-maketext-lexicon-perl liblocale-msgfmt-perl libwww-perl liblwp-protocol-https-perl liburi-perl libversion-perl
Download Foswiki files
Download Foswiki files by grabbing the latest archive from the official source and placing the extracted contents into the Apache web root directory. Moving these files to the correct folder on your Ubuntu system allows the web server to serve the wiki pages to your browser.
Download the latest Foswiki archive and place the contents in the correct directory for Apache to access. Extracting the files into the `Foswiki` folder within Apache's main root sets the foundation, while adjusted file permissions complete the setup.
First, navigate to the `/tmp/` directory and download the Foswiki files. Next, extract the contents into the `Foswiki` folder within Apache's web root directory.
Proper file permissions ensure the Apache web server can securely access and utilize the Foswiki files without compromising system integrity.
Run the commands below to adjust Apache's root folder permissions, allowing the Foswiki application to function as intended.
cd /tmp
wget https://github.com/foswiki/distro/releases/download/FoswikiRelease02x01x09/Foswiki-2.1.9.zip
unzip Foswiki-*.zip
sudo cp -rf Foswiki-2.1.9 /var/www/foswiki
sudo chown -R www-data:www-data /var/www/foswiki/
If permissions become incorrect, the provided shell script `tools/fix_file_permissions.sh` corrects the installation.
This script, usually found at `foswiki/bin/configure`, checks file permissions and module dependencies, which helps prevent common issues with version 1.2.5.
cd /var/www/foswiki/tools
sudo -u www-data perl rewriteshebang.pl
When prompted, press 'y' to confirm and apply the changes.
Configuring Apache is the next crucial step to serve Foswiki content effectively and display web pages correctly to users.
Run the commands below to create an Apache virtual host file for Foswiki.
sudo nano /etc/apache2/sites-available/foswiki.conf
Copy and paste the content block into the Apache server block (the configuration section that defines how Apache handles requests for a specific domain), which controls incoming web traffic for the site.
<VirtualHost *:80>
  ServerName foswiki.example.com
  ServerAdmin admin@example.com
  DocumentRoot /var/www/foswiki

  ScriptAlias /bin /var/www/foswiki/bin
  Alias /pub /var/www/foswiki/pub

  <Directory /var/www/foswiki/>
       Options FollowSymlinks
       AllowOverride All
       Require all granted
  </Directory>

  <Directory /var/www/foswiki/bin>
       Options +ExecCGI  -FollowSymLinks
       AllowOverride None
       SetHandler cgi-script
   </Directory>

       ErrorLog ${APACHE_LOG_DIR}/error.log
       CustomLog ${APACHE_LOG_DIR}/access.log combined
</VirtualHost>
Save the file.
Enable the Foswiki virtual host for Apache and restart the server with `sudo a2ensite foswiki.conf` and `sudo systemctl restart apache2` so the wiki becomes accessible through web browsers.
sudo a2ensite foswiki.conf
sudo a2enmod rewrite
sudo a2enmod cgi
sudo a2enmod access_compat
sudo systemctl restart apache2
Setup Let’s Encrypt SSL/TLS for Foswiki
Setup Let's Encrypt SSL/TLS for Foswiki to secure your site with HTTPS, which encrypts traffic and protects user login data from eavesdropping. You can generate and configure free SSL certificates for your Apache web server using Certbot after pointing your domain to the server.
Securing the Foswiki site with HTTPS (an encrypted protocol for secure communication over a computer network) protects user data and makes the installation safe.
Refer to the post below for more information on installing and creating Let’s Encrypt SSL certificates for Apache.
How to set up Let’s Encrypt SSL certificate for Apache on Ubuntu Linux
After restarting the Apache web server, open a browser and navigate to the server hostname or IP address specified in the Apache server block.
http://foswiki.example.com/bin/view
The Foswiki setup wizard should now appear.
Click the configure link to set up the application.
Configure all the necessary settings for the site, then click the Save button located in the upper right corner of the configuration page.
The login section at the top of the left-hand menu indicates whether the session is still using the temporary Admin user. Click the "Log Out" link to exit this account.
The Foswiki installation is now complete, meaning page creation and editing can begin immediately.
Foswiki is ready for use.
Conclusion:
To summarize, installing Foswiki on Ubuntu 24.04 with Apache involves these key steps:
-
- Install Apache: Ensure a stable HTTP server is set up to host Foswiki.
-
- Install Perl and Dependencies: Foswiki is Perl-based, so installing required Perl modules is essential.
-
- Download and Configure Foswiki: Fetch the latest Foswiki package and set it up in the Apache root directory.
-
- Set Permissions: Adjust file permissions for secure interaction between Apache and Foswiki.
-
- Configure Apache: Create a virtual host file to properly route web traffic to the Foswiki installation.
-
- Secure with SSL: Enhance security by implementing an SSL/TLS certificate using Let’s Encrypt.
-
- Complete Installation: Access the Foswiki setup wizard to finalize configurations and start using the platform.
A secure Foswiki installation, achieved by following these steps, ensures teams collaborate effectively and manage knowledge. This setup handles multiple users without trouble.
Was this guide helpful?





No comments yet — be the first to share your thoughts!