How to Install Elasticsearch 8 on Ubuntu 24.04


Installing Elasticsearch 8 on Ubuntu 24.04 gives you a fast search engine that can store, search and sort large amounts of data in seconds. Security is on by default in Elasticsearch 8, including 8.11. As soon as you add the official Elastic software repository and install the package, the installer sets up authentication and encryption for you.
This guide covers the install, starting the service, a few common settings, and a test to confirm it works. Run every command as a user with sudo rights. Give the server enough RAM too, because Elasticsearch is memory-hungry, and a very small VM may fail to start it.
To install Elasticsearch 8 on Ubuntu 24.04, add the official Elastic apt repository and GPG key, then run sudo apt update followed by sudo apt install elasticsearch. Security is enabled by default, so copy the generated password for the elastic user from the installer output, as it appears only once. Then run sudo systemctl enable elasticsearch.service –now to start the service.
Install prerequisites
Before you set up Elasticsearch, install a few helper packages. They let your system download files over HTTPS and handle the repository signing key. Most Ubuntu 24.04 installs already have some of them, and apt simply skips anything that is already installed.
To install the required packages, run the command below.
sudo apt update
sudo apt install dirmngr ca-certificates software-properties-common apt-transport-https curl wget
Install Elasticsearch
Next, add the official Elastic repository. You do this in two parts. First you download the Elastic GPG key. Then you add the repository to your system’s sources list. The key lets apt check that every package it downloads really comes from Elastic and was not altered on the way.
Start with the key. Run the command below, and make sure it finishes without errors before you move on.
wget -q https://artifacts.elastic.co/GPG-KEY-elasticsearch -O- | sudo gpg --dearmor -o /usr/share/keyrings/elasticsearch-keyring.gpg
Then add the repository file. This tells apt where to find the Elasticsearch 8 packages. The command creates a new file in your sources list and does not change any existing ones.
echo "deb [signed-by=/usr/share/keyrings/elasticsearch-keyring.gpg] https://artifacts.elastic.co/packages/8.x/apt stable main" | sudo tee /etc/apt/sources.list.d/elastic-8.x.list
After that, update the Ubuntu package index and install Elasticsearch. The update step matters. Without it, apt does not know the new repository exists and cannot find the package. The download is large, so expect it to take a few minutes.
sudo apt update
sudo apt install elasticsearch
When the install runs, security features are enabled and configured by default. The passwords, certificates and keys are printed to your terminal.
Copy the password for the built-in elastic user now. It appears only once, in the installer output. Save it in a password manager or a safe note. If you lose it, you can generate a new one later with the password reset tool that ships with Elasticsearch.
--------------------------- Security autoconfiguration information ------------------------------

Authentication and authorization are enabled.
TLS for the transport and HTTP layers is enabled and configured.

The generated password for the elastic built-in superuser is : e+x0VI*0wOpBVO9Z0ecz

You can complete the following actions at any time:

Reset the password of the elastic built-in superuser with
'/usr/share/elasticsearch/bin/elasticsearch-reset-password -u elastic'.
Configure Elasticsearch
Next, configure Elasticsearch to run as a systemd service. Enabling the service makes it start on every boot, so the search engine is there whenever your applications need it. Then you check that the background process is actually running. The package install does not start the service for you, so this step is required.
First, start the service. Run the command below, then check the status. You should see active (running) in the output. If it shows failed instead, look at the service logs. Low memory is a common cause.
sudo systemctl enable elasticsearch.service --now
This directory holds your indexed data and the cluster’s state. Do not edit or delete files in it by hand while the service runs. If you plan to hold a lot of data, make sure the disk behind this path has plenty of free space.
The main configuration files are in [/etc/elasticsearch]. Make a backup copy of any file before you change it, so you can go back if something breaks.
Run the command below to open the main configuration file in a text editor.
sudo nano /etc/elasticsearch/elasticsearch.yml
Now set the options that suit your environment. The file is long and most lines start with #, which means they are comments and have no effect. To use an option, remove the # from the start of its line and change the value.
To control which network address Elasticsearch listens on, follow these steps:
- Scroll to the Network section of the file.
- Find the line for network binding, network.host, and remove the comment mark at the start of it.
- Replace the value with the IP address you want Elasticsearch to listen on.
Leave it on the local address if only applications on this same server need to reach Elasticsearch. If you bind it to a public or network address, remember that other machines can then reach it. Limit access with a firewall, and rely on the password from the install. Elasticsearch also applies stricter startup checks once it listens on a non-local address.
You can also set a cluster name, a node name, memory allocation and other options. The cluster name (cluster.name) and node name (node.name) are useful when you run more than one node. For a single test server, the defaults are fine. Change only what you need.
# Please consult the documentation for further information on configuration options:
# https://www.elastic.co/guide/en/elasticsearch/reference/index.html
#
# ---------------------------------- Cluster -----------------------------------
#
# Use a descriptive name for your cluster:
#
cluster.name: my-application
#
# ------------------------------------ Node ------------------------------------
#
# Use a descriptive name for the node:
#
node.name: node-1
#
# Add custom attributes to the node:
# Enable security features. Change to false if SSL isn't configured.
xpack.security.enabled: false
Save the file and exit the editor. If you opened it in nano, press Ctrl+O, then Enter to save, and Ctrl+X to exit.
Elasticsearch reads its configuration only at startup, so restart it after any change to apply the new settings. If the service fails to come back, you most likely made a typo in the file. Check the spelling and indentation of the lines you edited. You can also restore your backup copy and restart again to undo your changes.
sudo systemctl restart elasticsearch
To test whether Elasticsearch is running, run the command below. Because security is on, the request goes over HTTPS on port 9200, and it needs the elastic user and the password you saved earlier. The server uses a self-signed certificate, so the test has to account for that.
curl http://localhost:9200
It should return output similar to the example below. A reply like this means Elasticsearch is up and answering. It is a short block of JSON that includes your node name, your cluster name, the version number and the tagline You Know, for Search.
{
  "name" : "node-1",
  "cluster_name" : "my-application",
  "cluster_uuid" : "aQCFrr5XQpiQ0AQnpQxn_A",
  "version" : {
    "number" : "8.17.3",
    "build_flavor" : "default",
    "build_type" : "deb",
    "build_hash" : "a091390de485bd4b127884f7e565c0cad59b10d2",
    "build_date" : "2025-02-28T10:07:26.089129809Z",
    "build_snapshot" : false,
    "lucene_version" : "9.12.0",
    "minimum_wire_compatibility_version" : "7.17.0",
    "minimum_index_compatibility_version" : "7.0.0"
  },
  "tagline" : "You Know, for Search"
}
You can also use a web browser. Open the same address, using https and port 9200. Your browser will warn you about the certificate, because it is self-signed and not issued by a public authority. For a test server you can accept the warning and continue. When the browser asks for credentials, sign in as elastic with your saved password, and you should see the same JSON reply.
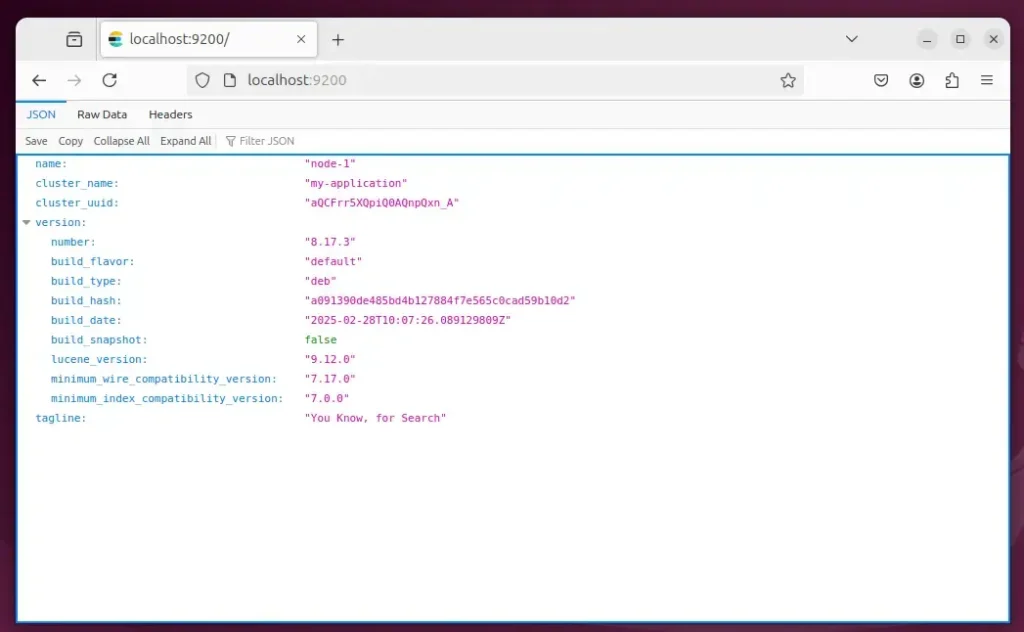
That should do it! Elasticsearch 8 is now installed, secured and running on your Ubuntu 24.04 server.
Conclusion:
Installing Elasticsearch 8 on Ubuntu 24.04 gives you a solid way to manage and search large datasets. Here's a recap of the key points:
- Robust Search Solutions: Elasticsearch is built for high-performance data retrieval and analytics.
- Elastic Stack Integration: It works well with other Elastic Stack components such as Logstash and Kibana for a complete data processing setup.
- Easy Installation: The install is straightforward and takes only a few commands.
- Security Features: Built-in security is on from the first start, which protects your data from unauthorized access.
- Customizable Configuration: You can adjust the settings to fit your own use case.
Follow the steps in this guide and you can put Elasticsearch 8 to work in your projects, searching and analyzing large amounts of data quickly.
Have a question about this guide?
Answered by AI from this guide. Good questions may be added to this page — please don't include personal details.
Did this guide fix your problem?

About the Author
Richard
Tech Writer, IT Professional
Richard is a writer at Geek Rewind who turns complex IT tasks into clear, step-by-step guides. He draws on years of hands-on experience in system administration and enterprise IT operations, focusing on Windows, Linux and WordPress: the problems people actually run into, and the fixes that work. His server and WordPress guides come from systems he runs himself. Richard builds and maintains the platform behind Geek Rewind, from its Ubuntu servers and Nginx configuration to its custom WordPress plugins. Many new tutorials start with readers' questions, and he's always glad to answer them in the comments.
No comments yet — be the first to share your thoughts!