How to Find Your MAC Address in Windows 11

A MAC address (a unique 12-character physical hardware code that identifies your computer on a network) helps routers and network gear recognize your device on Wi-Fi or Ethernet. Windows 11 assigns this digital serial number to every network adapter built into your computer. It is also called the physical address, hardware address, or Ethernet ID, depending on where you look.
Finding this code takes a few clicks in your Windows settings or a quick command in Command Prompt or PowerShell. You need this number most often when you set up home router security, like MAC filtering, or when you troubleshoot stubborn connection problems. This guide covers all three methods. The steps are written for current Windows 11, and they work the same on Home and Pro.
Open Settings Network & internet Advanced network settings, click the arrow next to your Wi-Fi or Ethernet adapter, select View additional properties, and look for Physical address (MAC). The value appears as 12 characters in six pairs, separated by hyphens, for example 00-1A-2B-3C-4D-5E.
Method 1Using Windows Settings
You can find your MAC address in Windows 11 through the Settings app without using any commands. Open the Settings app, go to Network & internet, and select Advanced network settings to view your hardware details. Your MAC address, also called the physical address, appears right next to your active network connection.
Make sure you read the address for the adapter you are actually using.
- Press the Win+I on your keyboard to open Settings . The Settings window opens with a list of categories down the left side.
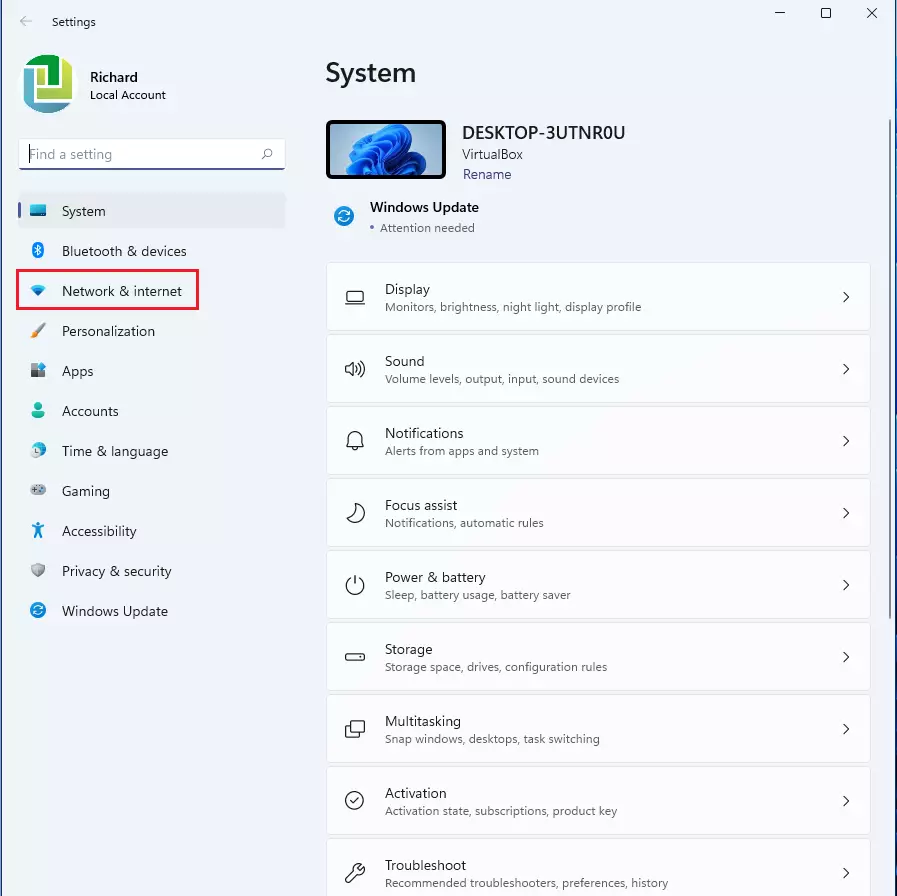
- Click Network & internet. The page on the right now shows your Wi-Fi and Ethernet options and your connection status.

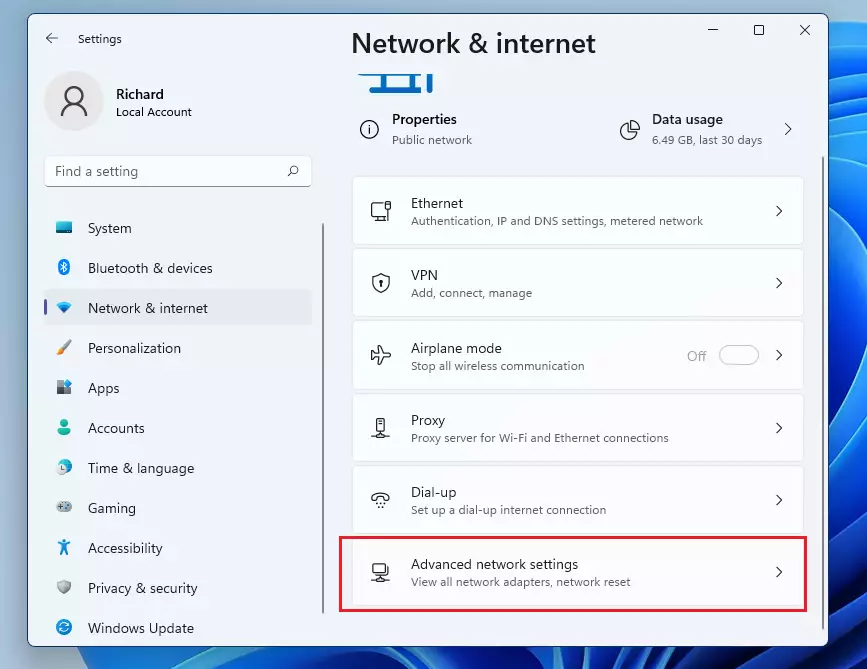
- Click Advanced network settings at the bottom of the list. You may need to scroll down to see it. A new page opens with a list of your network adapters.
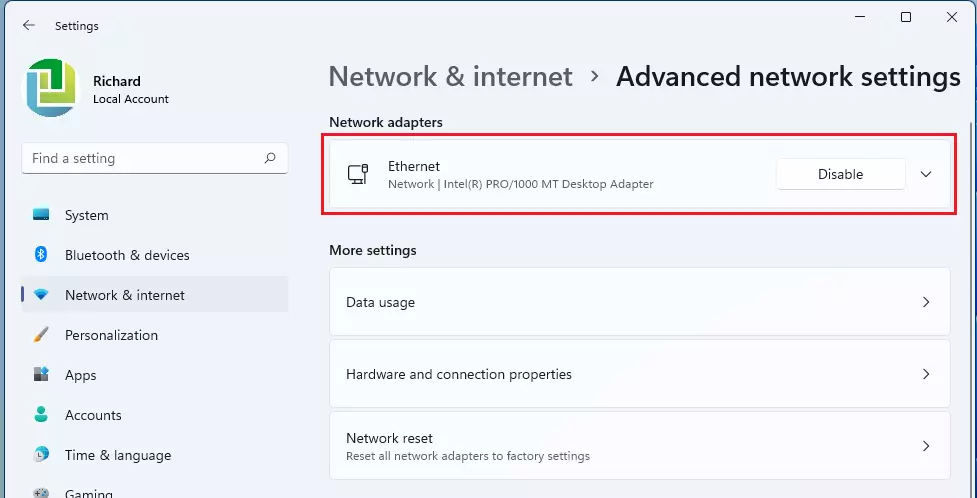
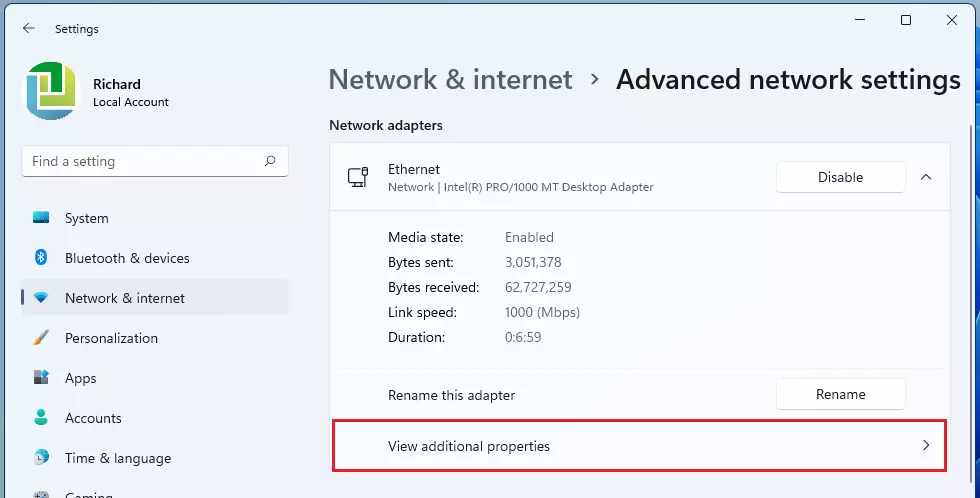
- Click the arrow next to your Ethernet or Wi-Fi adapter. Pick the one that shows as connected. The entry expands to show more details and buttons.
- Click View additional properties. A list of properties for that adapter appears, including its IP and DNS details. If you do not see this button, your Windows 11 build is probably older. In that case, go to Network & internet, open your connection’s properties page, and look for the same details there.
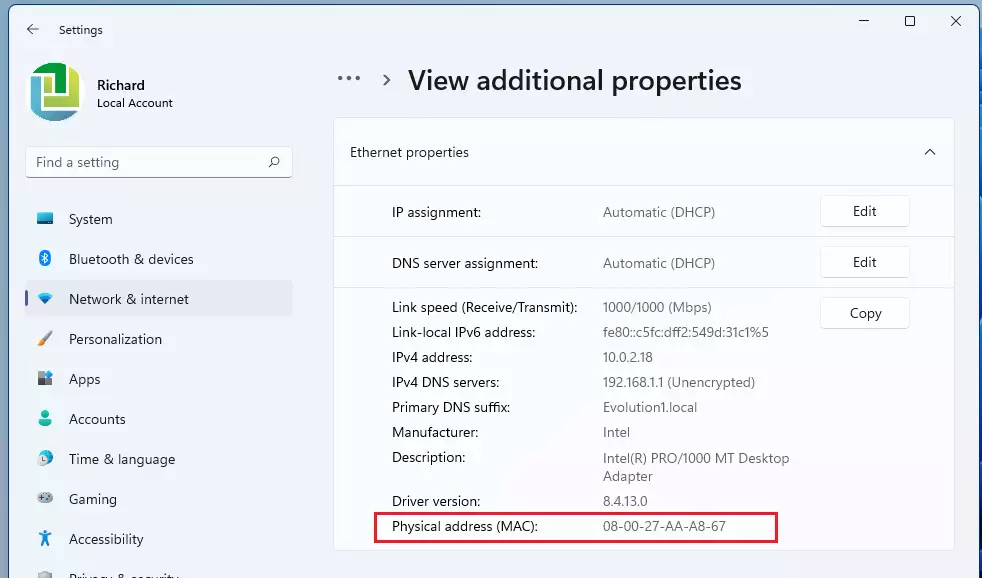
- Look for the line labeled Physical address (MAC). The value is 12 characters in six pairs, usually separated by hyphens, for example 00-1A-2B-3C-4D-5E. Some routers want colons instead of hyphens, so swap them if the router rejects the address.
Method 2Using Command Prompt
You can use the Command Prompt to find your MAC address in Windows 11 by running a simple network command. Open Command Prompt from the Start menu , type ipconfig /all, and press Enter to view all network adapter details. Look for the Physical Address line under your active internet connection to see your hardware ID.
This method is quick, and you do not need administrator rights. The output is long, so you may need to scroll up to find the right adapter.
- Click the Start button and type cmd. Command Prompt appears at the top of the search results.
- Select Command Prompt. A black window opens with a blinking cursor.
- Type the following command and press Enter. A long list of adapters and their settings fills the window:
ipconfig /allLook for Physical Address under your active network connection. Adapters are listed by name, such as Ethernet adapter Ethernet or Wireless LAN adapter Wi-Fi. An adapter that is not connected shows Media disconnected, so skip it unless you need its address anyway.
You can then paste it into your router's settings page.
Method 3Using PowerShell
You can find your MAC address in Windows 11 using PowerShell by running a quick network command. Open Terminal or PowerShell from the Start menu, type Get-NetAdapter, and press Enter. A table appears showing all network adapters on your computer, with the MacAddress column listing the hardware ID for each one.
This view is tidier than the Command Prompt output. It lists one adapter per row, so it is easier to scan when a PC has several adapters.
- Right-click the Start button and select Terminal or PowerShell. A window opens with a PowerShell prompt. On some systems the menu entry is named Terminal (Admin), but you do not need admin rights for this.
- Type the following command and press Enter. The table appears within a second or two:
Get-NetAdapterA table appears on screen displaying network details. The MacAddress column lists the ID for each adapter present on the system. Check the Status column too. The adapter marked Up is the one currently connected, and that is usually the address you want.
Troubleshooting and Common Issues
Missing network hardware details usually point to missing or broken network drivers. Open Device Manager and check whether your network adapter is listed without a warning icon. Reinstalling or updating its driver often brings the adapter back. Virtual machines can also generate extra network adapters that clutter the list, and so can VPN software. Those entries have their own made-up MAC addresses, so ignore them and read the line for your real Wi-Fi or Ethernet adapter. Anyone experiencing connection drops might want to learn how to set a static IP in Windows 11 to stabilize their connection.
MAC Address Randomization
Windows 11 utilizes randomized hardware identifiers to protect user privacy on public networks. This means the system might display a different identifier on public Wi-Fi compared to a home router. The feature applies to Wi-Fi only. Your Ethernet adapter keeps its normal address.
Users requiring a consistent ID for router filtering can toggle this behavior within the Wi-Fi configuration menu. Go to Settings Network & internet Wi-Fi, open the properties of your home network, and set Random hardware addresses to Off. Reconnect to the network, then check the address again. To undo the change, set it back to On. This option only appears if your Wi-Fi adapter and its driver support randomization.
Summary
Your MAC address is a unique hardware ID that identifies your computer on any local network. You can easily find this permanent digital fingerprint in the Windows 11 Settings app or by using Command Prompt and PowerShell tools whenever you need it for network setup or troubleshooting.
- A MAC address is a unique ID used to identify your device on a network.
- You can find this easily in the Settings app under Network & internet.
- Advanced users can use the
ipconfig /allcommand in Command Prompt. - You can also use the
Get-NetAdaptercommand in PowerShell to see a list of your network hardware. - MAC address randomization is a privacy feature that may change your visible ID on public networks. Turn it off for your home network if your router filters by MAC address.
Was this guide helpful?

About the Author
Richard
Tech Writer, IT Professional
Richard is a writer at Geek Rewind who turns complex IT tasks into clear, step-by-step guides. He draws on years of hands-on experience in system administration and enterprise IT operations, focusing on Windows, Linux and WordPress: the problems people actually run into, and the fixes that work. His server and WordPress guides come from systems he runs himself. Richard builds and maintains the platform behind Geek Rewind, from its Ubuntu servers and Nginx configuration to its custom WordPress plugins. Many new tutorials start with readers' questions, and he's always glad to answer them in the comments.


No comments yet — be the first to share your thoughts!