How to Enable Scareware Blocker in Windows 11 Edge

The scareware blocker in Microsoft Edge on Windows 11 stops tricky websites from showing fake virus alerts and loud pop-ups. This built-in security tool catches pages that pretend to be computer warnings, so you do not fall for expensive tech support scams.
When the blocker is on, bad sites can no longer freeze your browser, lock it in full-screen mode or play loud warning sounds. When Edge spots a scam, it blocks the page and shows a clear warning that lets you close the tab safely. This guide covers two ways to set it up. You can use the Edge settings page for your own account, or the Registry Editor to force the setting for every user on the PC. Both work on Home and Pro, and both are reversible.
Open Edge settings, click Privacy, search, and services, then turn on Scareware blocker. For all users, administrator access is required to modify registry keys under 🗝️HKEY_LOCAL_MACHINE\
Option 1Change settings for your account
- Open Microsoft Edge from the Start menu or the taskbar . Edge should be up to date, because newer versions have more scam-blocking options.
- Click the Settings and more button (the 3 dots in the top right corner) and select Settings. The settings page opens in a new tab.
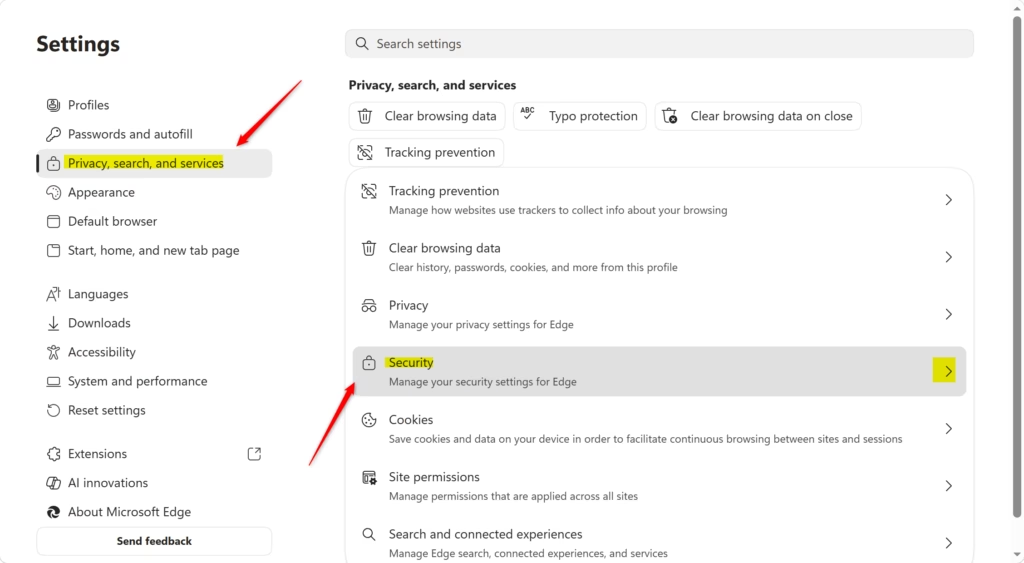
- Click Privacy, search, and services on the left. If you do not see the left-hand list, your window is probably narrow. Click the menu icon at the top left of the settings page to show it.
- Scroll down to the Security section. The scareware options are listed here, below the SmartScreen and related settings.

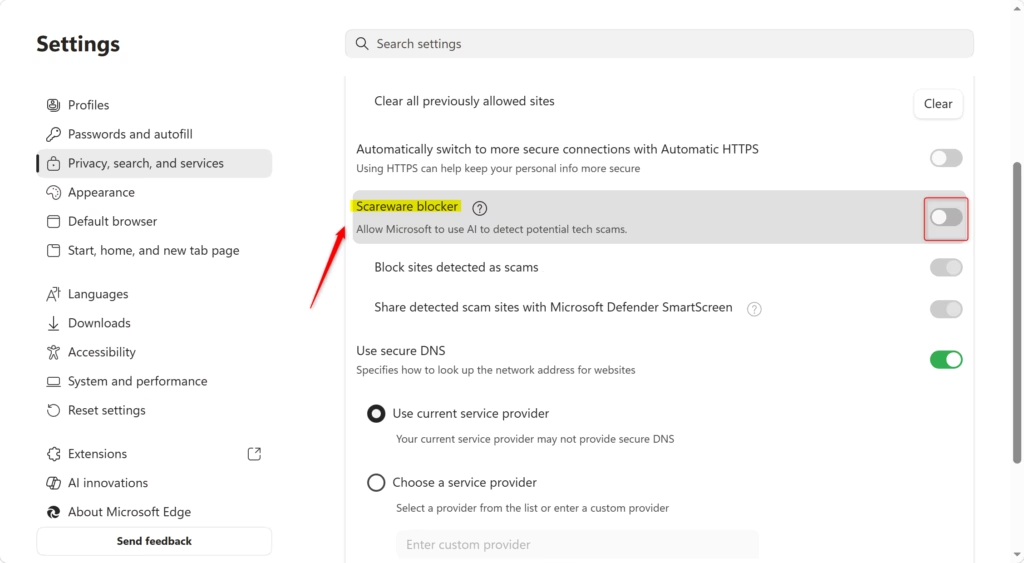
To Turn On Scareware Blocker:
- Make sure Scareware blocker is turned on. A switch that is filled in and slid to the right means it is on. Depending on your Edge version, it may have been off until now.
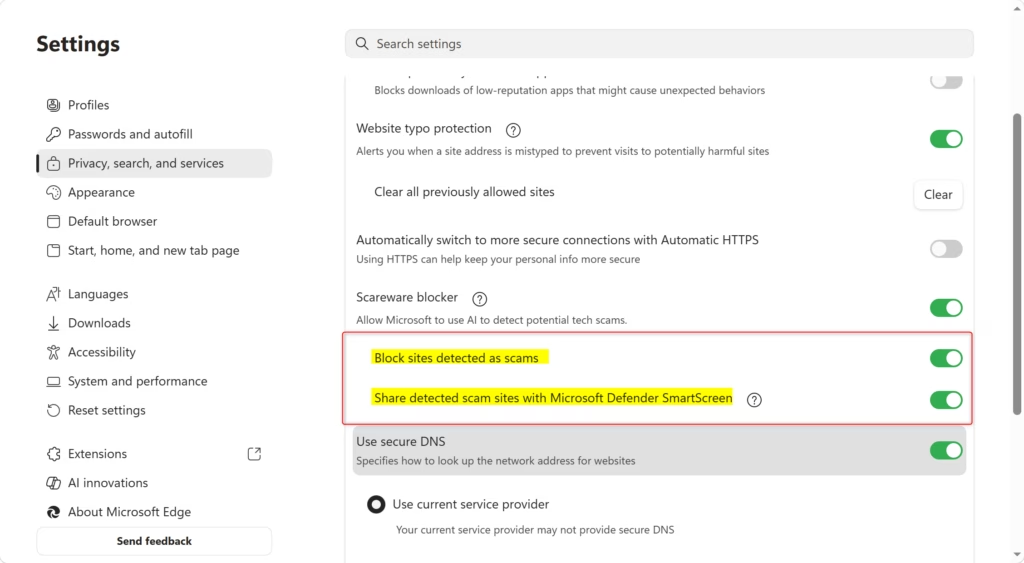
- If you are on version 142 or higher, you can also toggle Block sites detected as scams. If you do not see this option, your Edge is older than 142. Go to Settings About Microsoft Edge so Edge can check for and install the update, then restart the browser.
- You can also choose to toggle Share detected scam sites with Microsoft Defender SmartScreen. This sends details of scam pages that Edge finds to Microsoft. It is optional, so leave it off if you would rather not share that data. The blocker still works without it.
To Turn Off Scareware Blocker:
- Simply toggle the Scareware blocker switch to off. The switch should turn grey and slide to the left. The change applies straight away, so you do not need to restart Edge. To turn the blocker back on, flip the same switch again.
- Close the settings tab when you are finished. Edge saves the choice as soon as you change it, so there is no Save button to press.
Option 2Change settings for all users (Registry)
Registry Editor (a tool for changing advanced Windows settings ) lets you turn on the scareware blocker in Edge for every user account on your computer at the same time. This method forces the setting on globally and locks the option, so other people using the PC cannot turn it off in their browser settings. You need to be signed in with an administrator account and approve the User Account Control prompt. Registry Editor is included in both Home and Pro.
This method uses the registry to enforce settings for everyone on the computer. Using these settings will gray out the options in the main menu for other users, and Edge will show that the browser is managed by your organization. Back up the registry or create a restore point before you change anything. After you apply a change, close all Edge windows and open Edge again so it picks up the new value.
Always Enable Scareware Blocker:
reg add "HKEY_LOCAL_MACHINE\SOFTWARE\Policies\Microsoft\Edge" /v ScarewareBlockerProtectionEnabled /t REG_DWORD /d 1 /f
Disable Scareware Blocker:
reg add "HKEY_LOCAL_MACHINE\SOFTWARE\Policies\Microsoft\Edge" /v ScarewareBlockerProtectionEnabled /t REG_DWORD /d 0 /f
Default User Choice:
reg delete "HKEY_LOCAL_MACHINE\SOFTWARE\Policies\Microsoft\Edge" /v ScarewareBlockerProtectionEnabled /f
Option 3Manage scam site blocking for all users
Registry Editor also lets administrators control scam site blocking for all user accounts in Microsoft Edge by adding a specific command line. This ensures every person who logs into the computer stays protected from online tech support scams and dangerous websites, without anyone needing to change individual browser settings. The same rules apply as above. Use an administrator account, back up first, and restart Edge afterwards. The Default User Choice setting is the way to undo a forced value and hand control back to each user.
Always Enable:
reg add "HKEY_LOCAL_MACHINE\SOFTWARE\Policies\Microsoft\Edge" /v ScarewareBlockerBlocksDetectedSitesEnabled /t REG_DWORD /d 1 /f
Disable:
reg add "HKEY_LOCAL_MACHINE\SOFTWARE\Policies\Microsoft\Edge" /v ScarewareBlockerBlocksDetectedSitesEnabled /t REG_DWORD /d 0 /f
Default User Choice:
reg delete "HKEY_LOCAL_MACHINE\SOFTWARE\Policies\Microsoft\Edge" /v ScarewareBlockerBlocksDetectedSitesEnabled /f
Option 4Manage scam sharing for all users
Registry Editor lets administrators decide whether Microsoft Edge shares detected scam site data with Microsoft on behalf of all computer users. Turning off this data sharing stops the browser from sending threat details to SmartScreen (a security feature that checks files and websites for safety) across every user account. The scam blocking itself keeps working. Only the reporting stops. As with the other registry changes, restart Edge afterwards. The setting will show as managed and greyed out in the Edge settings page.
Disable:
reg add "HKEY_LOCAL_MACHINE\SOFTWARE\Policies\Microsoft\Edge" /v ScarewareBlockerSendDetectedSitesToSmartScreenEnabled /t REG_DWORD /d 0 /f
Default User Choice:
reg delete "HKEY_LOCAL_MACHINE\SOFTWARE\Policies\Microsoft\Edge" /v ScarewareBlockerSendDetectedSitesToSmartScreenEnabled /f
References: Protecting more Edge users with expanded Scareware blocker availability and real-time protection Stand up to scareware with scareware blocker, now available in preview in Microsoft Edge Scareware blocker | Microsoft Edge Microsoft Edge Browser Policy Documentation ScarewareBlockerAllowListDomains
Summary
The scareware blocker in Edge is a handy tool that stops you from visiting fake websites that try to trick you. For your own account, you can switch it on or off in the browser settings in a few clicks. To set it for every user on the PC, use the registry method, and use the Default User Choice option whenever you want to give control back to each person.
Have a question about this guide?
Answered by AI from this guide. Good questions may be added to this page — please don't include personal details.
Did this guide fix your problem?

About the Author
Richard
Tech Writer, IT Professional
Richard is a writer at Geek Rewind who turns complex IT tasks into clear, step-by-step guides. He draws on years of hands-on experience in system administration and enterprise IT operations, focusing on Windows, Linux and WordPress: the problems people actually run into, and the fixes that work. His server and WordPress guides come from systems he runs himself. Richard builds and maintains the platform behind Geek Rewind, from its Ubuntu servers and Nginx configuration to its custom WordPress plugins. Many new tutorials start with readers' questions, and he's always glad to answer them in the comments.
No comments yet — be the first to share your thoughts!