

This article explains how to turn the Live Captions profanity filter on or off in Windows 11.
Live captioning is a new feature released with Windows 11 build 22557 that helps everyone understand audio better. This includes people who are deaf or hard of hearing. You can view captions of spoken content in real time.
Live captions can be turned on by pressing WINDOWS + CTRL + L or from the Accessibility flyout under Quick Settings.
With Live Captions, you can enable or disable it, move the Live Captions bar, enable Live Captions in different languages, switch languages, include microphone audio, and more.
What Is the Profanity Filter in Live Captions?
Live Captions has a “Filter profanity” option. This option automatically hides any profanity spoken during a live captioning session. Why use this? It can be helpful in settings where profanity is not appropriate or might offend people.
However, if you want to see an accurate representation of the spoken words, leave the filter off. This way, you will see exactly what was said, including any profanity.
How to Turn On or Off “Filter Profanity” in Live Captions
Here’s the easiest way to change this setting.
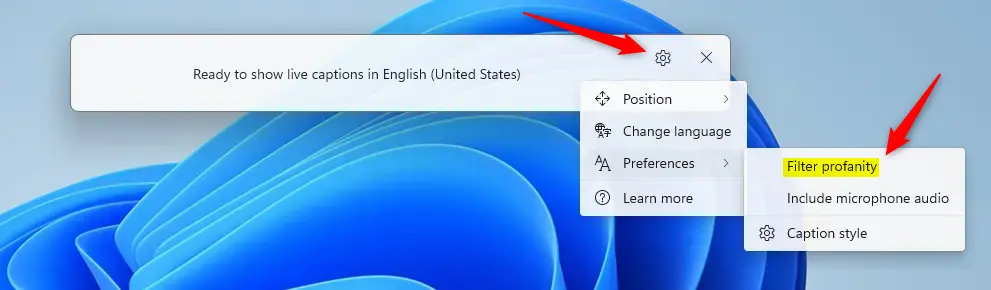
- Turn on Live Captions by pressing
Windows logo key + Ctrl + L. - Click the Settings (gear) icon on the Live Captions bar.
- Select Preferences.
- Turn on or off the Filter profanity option.
This will allow you to filter out profanity in live captioning sessions.
How to Change the Profanity Filter Using Registry Editor
Another way to control the profanity filter is to use Windows Registry Editor. What happens when you edit the registry? Your changes will apply to how Live Captions works on your computer.
⚠️ Admin Privileges Required
- Open Windows Registry editor as administrator.
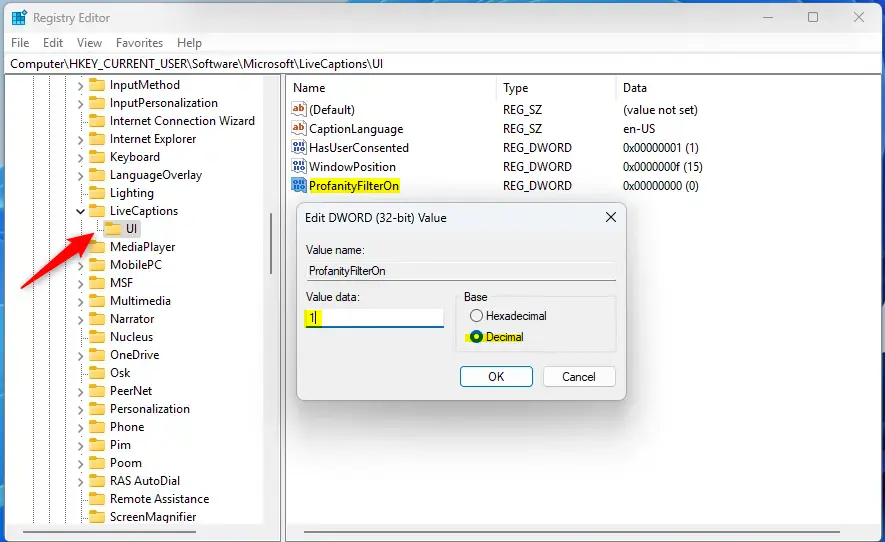
- Navigate to the registry key below:
Computer\HKEY_CURRENT_USER\Software\Microsoft\LiveCaptions\UI - Double-click the ProfanityFilterOn (REG_DWORD) item in the right pane to open it.
- Type
1to turn on the profanity filter. Type0to turn off the profanity filter. - Click OK.
If you do not see the “ProfanityFilterOn” item, follow these steps instead:
- Right-click a blank area in the right pane.
- Select New and then DWORD (32-bit) Value.
- Type the name
ProfanityFilterOn. - Enter
1to enable the profanity filter or0to disable it. - Click OK.
You may need to restart your computer for the changes to take effect.
Summary
Live Captions in Windows 11 is a helpful feature for anyone who wants to read what is being said out loud. The profanity filter option lets you hide or show profanity in those captions. You can turn this setting on or off in two ways. The first way is through the Live Captions settings menu, which is quick and easy. The second way is through the Windows Registry Editor, which gives you more control. Choose whichever method works best for you. Remember to restart your computer if you use the registry method.
Frequently Asked Questions
How do I enable Live Captions in Windows 11?
What is the purpose of the profanity filter in Live Captions?
Can I customize the profanity filter settings in Live Captions?
How can I disable the profanity filter using the Registry Editor?
Will I need to restart my computer after changing the profanity filter settings?
Leave a Reply