How to Transfer Files from Memory Card to Windows 11
You transfer files from a memory card to Windows 11 by using a card reader connected to your PC or a laptop with a built-in slot, making it simple to move data like photos and videos.
A memory card, often an SD card used in cameras, acts as portable storage. Windows 11 recognizes these cards once inserted, presenting them as a new drive.
When you plug in your card reader, Windows 11 typically opens File Explorer automatically, showing the card’s contents under “This PC.” You can then drag and drop or copy and paste your files directly to your computer.
Insert your memory card into a reader connected to your PC. Windows 11 will detect it as a drive in File Explorer. Open the card’s drive, select your files, copy them with Ctrl+C, then paste them into a folder on your PC using Ctrl+V.
Why Transfer Files?
You’ll want to transfer files for a few key reasons. It keeps your data safe, frees up space on your devices, and lets you move work between computers. Once transferred, your files are in a new spot, making them easier to find or back up.
How to Transfer Files from a Memory Card
A memory card is a portable way to store photos and documents. Windows 11 supports SD, mini SD, and micro SD cards. If your PC lacks a slot, use a USB card reader.
Step 1Insert Your Memory Card
Insert your card into the reader. If the computer doesn’t see it, check that the USB connection is secure.
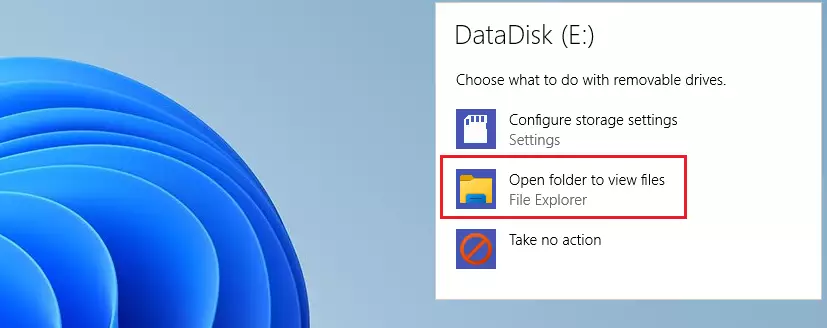
Step 2Choose What to Do
Windows 11 will pop up a notification. Click Open folder to view files.
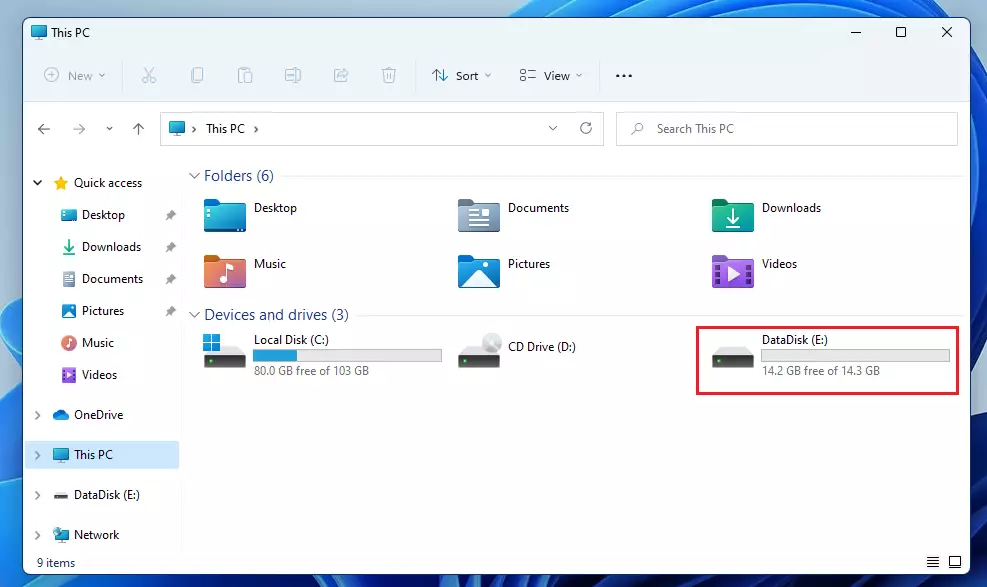
Step 3Use File Explorer
If no prompt appears, open File Explorer. Click This PC on the left and look for your drive letter, which appears like E: or F:.
Step 4Copy and Paste
Select your files. Press CTRL + C to copy. Navigate to your destination folder and press CTRL + V to paste.
Transferring Files Between Two PCs
You can move files between computers using a network or a USB-C cable. For network transfers, make sure both PCs are on the same Wi-Fi. Right-click a folder, select Properties, then Sharing to allow access.
Using Cloud Syncing with OneDrive
OneDrive is built into Windows 11. Sign in with your Microsoft account. Drag files into the OneDrive folder, and they will sync to the cloud. This lets you access them from any device.
Using External Hard Drives
For large amounts of data, an external hard drive is the fastest method. Plug the drive into a USB port. Drag and drop your files from your PC to the drive letter shown in File Explorer.
Administrative Tasks
Note: Some network sharing settings need administrator privileges. You might need to enter your password if prompted when changing permissions in places like 📁C:\Windows\System32 or network settings.
Summary
Transferring files from a memory card to Windows 11 is simple using a few common methods.
Can I transfer files from 🪟 Windows 10 to 🪟 Windows 11?
Yes. You can use an external hard drive, OneDrive, or a network transfer to move files from a Windows 10 PC to a Windows 11 PC. Copy your files to the storage device on the old PC and paste them onto the new one.
What is the fastest way to transfer large files in 🪟 Windows 11?
The fastest way to transfer large files is using a high-speed external SSD connected via a USB-C port. This bypasses internet speed limits and network congestion, allowing for direct data transfer at the maximum speed supported by your hardware ports.
Does 🪟 Windows 11 have a built-in file transfer tool?
Windows 11 includes File History and OneDrive for backups and syncing. While there isn’t a single “transfer wizard” for moving everything, these built-in tools make manual migration through File Explorer or cloud synchronization very reliable for most users.
How do I transfer files without an internet connection?
You can transfer files offline using physical media like USB flash drives, external hard drives, or memory cards. Copy the files to the drive on the source computer, disconnect it, and plug it into the destination computer to paste the files.
Was this guide helpful?


This does not work.