How to Access File Explorer Options in Windows 11
You access File Explorer Options in Windows 11 through the ribbon menu or a keyboard shortcut.
File Explorer Options, also known as Folder Options, is the central hub for customizing how Windows displays and manages your files and folders. This panel lets you tailor your PC’s file handling behavior.
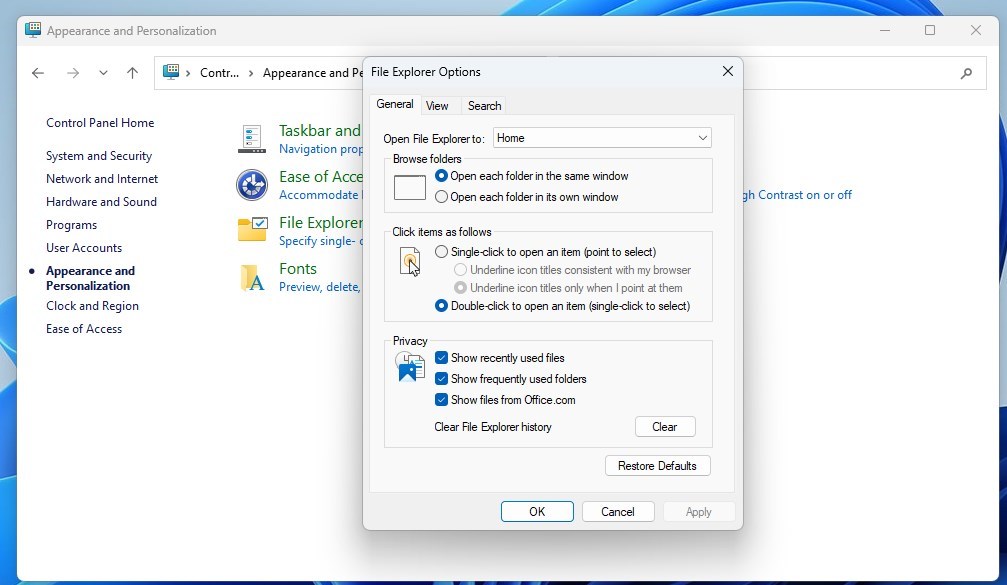
Within File Explorer Options, you control crucial settings such as showing or hiding file extensions, determining if folders open in a new window, and managing hidden system files. For instance, you can enable the visibility of hidden files and folders with a simple toggle.
Opening this panel gives you direct command over your digital environment, allowing you to immediately enhance your workflow and file interaction.
Open File Explorer, click the three dots (…) on the command bar, and select Options. Alternatively, search for and open Control Panel, then navigate to Appearance and Personalization, and click File Explorer Options.
Method 1Using the File Explorer Menu
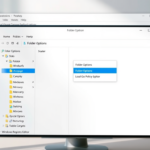
Accessing File Explorer options in Windows 11 is simple using the menu right inside File Explorer; just click the ‘See more’ dots on the top bar and select ‘Options’ to change your settings.
- Open File Explorer. You can do this by pressing the Windows key + E on your keyboard.
- Look at the top command bar. Click the See more icon, which looks like three dots ( … ).
- Select Options from the list.
Method 2Using the Control Panel
You can also find File Explorer options in Windows 11 by opening the Control Panel, a central spot for many computer settings, then going to Appearance and Personalization.
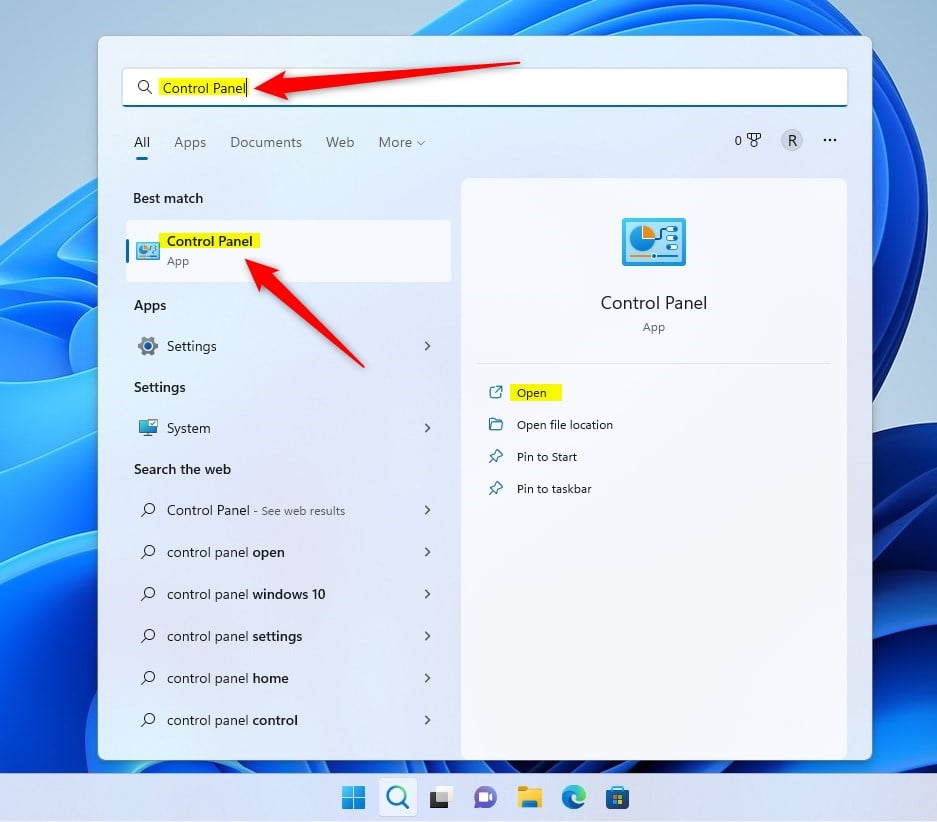
- Open the Start menu, search for “ Control Panel,” and open it.
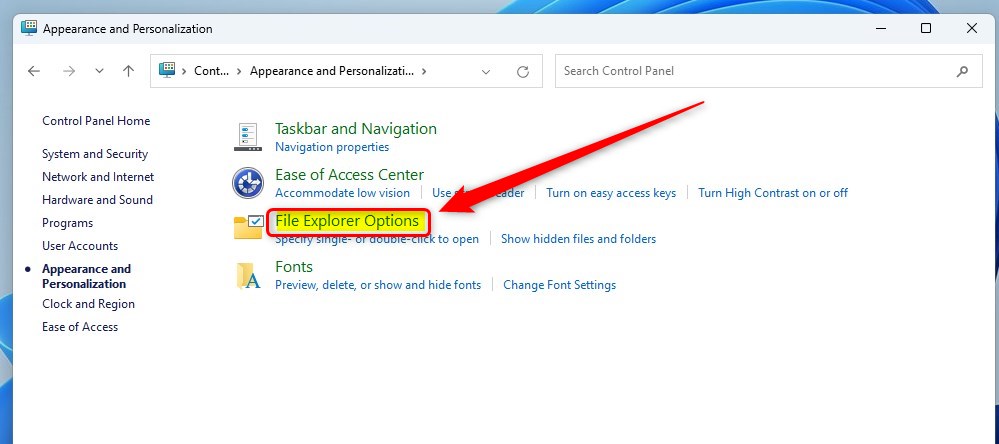
- Click on Appearance and Personalization.

- Click on File Explorer Options.
Note: Some advanced changes within these settings might require administrator privileges to save. If you’re prompted for a password or confirmation, make sure you’re logged in as an administrator.
Top 5 Most Useful File Explorer Settings
Discover the top 5 most useful File Explorer settings in Windows 11, starting with showing file extensions to easily see what type of file you’re working with.
Understanding Quick Access vs. This PC
By default, File Explorer opens to Quick Access, which shows your recent files. If you prefer a static view, change the setting to This PC. This shows your drives and folders right away, which is often faster for people who use their PC a lot.
How to Clear File Explorer History
To clear your recent file history, open File Explorer Options. Under the General tab, look for the Privacy section. Click the Clear button next to Clear File Explorer history. This removes the list of files you recently opened.
Summary
Finding the folder settings in Windows 11 is quite manageable once you know where to look. By using the “See more” menu or the Control Panel, you can customize your experience, manage privacy, and show hidden files. Always remember that some changes require administrator privileges to take effect.
How do I reset File Explorer options to default in 🪟 Windows 11?
Open File Explorer Options and go to the View tab, then click the Restore Defaults button. This will reset all folder views and advanced settings to their original factory state. You may need to restart File Explorer for all changes to apply correctly across your system.
Why can’t I see the File Explorer Options menu?
If you can’t see the Options menu, your account might have restricted permissions. Make sure you are logged in as an administrator. Sometimes, system policies set by an IT department can hide these settings. Check if your user account has the necessary rights to modify system preferences.
How do I show hidden files in 🪟 Windows 11 File Explorer?
Open File Explorer Options and click the View tab. Under the Advanced settings list, find the Hidden files and folders section. Select the radio button labeled Show hidden files, folders, and drives. Click Apply and OK to save your changes and make hidden items visible.
Was this guide helpful?

About the Author
Richard
Tech Writer, IT Professional
Richard, a writer for Geek Rewind, is a tech enthusiast who loves breaking down complex IT topics into simple, easy-to-understand ideas. With years of hands-on experience in system administration and enterprise IT operations, he’s developed a knack for offering practical tips and solutions. Richard aims to make technology more accessible and actionable. He's deeply committed to the Geek Rewind community, always ready to answer questions and engage in discussions.

[…] Once File Explorer is opened, open the Folder Options. […]
[…] First, open the File Explorer folder options. […]
[…] Another way to show or hide the network folder is to use the File Explorer Folder Option. […]
[…] First, open the File Explorer Folder Options. […]
[…] Once enabled, open File Explorer Folder Options. […]
[…] First, open File Explorer’s Folder Options. […]
[…] Open File Explorer Options: – Press Windows + S on your keyboard. – Type File Explorer Options and click on it when it appears. Learn more about opening File Explorer Options […]
[…] Folder Options lets you change how files and folders open. You can also control what shows up in the navigation […]