Share Your Screen Wirelessly: Casting to Another Windows PC

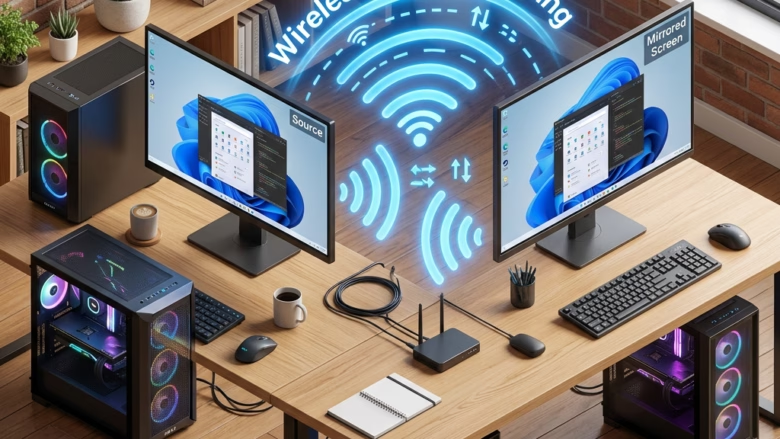
Wireless casting on Windows 11 mirrors your main computer’s display onto another nearby PC over Wi-Fi. The second laptop or desktop then works as an extra monitor. The feature uses Miracast, a wireless display technology built into Windows.
Both computers need to be on the same Wi-Fi network and support wireless display standards. If one PC has an old Wi-Fi adapter or outdated drivers, it may not show up as a target. Updating the Wi-Fi driver is the first thing to try in that case.
To cast your screen wirelessly to another Windows PC, first install the “Wireless Display” optional feature on the receiving PC via Settings System Optional features. Then, on the sending PC, press Win+K to open the Cast panel and select the receiving PC from the list.
Turn on the Wireless Display Feature
The receiving PC needs the Wireless Display optional feature before it can accept a cast. It is not installed by default, so do this first. It works the same on Windows 11 Home and Pro.
- On the Windows 11 PC you want to project to, click the Start button.
- Select Settings (the gear icon). You can also press Win+I.
- In Settings, click System on the left.
- Scroll down and click Optional features. This is where you add extra Windows tools.
- Under “Add an optional feature,” click View features. A search box appears.
- Type
Wireless Displayin the search box. - Find “Wireless Display” in the list and tick the checkbox next to it.
- Click Next, then click Install.
Windows downloads the package and installs it. This usually takes a minute or two, and you can watch progress on the Optional features page. If the feature does not appear in the search results, check that Windows is fully updated and that the PC is online.
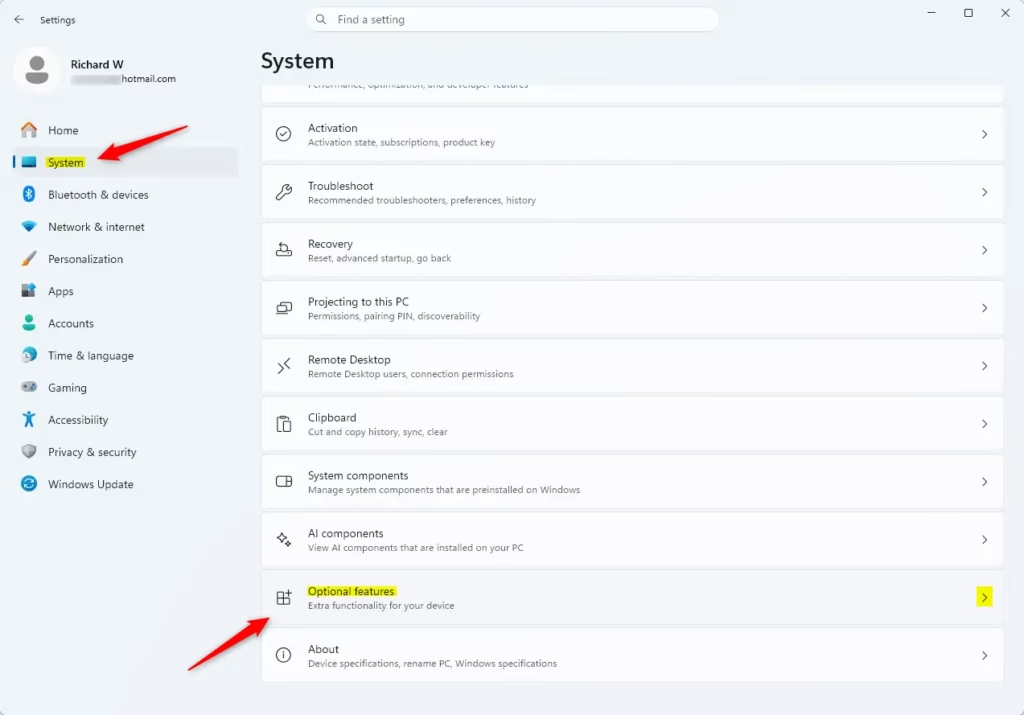
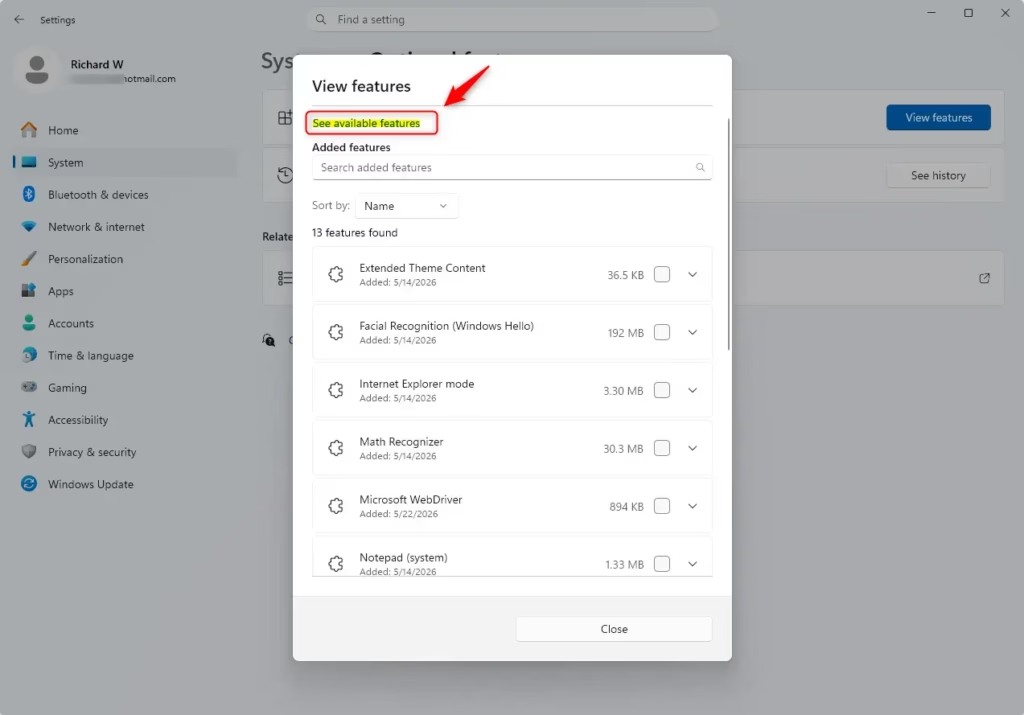
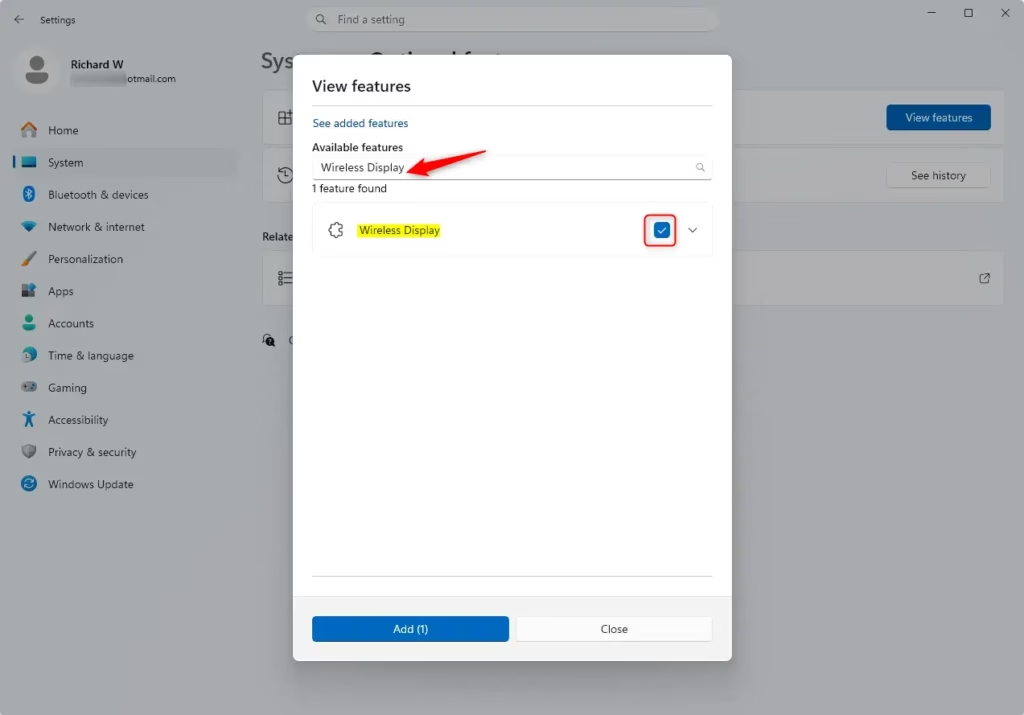
To recap, the path is Settings System Optional features View features. Search for Wireless Display, select it, click Next, then click Install. Once it shows as installed, you can move on. To undo this later, open the same Optional features page, find Wireless Display in the installed list, and remove it.
Set Up Projection Settings
Next, tell the receiving PC when it may accept incoming connections and whether to ask for a PIN. These settings are on the same PC where you just installed the feature.
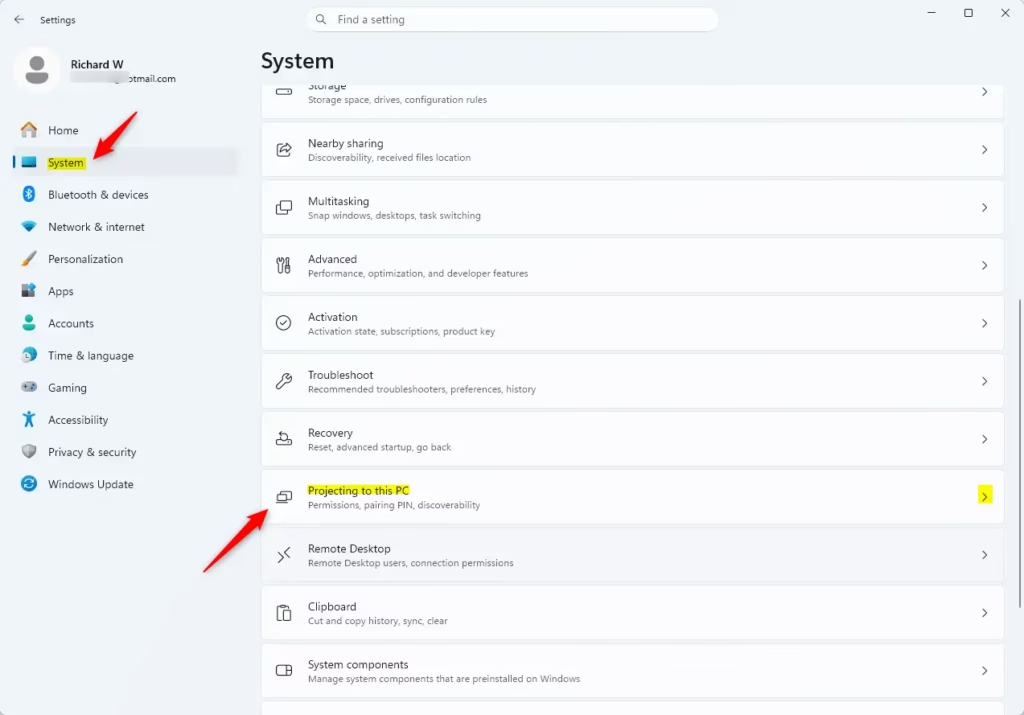
- After installation, go back to Settings System.
- Scroll down and click Projecting to this PC. If you do not see it, the Wireless Display feature may not have finished installing .
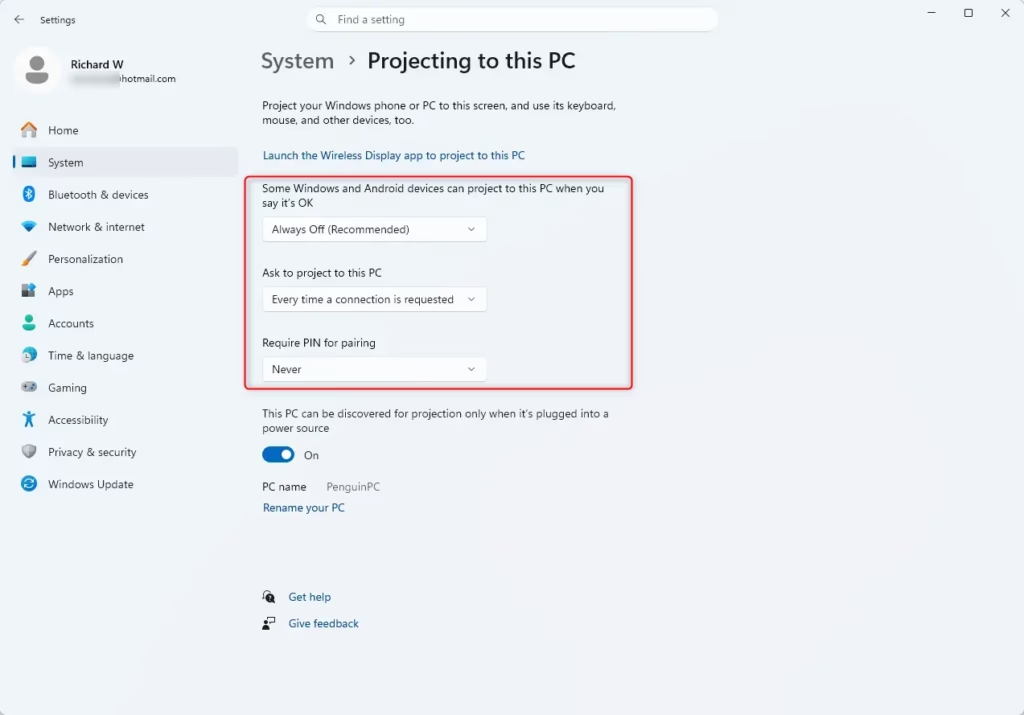
- Find the main option: “Some Windows and Android devices can project to this PC when you tell them to.” Choose whether it is available Everywhere or only On the same network. The same-network choice is safer. The exact wording can differ slightly between Windows 11 builds.
- Choose whether your PC needs a PIN to connect. Use a PIN if you are in a public place, so strangers cannot cast to your screen.
The changes apply as soon as you pick them. You do not need to restart.
If either PC switches networks or drops off Wi-Fi, the connection will fail or stop.
Start the Wireless Display App
The Wireless Display app must be open on the receiving PC. While it is closed, the PC will not show up as a target.
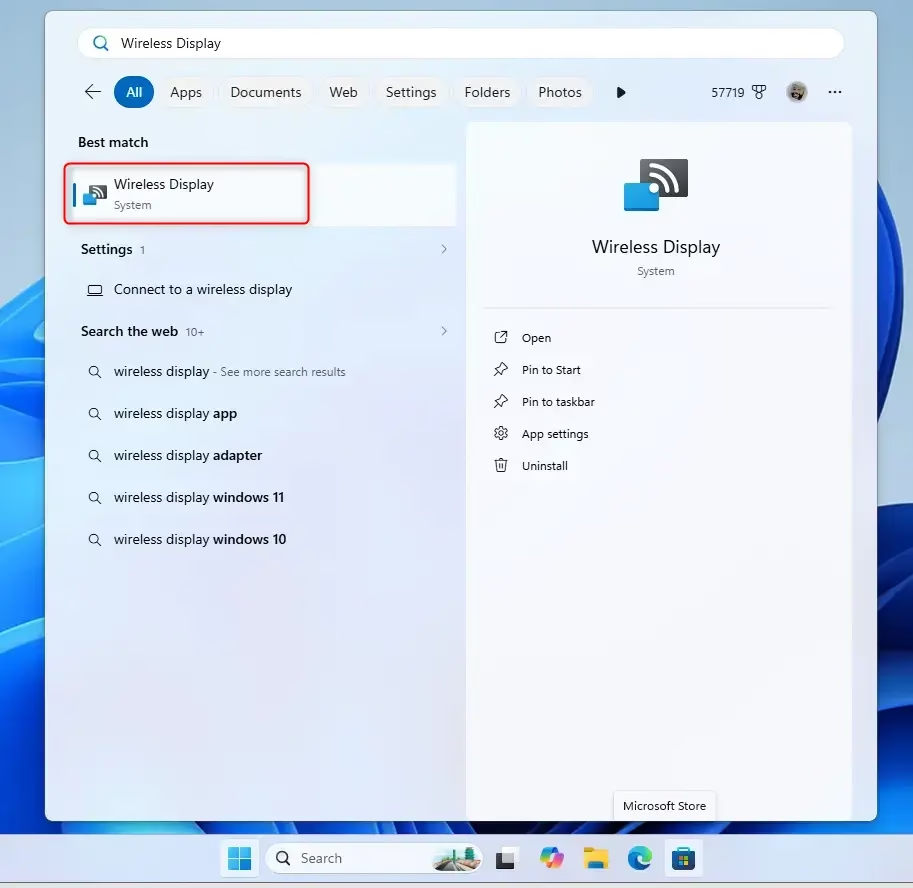
- On the receiving PC, click the Search icon on your taskbar (it looks like a magnifying glass).
- Type
Wireless Display. - Click the Wireless Display app when it appears in the results.
Leave the app open for as long as you want to receive the cast.
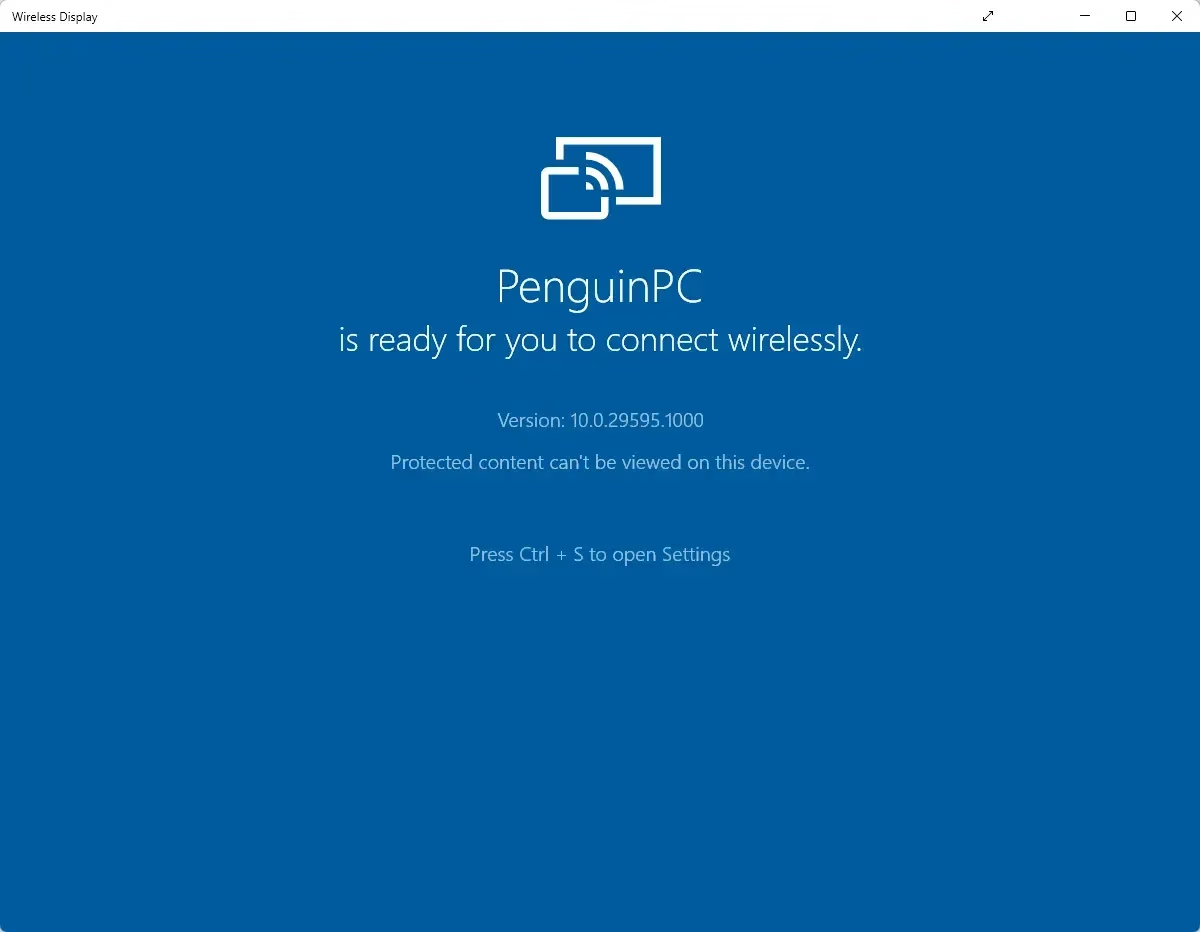
The app opens and shows a message confirming your PC is ready to connect wirelessly. It also shows your computer’s name. That name is how you will pick this PC from the sending computer, so note it down.
Important Note: The Wireless Display app comes built into Windows 11, version 22H2 and newer. Older versions might require the “Connect” app instead. Check your version by going to Settings System About and looking under “Windows specifications.” Anyone needing the Connect app should search for Connect in the taskbar search and open it.
Step 2Connect Your 🪟 Windows 11 PC
Your receiving PC is now ready for screen sharing. Next, start the connection from your main computer.
Start the Cast
The quickest way to connect is the Win+K shortcut. It opens the Cast panel, scans for nearby wireless displays and lets you pick the target PC.
- On the Windows 11 PC you want to project from, press Win+K together.
- Wait for a Cast or Connect panel to slide out from the right side of your screen.
- Let the panel search. It looks for wireless displays on your network, which can take a few seconds.
- Find the name of the receiving PC you set up earlier. It should appear in the list.
- Click the name of the receiving PC.
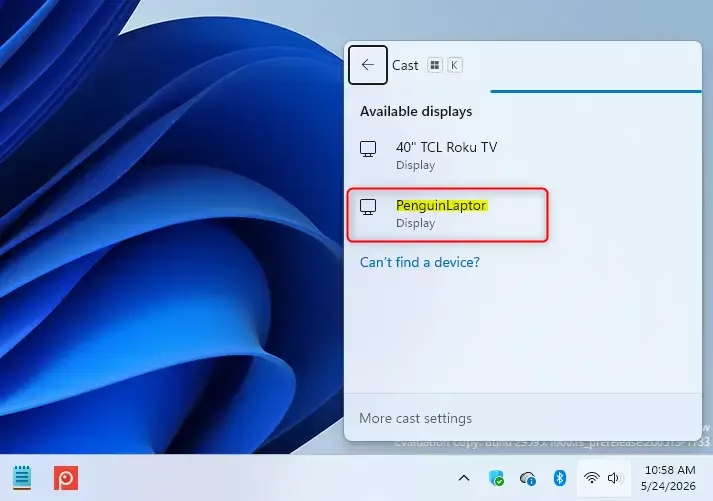
Your PC attempts the connection and shows “Connecting…”. If you set a PIN requirement on the receiving PC, the sending computer asks you to enter that PIN right away. Type it in to finish pairing.
Another Way: Use Display Settings
If the keyboard shortcut does not work, the Display settings page offers another way to start the cast.
- On the PC you are projecting from, right-click your desktop and choose Display settings.
- Scroll down to the Multiple displays section.
- Click Connect to a wireless display.
- Wait while Windows looks for devices, then pick the name of the PC you want to connect to.
If the target PC does not appear, check these things in order:
- The target PC’s Wi-Fi connection is active.
- The Wireless Display application is running on the target PC.
- Both the sending and target PCs are on the same network.
If all three are fine, close and reopen the Wireless Display application on the target PC. That often makes the device appear for casting.
Step 3Choose How to Show Your Screen
Once connected, your screen appears on the second PC. Windows then gives you several display modes that control how the two screens work together.
Understanding Display Modes
The Win+P shortcut opens the Project menu. From there you can duplicate your desktop, extend your workspace, or show your display on a single screen.
- Press Windows key + P on your keyboard.
- Look at the menu that pops up on the right side of your screen. It has these options:
- PC screen onlyShows your screen only on your main monitor.
- DuplicateShows the same thing on both screens. Good for presentations.
- ExtendMakes the receiving PC an extra screen for your computer. You can drag windows between them.
- Second screen onlyTurns off your main screen and only shows on the receiving PC.
- Click the mode you want. The screens change right away, and you can switch modes again at any time.
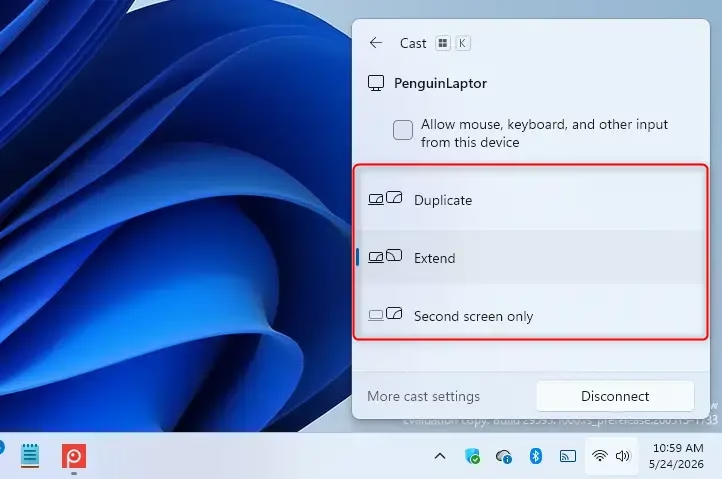
This lets you work with apps and content on the secondary display.
Step 4Stop Sharing Your Screen
To end the session, open the connection menu again and disconnect from there.
- Press Windows key + K again.
- In the Cast panel, find the name of the PC you are connected to.
- Click the Disconnect button next to its name.
You can also disconnect from Display settings:
- Right-click your desktop and choose Display settings.
- Scroll down to the Multiple displays section.
- Click Disconnect next to the name of the wireless display.
The connection ends and video stops going to the second PC. To cast again, repeat the connection steps. The receiving PC needs the Wireless Display app open each time.
Summary
Wireless screen sharing between Windows 11 PCs is a practical way to collaborate or add a screen in a pinch. You can connect, share and disconnect whenever you need to.
Have a question about this guide?
Answered by AI from this guide. Good questions may be added to this page — please don't include personal details.
Did this guide fix your problem?

About the Author
Richard
Tech Writer, IT Professional
Richard is a writer at Geek Rewind who turns complex IT tasks into clear, step-by-step guides. He draws on years of hands-on experience in system administration and enterprise IT operations, focusing on Windows, Linux and WordPress: the problems people actually run into, and the fixes that work. His server and WordPress guides come from systems he runs himself. Richard builds and maintains the platform behind Geek Rewind, from its Ubuntu servers and Nginx configuration to its custom WordPress plugins. Many new tutorials start with readers' questions, and he's always glad to answer them in the comments.
No comments yet — be the first to share your thoughts!