How to Change Agent Connector Protections on Windows 11
You change Agent Connector Protections on Windows 11 to control how AI applications access your data and system services.
These protections are a crucial security feature that dictates the level of access AI agents receive when interacting with your PC’s software and operating system.
For example, the specific “Reducing Protections for Agent Connectors” toggle allows you to fine-tune these permissions, enabling more seamless integration for advanced AI tools.
You can manage these settings, often found within advanced system configurations, to balance AI functionality with your PC’s security on Windows 11.
To change Agent Connector Protections, open Settings, go to System > Advanced, and find “AI components.” Toggle “Enable more agent connectors by reducing protections” on or off. This controls how AI agents access your apps and data.
What Is “Reducing Protections for Agent Connectors”?
Reducing Protections for Agent Connectors in Windows 11 is a setting that lets small AI programs, or agents, connect more easily with your apps and data.
Normally, these agent connectors operate securely with limited access to safeguard your PC. However, enabling “reducing protections” grants them broader access and more capabilities, which can be beneficial but also introduces potential risks.
Why Would You Change This Setting?
Turn it ON if you want AI tools to work with more apps and do more for you. Turn it OFF if you want to keep your PC safer with fewer connections.
How to Turn It On or Off Using Windows Settings
You can turn Agent Connector Protections on or off easily using the Windows Settings app by going to System, then Advanced, and finding the AI components section.
- Open the Settings app. You can do this two ways:
- Click the Start menu and select Settings, or
- Press Windows key + I on your keyboard.
- In Settings, click System on the left side.
- On the right, find and click Advanced.
- Look for the section called AI components.
- Find the switch labeled “Enable more agent connectors by reducing protections” and turn it On or Off depending on what you want.
How to Change This Setting Using the Registry (For Advanced Users)
Advanced users can change Agent Connector Protections by editing a specific value in the Windows Registry, but remember to back up your registry first.
⚠️ Requires admin privileges
Before you start:
- Back up your registry or
- create a System Restore point just in case.
- Open the Registry Editor by typing
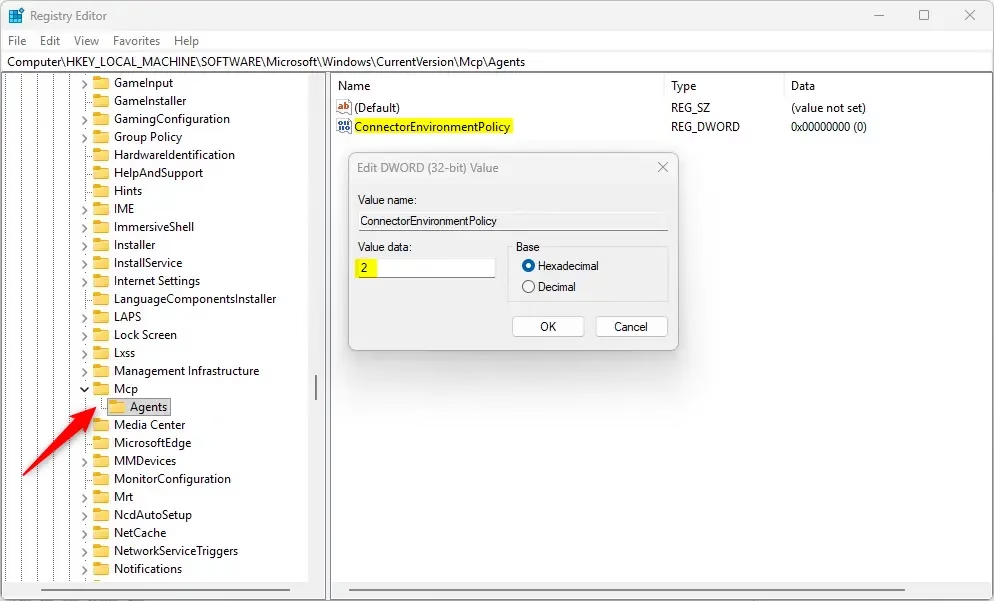
regeditin the Start menu search and pressing Enter. - Navigate to this folder path:
Computer\HKEY_LOCAL_MACHINE\SOFTWARE\Microsoft\Windows\CurrentVersion\McpAgents - Right-click on the Agents folder, select New > DWORD (32-bit) Value.
- Name the new DWORD value
ConnectorEnvironmentPolicy. - Double-click it and set the value to:
2to enable reducing protections (allow more access)1to disable reducing protections (keep it safe)
- Click OK and close the Registry Editor.
- Restart your computer to apply the change.
What Happens When You Change This?
When you enable reducing protections, AI agents can connect to more apps and services. They’ll work faster and do more tasks for you. When you disable it, your PC stays safer but AI tools have fewer connections.
Summary
In short, changing Agent Connector Protections gives AI agents more power to connect with your apps, but it can reduce your PC’s security. The easiest way to adjust this is through Windows Settings, while the Registry offers more control for advanced users, but always back up first.What is IBM agent Connect?
This section introduces ‘IBM Agent Connect,’ which is a tool designed to help software vendors and partners connect their solutions with IBM’s watsonx Orchestrate platform for better collaboration and productivity.
Was this guide helpful?

About the Author
Richard
Tech Writer, IT Professional
Richard, a writer for Geek Rewind, is a tech enthusiast who loves breaking down complex IT topics into simple, easy-to-understand ideas. With years of hands-on experience in system administration and enterprise IT operations, he’s developed a knack for offering practical tips and solutions. Richard aims to make technology more accessible and actionable. He's deeply committed to the Geek Rewind community, always ready to answer questions and engage in discussions.


No comments yet — be the first to share your thoughts!