How to Burn a CD or DVD in Windows 11
You can burn files to a CD or DVD directly within Windows 11 to create physical backups and share data.
This process involves using your computer’s optical drive to write digital information onto a blank recordable disc.
A standard CD-R holds approximately 700MB of data, while a DVD-R can store up to 4.7GB, making them suitable for different types of files.
You can choose to format the disc like a USB flash drive for easy file addition and removal, or create a “mastered” disc for compatibility with standard CD/DVD players.
Once you add your desired files to the disc in File Explorer, you simply initiate the burn process and wait for the data to be written.
Insert a blank disc into your drive, then choose to use it like a USB flash drive or with a CD/DVD player. Drag and drop your files into the disc’s folder in File Explorer and click the “Burn” button.
Understanding Disc Types and Compatibility
When you want to burn a CD or DVD in Windows 11, picking the right blank disc makes all the difference.
How to Finalize a Disc
Finalizing your disc in Windows 11 is a key step that makes sure it can be read on other computers or players.
Troubleshooting: Why is my disc not recognized?
If your computer doesn’t see the disc, check the physical connection and ensure the drive is plugged in. If you’re working with a virtual machine, make sure the ISO file is properly attached. Sometimes, the optical drive driver needs an update, which you can check in Device Manager.
Copyright and DRM Disclaimer
Please note that burning copyrighted media, such as commercial movies or music, is subject to legal restrictions. Do not copy files protected by Digital Rights Management (DRM). Only burn content that you own or have explicit permission to duplicate.
Summary
You can easily burn a CD or DVD in Windows 11 using File Explorer to back up important files or share data offline.- Burning a disc is a simple way to back up your files offline.
- You must choose between “USB mode” (flexible) or “CD/DVD player mode” (traditional).
- Make sure you have the correct type of blank disc for your needs.
- The process is handled entirely within Windows File Explorer.
- Always finalize your disc to ensure it works in external players.
Can I burn a DVD using Windows Media Player?
Windows Media Player Legacy can burn audio CDs, but it does not natively support burning video DVDs. For video files, it is best to use File Explorer to burn them as data files or use specialized third-party software designed for DVD authoring and video conversion.
Do I need third-party software to burn discs in 🪟 Windows 11?
No, you do not need extra software for basic tasks. Windows 11 has built-in tools in File Explorer to burn data to CDs and DVDs. However, third-party software is recommended if you need advanced features like creating bootable discs, burning ISO files, or complex video DVD menus.
Was this guide helpful?
100% of readers found this helpful (1 votes)

About the Author
Richard
Tech Writer, IT Professional
Richard, a writer for Geek Rewind, is a tech enthusiast who loves breaking down complex IT topics into simple, easy-to-understand ideas. With years of hands-on experience in system administration and enterprise IT operations, he’s developed a knack for offering practical tips and solutions. Richard aims to make technology more accessible and actionable. He's deeply committed to the Geek Rewind community, always ready to answer questions and engage in discussions.


When inserting a blank DVD+RW disc, the “Burn a Disc” window does not appear.
after dragging the files to new disc, the window shows a list of the files with a top header which says, “Files Ready to Be Written to the Disc,” but i can’t find a way to complete the process!
additionally, there is no “You have successfully burned your files to the disc” pop-up window.
after the files are copied [in spirit, i’m guessing,] a new explorer window opens with the ‘…ready to be…” message.
Yup, this doesn’t seem to work. Bad advice, but what do you expect from Windows?
My old faithful dell died at 14 years old so I bought the new dell Enspirion 3880 window 11 and it sucks! It’s not an update, they changed the whole program! Yes, I also tried these “how to burn instructions” with the same results as the above consumers. I’ve been disappointed with this since the day I got it. I’ve decided since being extremely happy with my iPhones for the last 12 years, guess it’s time to switch to APPLE for my office needs…I’ll be donating this piece of crap.
PS I wrote this on my wonderful iPad 🙂
There is no burn to disk option after dragging the files over and following the instructions. And the author hasn’t updated it. I have Windows 11. Rather useless article.
As it doesn’t show in this article the “Burn to disk” option, I found it here:
https://www.simplified.guide/microsoft-windows/burn-iso-image
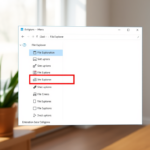
After dragging the files over to the DVD drive, in the Windows Explorer window you’ll see a button of 3 black dots at the top right of the Eject button. In there is “Burn to disc”.
this only words for data DVD’s not video DVD’s i.e ones that work on a standalone DVD player, which is mostly used in installations in art
Yes I am 75 years old and I like CD’s but unable to do so. I just may have to get a refurbished older computer or do you think if I purchased a cd burner software like Nero or something like that will work with windows 11. Windows 11 the biggest mistake I ever made.