How to Boot from USB in Windows 11
You boot from a USB in Windows 11 to start your computer using software or an operating system stored on a flash drive, bypassing your main hard drive.
This process is essential when you need to install a new operating system, run recovery tools, or troubleshoot system issues that prevent Windows from loading. A bootable USB drive acts like a temporary mini-computer for your PC.
To achieve this, you’ll first create a bootable USB with your desired software, typically using a tool like the official Windows 11 Media Creation Tool. Then, you access your computer’s BIOS or UEFI settings, usually by pressing F2, F10, F12, or DEL during startup, to change the boot order.
By setting the USB drive as the primary boot device, you instruct your PC to load its system from the flash drive instead of your internal hard drive.
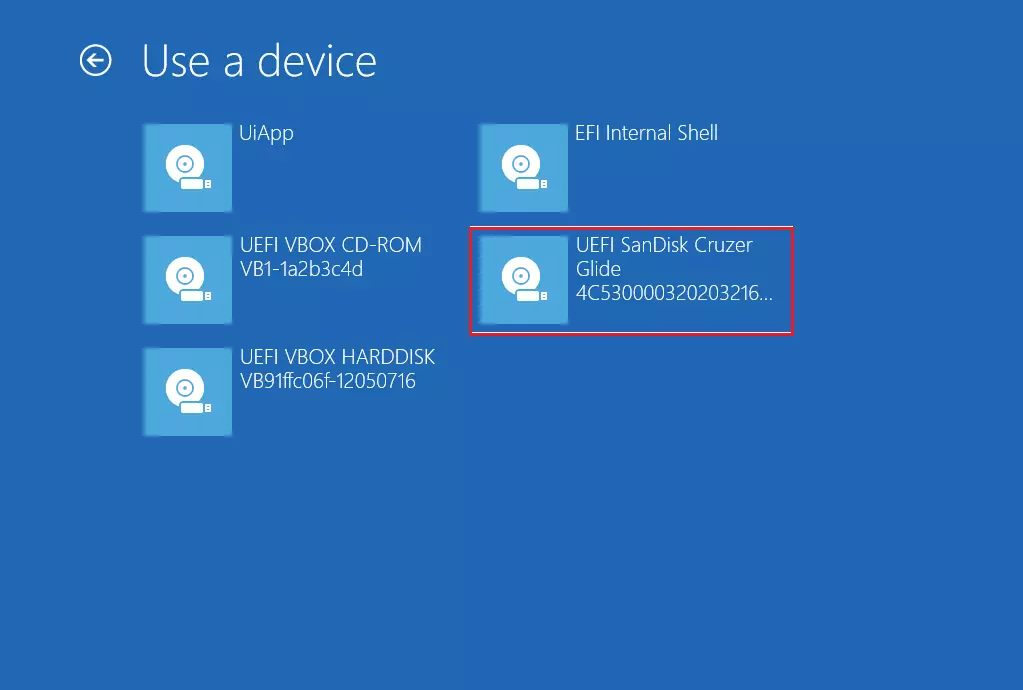
Access the Advanced Startup menu by going to Settings > System > Recovery > Restart now. Then select “Use a device” and choose your USB drive from the list. Alternatively, restart your PC and press the boot menu key for your manufacturer.
Preparation of Bootable Media
To boot from a USB in Windows 11, you first need to make a bootable flash drive using Microsoft’s Media Creation Tool or a program like Rufus with an ISO file, but remember this will erase everything on the USB.
How to Enter the BIOS on a 🪟 Windows 11 PC
To boot from USB in Windows 11, you often need to enter your PC’s BIOS or UEFI settings first. You can usually do this by restarting your computer and quickly pressing a specific key, like F2, F10, F12, or Del, as soon as it starts to turn on.
| Manufacturer | Boot Menu Key |
|---|---|
| Dell | F12 |
| HP | F9 or Esc |
| Lenovo | F12 or Fn+F12 |
| ASUS | F8 or Esc |
| Acer | F12 |
Booting through Windows Advanced Startup
You can boot from a USB drive in Windows 11 using the Advanced Startup option. First, plug in your USB, then go to Settings, System, Recovery, and click ‘Restart now’ under the Advanced startup section.
- Plug your USB drive into the computer.
- Go to Settings > System > Recovery.
- Find “Advanced startup” and click “Restart now.”
- When the menu appears, select “Use a device.”
From the list that appears, choose your USB drive. Your computer will restart and load from that drive.
Booting using the Computer Boot Menu
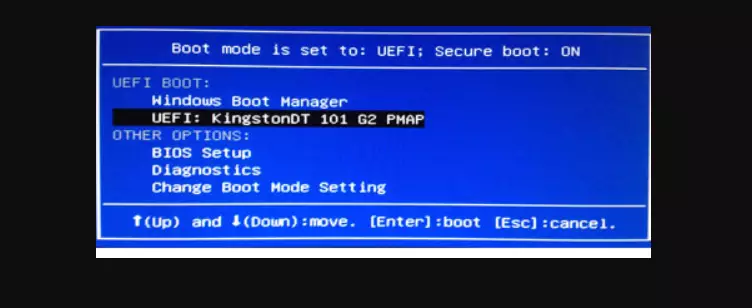
If Windows Advanced Startup doesn’t work, try using your computer’s built-in boot menu to boot from USB in Windows 11. Plug in your USB, restart your PC, and immediately press your computer’s specific boot menu key to select your USB drive.
- Plug your USB drive into the computer.
- Restart your computer.
- Immediately press the boot menu key for your model.
- Select your USB drive from the list using the arrow keys and press Enter.
Summary
Booting from a USB drive in Windows 11 involves preparing your bootable media and then using either the Advanced Startup menu or your computer’s hardware boot menu key, remembering to back up data and check BIOS settings if needed.
Why is my USB not showing up in the boot menu?
Your USB drive might not show up in the boot menu for Windows 11 if it wasn’t formatted correctly as bootable, so double-check you used a tool like Media Creation Tool or Rufus, and ensure your BIOS settings allow USB booting and don’t have Fast Boot enabled.
Do I need to disable Secure Boot to boot from USB?
You usually don’t need to disable Secure Boot to boot from USB in Windows 11 if your USB drive was created correctly for UEFI systems, but you might need to turn it off temporarily if you’re using older tools or unsigned software.
Will booting from USB erase my files?
Booting from a USB won’t automatically erase your files. However, if you choose to perform a clean installation of Windows, that process will wipe your internal drive. Always back up your important data to an external location before starting any major system repairs or installations.
Was this guide helpful?

About the Author
Richard
Tech Writer, IT Professional
Richard, a writer for Geek Rewind, is a tech enthusiast who loves breaking down complex IT topics into simple, easy-to-understand ideas. With years of hands-on experience in system administration and enterprise IT operations, he’s developed a knack for offering practical tips and solutions. Richard aims to make technology more accessible and actionable. He's deeply committed to the Geek Rewind community, always ready to answer questions and engage in discussions.


No comments yet — be the first to share your thoughts!