How to Backup and Restore Files in Windows 11
You can easily back up and restore your files in Windows 11 using built-in tools to protect your important data.
Backing up your files creates copies of your documents, photos, and other personal information, saving them to a separate location. Restoring uses these copies to recover your data if your computer experiences a hardware failure, software corruption, or accidental deletion.
Windows 11 offers File History, a robust feature that automatically saves versions of your files in libraries, on the desktop, and in contacts. For a full system image backup, you can utilize the older but still functional Backup and Restore (Windows 7) tool, which creates a complete snapshot of your entire drive.
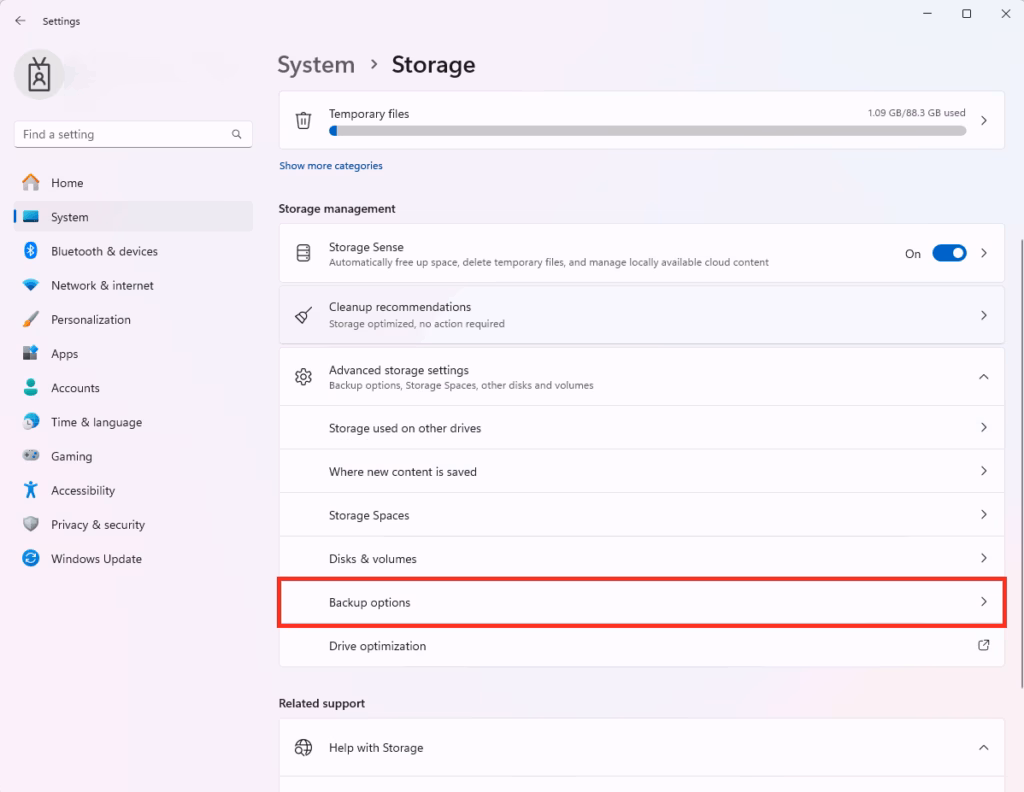
To back up files in Windows 11, use the Windows Backup app to sync to the cloud, or go to Settings > System > Storage > Advanced backup options to set up File History with an external drive. To restore, connect your drive and use the File History window to select and restore files.
Why Back Up Your Files?
Backing up means creating a copy of your data somewhere else. If your computer fails or you accidentally delete something, you can get it back.
What happens when done? Once you’ve backed up, you can relax knowing your photos, documents, and work are protected from the unexpected.
File History vs. Windows Backup
Windows 11 gives you two main ways to backup files: File History and Windows Backup.
External Drive Preparation
Before using an external drive, ensure it’s formatted correctly. NTFS is ideal for drives you’ll only use with Windows. If you need to share the drive with a Mac, exFAT is the way to go. Make sure your drive has enough space for your entire user folder.
How to Back Up Your Files in 🪟 Windows 11
Step 1Use the Windows Backup App
Download the official Windows Backup app if it’s not installed yet. This tool syncs your Edge preferences, settings, and files to the cloud. Check your OneDrive storage limits regularly to ensure you have enough space for your backups.
Step 2Set Up File History
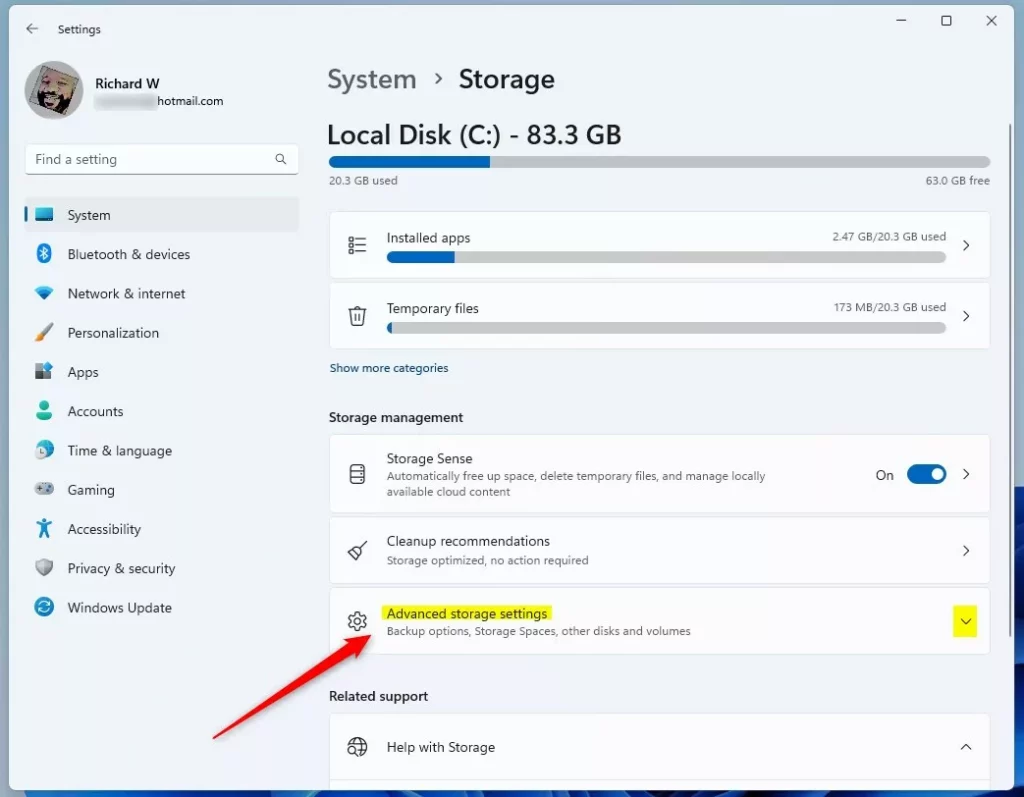
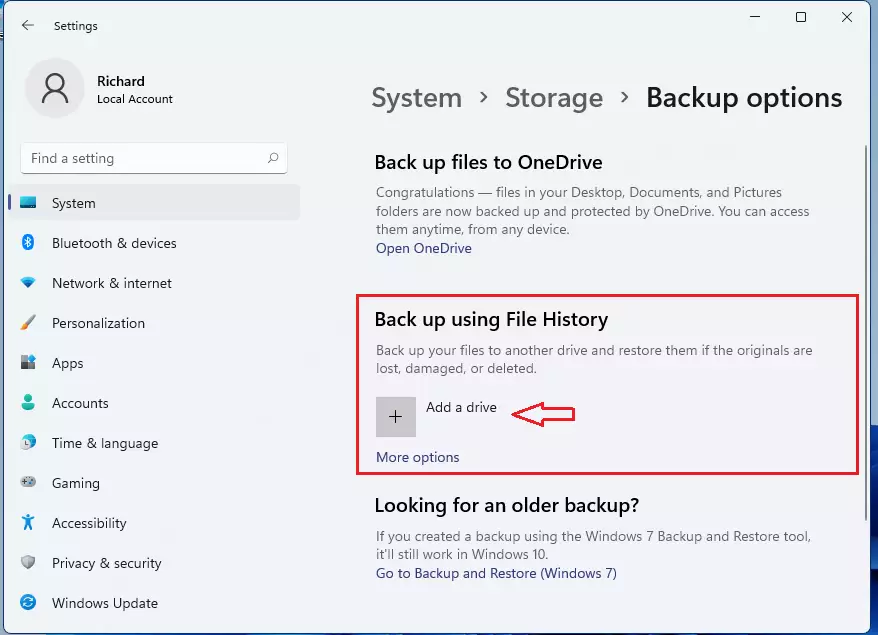
Now, let’s set up File History. Navigate to Settings > System > Storage > Advanced backup options. Click Add a drive to select your external storage. Windows will now automatically save versions of files in 📁C:\Users\username.
Pro Tip: The 3-2-1 Backup Rule
Keep 3 copies of your data, on 2 different media types, with 1 copy stored off-site (like in the cloud). This is the gold standard for data safety.
System Image and Recovery
For a full PC recovery, use the Windows Recovery Environment. This lets you restore a system image – think of it as a complete snapshot of your entire drive, including Windows and all your installed applications.
How do I restore files from an external drive?
To restore files from an external drive, first connect your drive.
What is the difference between syncing to OneDrive and backing up?
Syncing to OneDrive keeps files identical across all your devices in real-time. If you delete a file on your PC, it deletes in the cloud. A true backup is a separate, static copy that remains safe even if you delete the original file from your computer.
Summary
- Use OneDrive for cloud sync and File History for local versioning.
- Perform manual backups to external drives weekly.
- Always verify your backups by attempting a test restore.
- Use the Windows Recovery Environment for full system failures.
Was this guide helpful?

About the Author
Richard
Tech Writer, IT Professional
Richard, a writer for Geek Rewind, is a tech enthusiast who loves breaking down complex IT topics into simple, easy-to-understand ideas. With years of hands-on experience in system administration and enterprise IT operations, he’s developed a knack for offering practical tips and solutions. Richard aims to make technology more accessible and actionable. He's deeply committed to the Geek Rewind community, always ready to answer questions and engage in discussions.


The Backup from file history option doesn’t show in windows 11 build 22000.71
You need to make some suggestions to do so.
Good article
I typed “File History” in the search window, and it was there.
thank you!
Hi Richard,
Nice Article!
Which OS build are you using? In my case that Looking for older backup and windows 7 link is missing.
I’m using Windows 11 Insider Preview.
I also miss these options, I cannot access anymopre my backup settings, but the backup is obviously running
Edition Windows 11 Home
Version 21H2
Installed on 30.7.21
OS build 22000.100
Serial number PF1XY79J
Experience Windows Feature Experience Pack 421.18901.0.3
Try searching fore File History.
I can find File History, but I can not see the option where I can set up a new external device to save all my files.
I don’t see File History in Windows 11 Insider Preview Home. I guess I will have to find some other software to make a backup.
Experience: Windows 11 Home
Version: 21H2
OS Build: 22000.120
Experience: Windows Feature Experience Pack 1000.22000.120.0
The options shown to backup with file history to a drive of your choice are not shown in my preview version of Windows 11. Current version is 22000.132. Will these options be available in further updates?
There is NO Back Up Using File History Option!
The title is a bit misleading. It’s not really the backup type most ppl will be looking for.
Based on the given “solution” you can simply copy the files to USB or External Drive or upload to cloud, the feature shown is pretty much useless unless you paid for OneDrive and you have a ton of space in there.
What I did to backup:
Search -> Control Panel -> “Backup and Restore (Windows 7)” under System and Security, idk why it says Win7 though, but it basically backed up my whole OS I suppose.
Haven’t tried to Recover yet but I hope it will restore the Win 11 properly. Will reply to my own comment if it worked.
Another option is to create .ISO of current OS build w/ all software, saved passwords and such but that could take 100GB+ USB Drive/Phone Memory ( if using phone as USB drive w/ DriveDroid app )
The last and best solution is to Mirror the drive to another drive using Linux.
That is what I did after the File History option went on and on to back up. When I had my W10 reinstalled I used the W7 back up app to reload my files and it went very well.
for those who do not find the option, look in the search box – file history – a window opens with the files, on the right there is the icon for setting the option. It’s hidden but it’s still there.
Great article, Richard. But, you need to proofread. Thanks!
You say, “In Windows Settings –> System –> Storage –> Advanced Backup options, select Back up using File History instead of going to OneDrive as mentioned above.” But there is no “Advanced Backup” under Storage. None of this section is valid.
[…] using Windows 11. Microsoft OneDrive is a feature 11 that keeps your photos and files backed up to the cloud, synced, and accessible on all devices connected to your OneDrive […]
[…] 11. Microsoft OneDrive is a feature in Windows 11 that keeps your photos and files backed up to the cloud, synced, and accessible on all your other devices connected to your OneDrive […]
[…] written multiple detailed steps here that can help you, from ransomware protection to backing up your computer and protecting your data […]
[…] How to Backup and Restore in Windows 11 – Website for Students […]
[…] How to Backup and Restore in Windows 11 […]
[…] How to Backup and Restore in Windows 11 […]
[…] Read our previous post on how to Backup Windows 11. […]
[…] shown you how to install and use OneDrive to back up your files and protect your information. If your files are missing or corrupted, you can restore […]
[…] Windows backup is a feature in Windows that lets you create a backup of your files, folders, settings, and preferences. It protects your data in case something goes wrong. […]
[…] Windows Backup is a feature in Windows that allows you to create a backup of your files, folders, settings, preferences, and system images. Why? It protects you against data loss. […]