How to Automatically Disable Wi-Fi on Windows 11 with Ethernet
This guide shows you how to make your Windows 11 computer turn off Wi-Fi by itself when you plug in an Ethernet cable.
To automatically disable Wi-Fi on Windows 11 when using Ethernet, enable the “Disable Upon Wired Connect” setting in your Wi-Fi adapter’s properties or use PowerShell commands. This ensures your computer prioritizes the wired connection and saves battery.
Why disable Wi-Fi when using Ethernet?
When you plug in an Ethernet cable, your computer uses the wired connection for internet. However, your Wi-Fi stays on in the background. This wastes battery power and can sometimes cause connection conflicts. Turning off Wi-Fi when you are plugged in keeps your machine running efficiently.
What happens when done?
Once this feature is enabled, your computer will detect the wired connection and instantly shut off the Wi-Fi radio. If you unplug the Ethernet cable, your computer will automatically turn the Wi-Fi back on so you stay connected.
Quick Summary: To automatically disable Wi-Fi on Windows 11 when using Ethernet, you can adjust your network adapter settings in Device Manager or use PowerShell scripts. This ensures your computer prioritizes the stable wired connection, saves battery, and prevents network conflicts.
Method 1Using Network Adapter Settings (Requires Admin)
Note: Some steps in this guide require administrative privileges to modify your hardware settings.
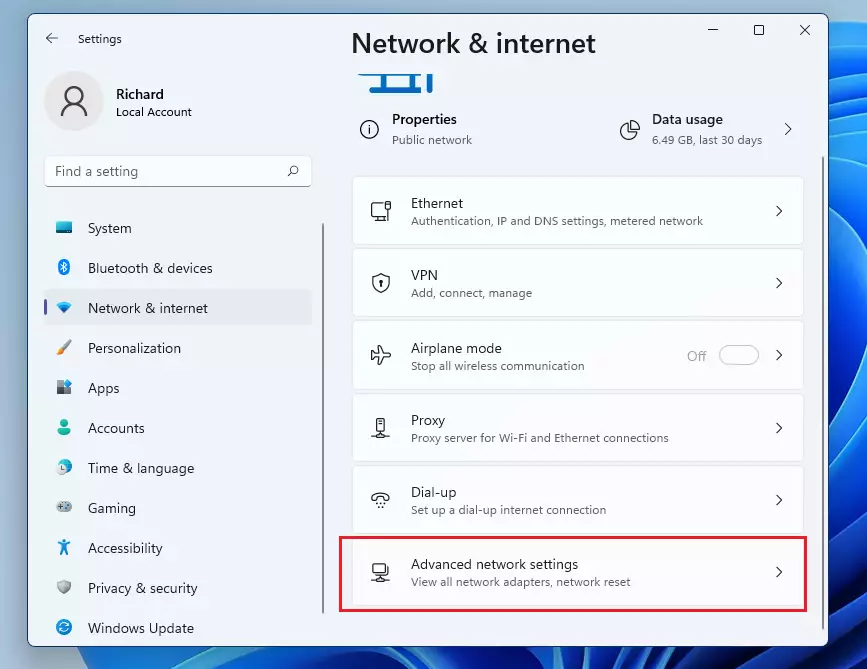
You can access your System Settings by pressing the Windows key + I on your keyboard or by clicking Start > Settings.
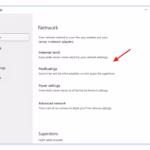
Once the Settings window opens, click on Network & internet. Next, select Advanced network settings on the right side of the screen.
On the next screen, click on More network adapter options.

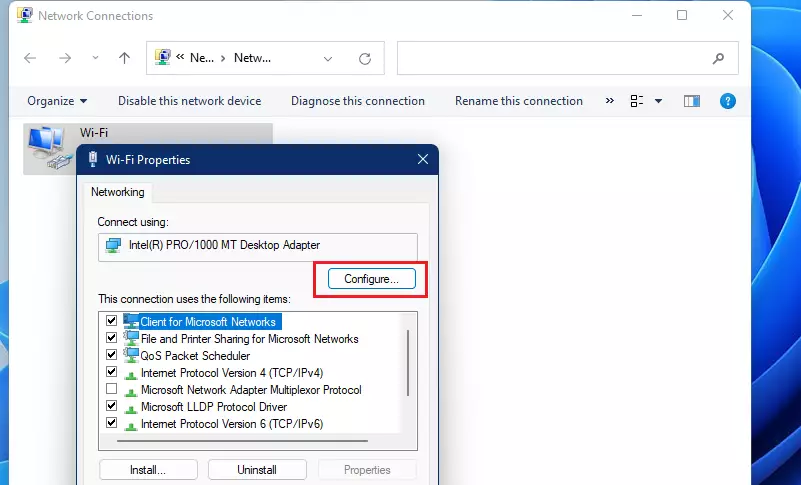
This opens a new window showing your network connections. Right-click on your Wi-Fi connection and select Properties.

In the window that appears, click the Configure button.
A new window will pop up. Look through the list of settings for Disable Upon Wired Connect. Click on it and change the value to Enabled. If you ever want to turn this off, just follow these same steps and select Disabled instead.
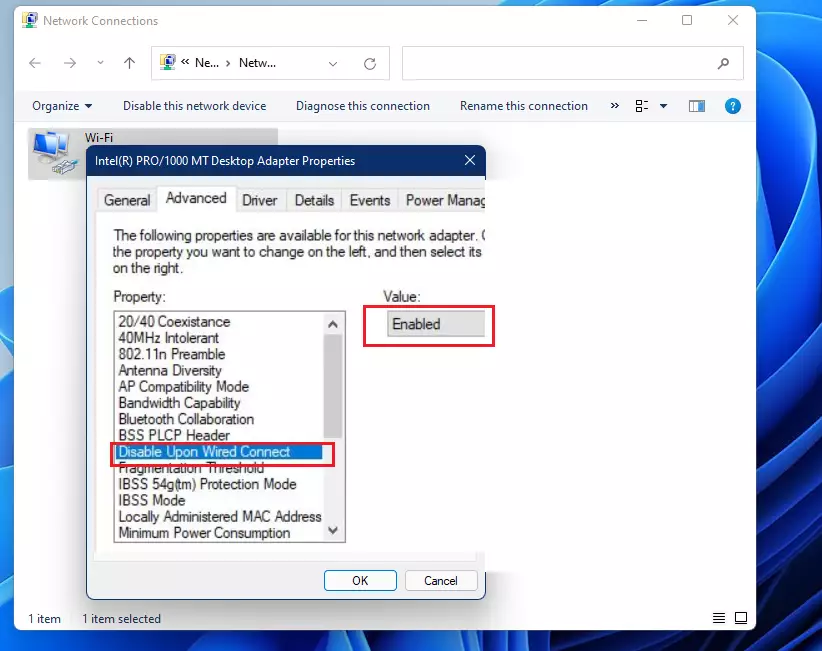
Click OK to save your changes and close the windows.
Method 2Automating with PowerShell
For advanced users, you can use PowerShell to toggle your Wi-Fi adapter. You must run PowerShell as an Administrator. Use the following commands to manage your network adapter status:
Disable-NetAdapter -Name "Wi-Fi" -Confirm:$false
To re-enable it , use:
Enable-NetAdapter -Name "Wi-Fi"
You can find more details on managing these settings at the official Microsoft documentation.
Why does 🪟 Windows 11 automatically turn Wi-Fi back on?
Windows 11 is designed to keep you connected at all times. If the Ethernet cable is disconnected or the network adapter power management settings are set to wake the device, Windows may automatically reactivate the Wi-Fi radio to ensure you do not lose internet access. You can prevent this by adjusting the power management tab in the Device Manager properties for your Wi-Fi card.
Summary
By enabling “Disable Upon Wired Connect” or using PowerShell scripts, you allow your computer to manage its own connections. This simple change saves battery life, reduces energy use, and ensures your computer always prioritizes the faster, more stable wired connection. It is a quick way to keep your Windows 11 system running smoothly without needing to manually toggle your Wi-Fi on and off.
How do I permanently disable Wi-Fi on 🪟 Windows 11?
You can permanently disable Wi-Fi by opening the Device Manager, locating your wireless network adapter, right-clicking it, and selecting Disable device. This stops the hardware from functioning until you manually re-enable it . This is useful if you never intend to use wireless connections on your desktop computer.
Does disabling Wi-Fi improve Ethernet connection stability?
Yes, disabling Wi-Fi while using Ethernet prevents Windows from constantly switching between connections. This reduces latency and packet loss, ensuring your traffic flows exclusively through the more stable wired network adapter. It eliminates the risk of the system dropping your connection while trying to re-authenticate with a wireless access point.
Was this guide helpful?

About the Author
Richard
Tech Writer, IT Professional
Richard, a writer for Geek Rewind, is a tech enthusiast who loves breaking down complex IT topics into simple, easy-to-understand ideas. With years of hands-on experience in system administration and enterprise IT operations, he’s developed a knack for offering practical tips and solutions. Richard aims to make technology more accessible and actionable. He's deeply committed to the Geek Rewind community, always ready to answer questions and engage in discussions.


No comments yet — be the first to share your thoughts!