How To Optimize Windows 11 For Gaming Performance

Optimizing Windows 11 for gaming performance means adjusting system settings to allocate more processing power and memory to your games.
By default, Windows 11 runs many background processes for productivity and system maintenance. These can eat up valuable resources your games need.
By tweaking these settings, you can ensure your CPU and GPU focus on delivering higher frame rates and smoother gameplay. This is especially noticeable in titles like Cyberpunk 2077 or Elden Ring, which can really stress your hardware.
Even minor adjustments can free up significant resources. This means less stuttering and a better overall gaming experience for you.
Enable Hardware-Accelerated GPU Scheduling in Settings, adjust your GPU’s control panel to prefer maximum performance, and disable unnecessary background UI features like notifications and clipboard history. You can also disable Virtualization-Based Security via Core Isolation settings.
Step 0 Create a System Restore Point
Creating a system restore point before you start optimizing Windows 11 for gaming is your safety net, letting you easily undo changes if something goes wrong.
- Press the Windows Key and type Create a restore point.
- Select the result and click Create.
- Give it a name like “Before Gaming Optimization” and click Create.
1Enable Hardware-Accelerated GPU Scheduling
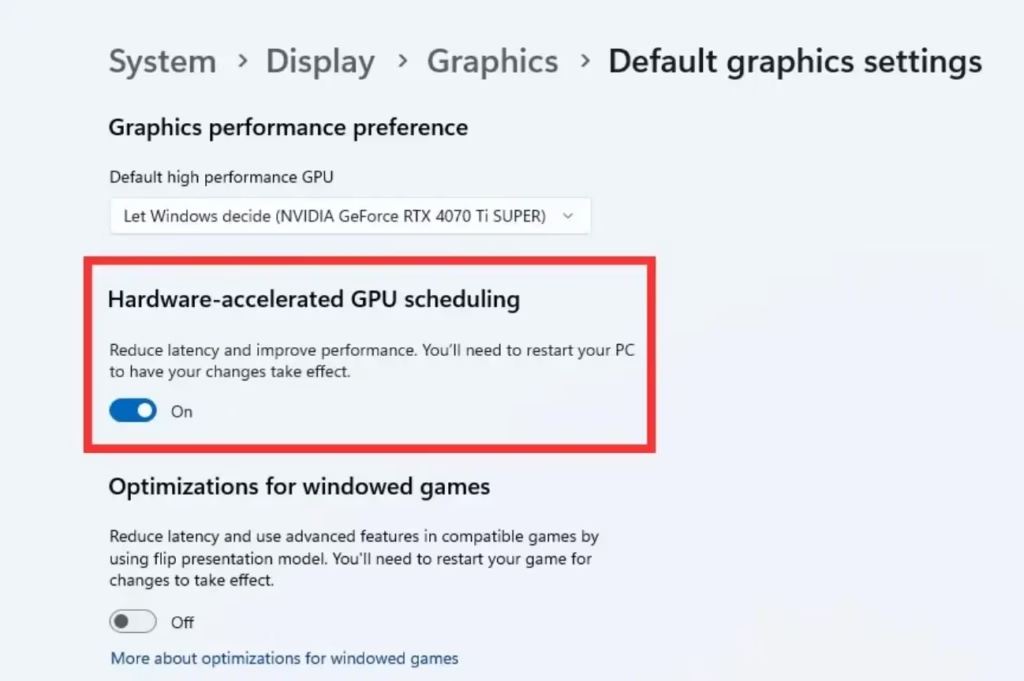
Hardware-Accelerated GPU Scheduling (this lets your graphics card manage its own memory) can reduce input lag and improve frame time stability.
Technology News
- Open Settings > System > Display > Graphics.
- Click Change default graphics settings.
- Toggle Hardware-accelerated GPU scheduling to On.
- Restart your PC to apply changes.
2GPU-Specific Control Panel Settings
Your graphics card’s control panel, like NVIDIA’s or AMD’s, has specific settings that can boost gaming performance by overriding Windows defaults.
Computer Hardware
- NVIDIA: Open NVIDIA Control Panel > Manage 3D settings. Set Power management mode to Prefer maximum performance.
- AMD: Open AMD Adrenalin Software > Performance > Tuning. Ensure the profile is set to Gaming.
3Granular OS UI Settings
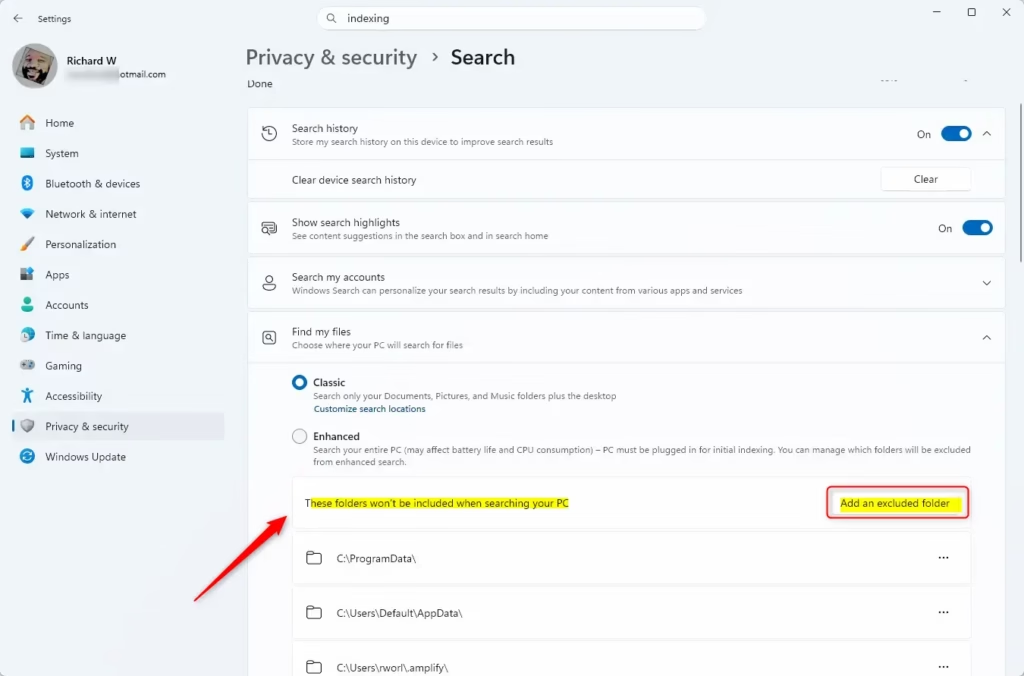
Adjusting granular OS UI settings helps optimize Windows 11 for gaming by turning off features that use system resources in the background.
- Indexing: Search for Indexing Options, click Modify, and uncheck folders you do not need to search often.
- Notifications: Go to Settings > System > Notifications and turn off Do not disturb or disable specific app alerts.
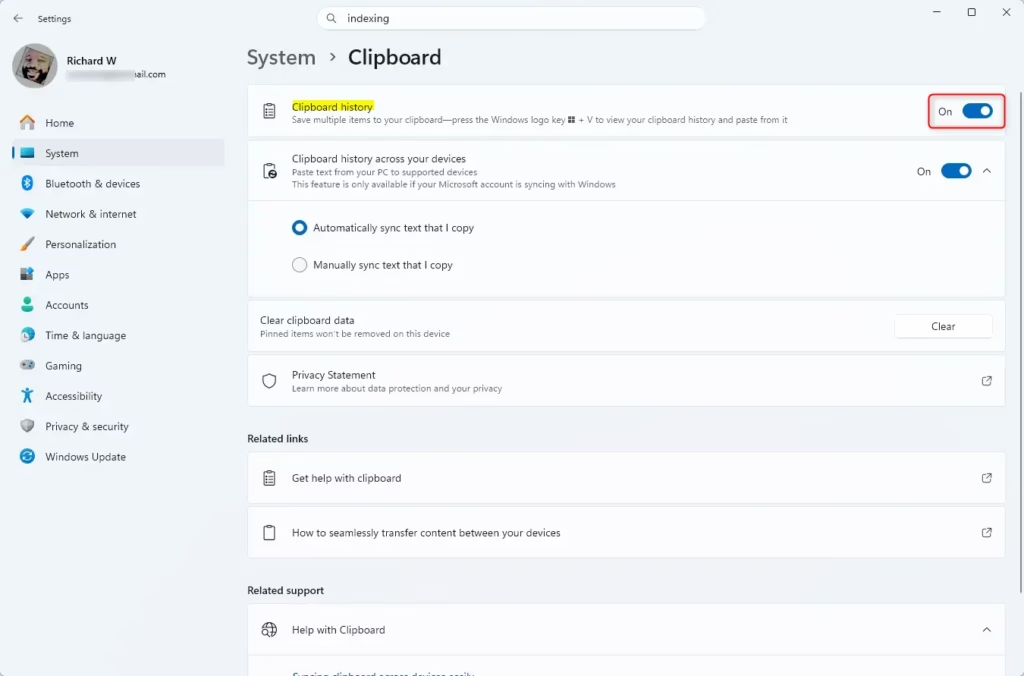
- Clipboard: Go to Settings > System > Clipboard and turn off Clipboard history if you do not use it.
4Registry Edits for Gaming
Registry Edits for Gaming. You’ll need admin privileges for this. Use these tweaks to stop background processes from hogging your CPU.
Chips & Processors
🗝️RegistryCopy
HKEY_LOCAL_MACHINE\SOFTWARE\Microsoft\Windows NT\CurrentVersion\Multimedia\SystemProfile
You’ll want to change ‘NetworkThrottlingIndex’ to ‘ffffffff’ and ‘SystemResponsiveness’ to ‘0’.
5Disable Virtualization-Based Security (VBS)
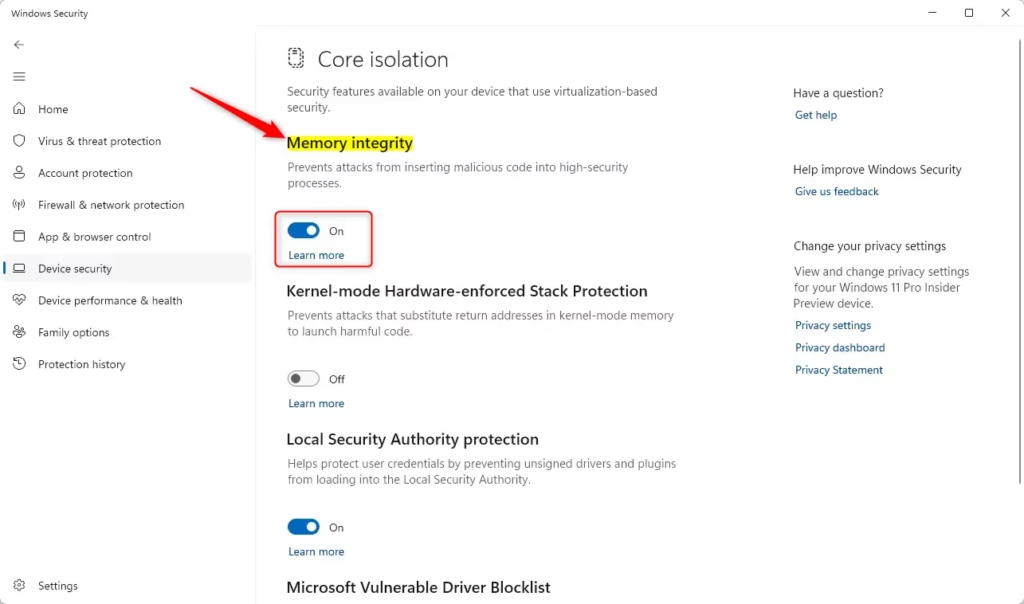
Admin Privilege Required: VBS can lower gaming performance by 5-15%.
- Search for Core Isolation in the Windows search bar.
- Toggle Memory integrity to Off.
- Restart your computer.
Summary
Optimizing Windows 11 for gaming performance means reducing background tasks and ensuring your system runs smoothly, leading to a better gaming experience.
Was this guide helpful?

About the Author
Richard
Tech Writer, IT Professional
Richard, a writer for Geek Rewind, is a tech enthusiast who loves breaking down complex IT topics into simple, easy-to-understand ideas. With years of hands-on experience in system administration and enterprise IT operations, he’s developed a knack for offering practical tips and solutions. Richard aims to make technology more accessible and actionable. He's deeply committed to the Geek Rewind community, always ready to answer questions and engage in discussions.


No comments yet — be the first to share your thoughts!